Transfer Auditing
The new security policy in Don's company requires a full, detailed audit log of all transferred files. He can use audit logging to maintain a record of file transfer activity.
-
To audit Transfer Site activity, set up audit logging on the Reflection Secure Shell Proxy.
-
To audit Job actions that transfer files, set up audit logging on added Reflection for Secure IT Servers.
Note
Both Reflection for Secure IT Server for Windows and Reflection for Secure IT Server for UNIX support audit logging. The procedure below shows how to configure auditing in Reflection for Secure IT Server for Windows. If you decide to use a Reflection for Secure IT Server for Windows for UNIX, you can use the AuditLog keyword to enable audit logging. See the Reflection for Secure IT Server for UNIX User Guide for details.
To enable file transfer auditing on Reflection servers for Windows
-
As a Windows administrator on the system where you want to enable auditing, launch the Reflection console:
-
To set up Transfer Site auditing, start the Reflection Secure Shell Proxy. For this evaluation, the proxy is running on the same Gateway Server system that runs Gateway Administrator.
-
To set up auditing on the Reports server or the Transfer Site server, configure the Reflection for Secure IT Server for Windows running on those servers.
-
-
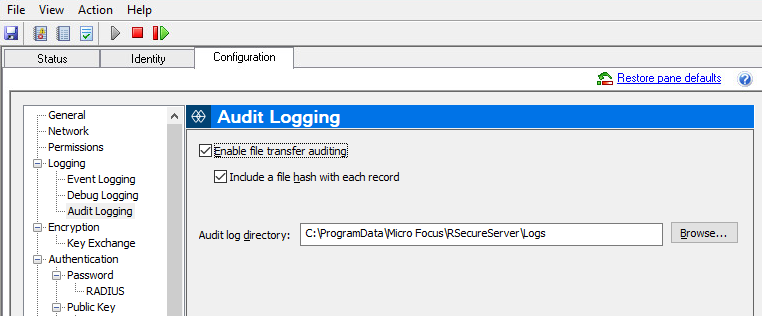
From the Configuration go to Logging > Audit Logging.
-
Select Enable file transfer auditing.
-
Save your settings (File > Save Settings).

To view a Transfer site audit log
-
Use the procedure above to enable audit logging on the Reflection Secure Shell Proxy.
-
Log into an SFTP client as Don and transfer files in both directions.
-
From the Reflection Secure Shell Proxy console, use the audit log file toolbar button to view the audit log:

To view an audit log of transfers on the Reports server
-
Use the procedure above to enable audit logging in the Reflection for Secure IT Server for Windows running on your Reports server.
-
Add new PDF files to the scanned directory. Click Run Now from the Reports Job or wait for the scan interval.
-
From the Reflection for Secure IT Server for Windows console, use the audit log file toolbar button to view the audit log.