Delegated Administration
Smart companies are paying increasing attention to secure internal management practices. With this in mind, Don wants to ensure that users with access to Gateway Administrator have access to only those features and servers they need to do their Job. For this, he will add delegated administrators and configure their access rights.
Set Up Delegated Administration
Lee is a financial analyst in Don's company. Don wants her to be able to add and edit Jobs and Transfer Sites, but does not want her to have access to Gateway Administrator system settings.
Add a File Transfer Administrator to Gateway Administrator
-
Log into Gateway Administrator as Don.
-
On the Users tab, click New.
-
For UserID enter Lee.
-
For Email address, use an arbitrary address (like Lee@demo.com). The tests that follow don't use emails.
-
Click Specify password, then enter and confirm a password.
-
From the Reflection Gateway group membership list, select File Transfer Administrators.
This group provides access to Transfer Sites, Jobs, and users, but not groups or system management.
-
Click Save.
-
Click Logout and log in as Lee. Notice that only four tabs are available to this user: Transfer Sites, Jobs, Users, and About.
-
Click Transfer Sites. Note that Lee does not yet have access to the site Don created. Transfer Sites can only be viewed and edited by individuals who are members of the Transfer Site and have management rights .
-
Click Jobs. Lee can see the Jobs Don created. Transfer Site Administrators have the Manage Jobs role enabled, and every user with this role can see all configured Jobs.
-
Click Logout.
You can use the next procedure to give Lee access to Don's Transfer Site.
Enable an additional user to Manage your Transfer Site
-
Log into Gateway Administrator as Don.
-
On Transfer Sites tab, select the Reports site and click Edit.
-
Under Existing User, search for Lee and click Add.
-
In the user list for Lee, under Permissions, click the gear icon to change it from gray (disabled) to green (enabled). This gives Lee management rights to this site.

-
Click Save, then Logout.
-
Log in as Lee.
-
Click Transfer Sites. This user can now view and edit the Reports site.
-
Click Logout.
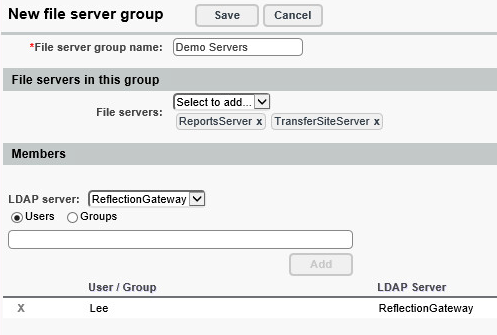
File server groups are a feature of the Gateway Administrator that enables you to specify which file servers Gateway Administrator users have access to. Use the next procedure to see how this feature works.
Use File Sever Groups to limit access to added file servers
-
Log into Gateway Administrator as Don.
-
Go to System > File Server Groups > New.
-
For File server group name enter Demo Servers.
-
Use the File servers drop-down to add both of your file servers to this group.
-
Add Lee as a member of this group.
-
Click Save.

-
Click Users and add a new user, Paul. Use an arbitrary email and specify a password.
-
Add this user to the File Transfer Administrators group and click Save.
-
Log out, then log in as Paul.
-
On the Jobs tab, Paul cannot see the existing Jobs. This is because their actions require access to servers in the Demo Servers file server group, and he is not a member. If he tries to create a new Job, he sees a message telling him that he cannot create a Job because he doesn't have access to any servers.
-
Log in as Lee to confirm that--as a member of the Demo Servers group--she can view the existing Jobs and create new Jobs using the servers in this group. Click Logout.
-
Log in as Don. Although he is not a member of the Demo Serves group, he can view the existing Jobs and create new ones. This is because all users in the Administrators groups have access to all file servers regardless of how the file server groups are set up.
-
While you're still logged in as Don, delete the Demo Servers group. (Go to System > File Server Groups and select the Demo Servers group and click Delete.)
When there are no file server groups configured, all users with Manage Jobs role can create and edit Jobs using all added servers.
-
Log out and log in again as Paul. Confirm that he can now view the existing Jobs and add new ones.