Add an Action that Transfers Files
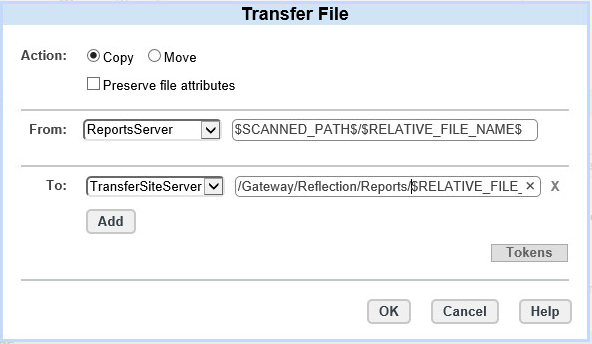
After you have the stand-in security test working, you're ready to create a second Job action that moves the files to your Transfer Site server.
To add a Job action that Transfers Files
-
If you are not still logged in, log into Gateway Administrator as Don.
-
From the Jobs page, select the Reports Job and click Edit.
-
Under Actions, from the Add action... list, select Transfer file.
-
For From, leave the default values.
-
For To, select the name of your Transfer Site file server and enter the following path:
/Gateway/Reflection/Reports/$RELATIVE_FILE_NAME$The first part of the path (
/Gateway/Reflection) identifies the Transfer Site base directory you specified for this server. Putting files in a subdirectory of this directory will enable you to create a Transfer Site later for exchanging these files.
Click OK to return to the New Job page.
Test your modified Job
-
On the Reports server, copy one or more
*.pdffiles toc:\reportsor update the existing files.Note
To facilitate testing, you can quickly update your files from a Command Window using the
copycommand with the syntax shown here:C:\reports> copy /b *.pdf +,, test.pdf test2.pdf 2 file(s) copied. -
In Gateway Administrator, go to the Jobs page, select the Report Job and click Edit.
-
Click Run Now to test the action. You'll see a Running Job message. You can close this message at any time; it has no effect on execution of Job actions.
If the Job works, you should receive a success notification in the email
you specified. Go to your Transfer Site server and confirm that your PDF
files have been transferred to C:\Gateway\Reflection\Reports. Note
that safefiles.txt was not included in the transfer because it does
not meet the filter requirements.