Create a Transfer Site
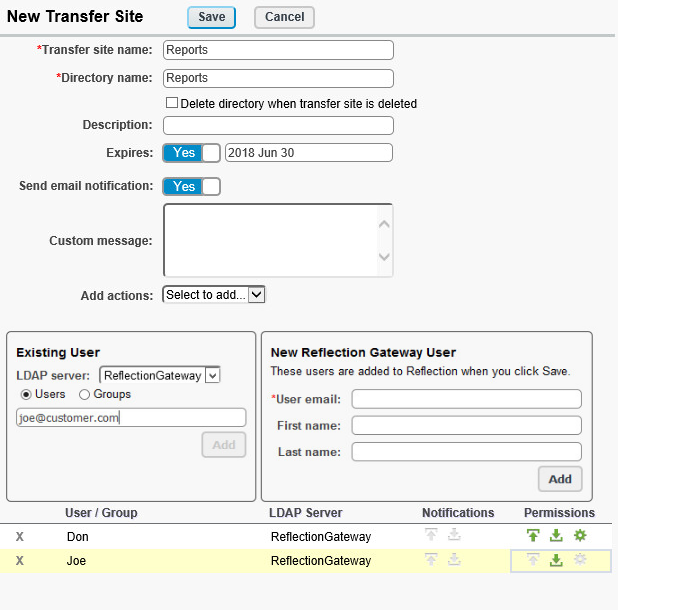
In this procedure you will create a Transfer Site called Reports. This site will initially have two members. The system administrator, Don, who creates the site will have management rights and full access to upload and download files. The customer, Joe, will receive email notification when he is first given access to the site and will have rights to download files only.
Add a new Transfer Site
-
Log into Gateway Administrator as Don.
-
From the Transfer Sites page click Add. This opens the New Transfer Site page.
-
For Transfer site name, enter Reports.
Click in Directory name to enter this same name automatically.
The Job you have already configured and tested uploads files to
c:\Gateway\Reflection\Reports. Because the Transfer Site base directory isc:\Gateway\Reflection, specifyingReportsfor the directory here will give Transfer Site users access to the files uploaded to that location by your Job. -
Under Existing User, type Joe in the search box. When you see the email address you provided for this user, select it and click Add. (Email addresses are shown because these are always unique for each user.)
This adds Joe to the list of users for this Transfer Site.
-
For \<Joe>, under Permissions, click the upload icon to change it from green
 (enabled) to gray
  (disabled). This change disables his ability to upload files.
-
Click Save.
You'll see a message telling you that the specified directory already exists on your server. This directory was created by the automated Job you've already tested. Click OK. For this test, this message confirms that the configuration is what we want.