Report Writer Set Statement
These statements enable you to hold the current page, in whole or in part, and/or fill it in an irregular fashion.

Set Statement: Coding Rules
-
Format a (SET PAGE) cannot be used unless there is (a) a WITH PAGE BUFFER clause in the SELECT ... ASSIGN clause for the associated file and (b) a PAGE LIMIT clause in the associated RD entry. (The Page Buffer feature uses an Independent Report File Handler to produce the report output and will assume MODE PRNT if there is no MODE specified in your SELECT ... ASSIGN clause. File handlers are described later (see Independent Report File Handlers).)
-
The SET LINE and SET COLUMN statements cannot be used unless there is either a WITH PAGE BUFFER clause or a WITH RANDOM PAGE clause in the SELECT ... ASSIGN clause.
-
If your program contains more than one Report Description, you must qualify your SET PAGE STATUS, SET LINE and SET COLUMN statements by IN or OF report-name . Without qualification, the statements are assumed to refer to your one and only Report Description.
-
Format b (SET LINE) is used for altering the value of LINE-COUNTER. SET LINE TO ... sets LINE-COUNTER equal to the value given and forces the next line to appear there. You can use the FIRST DETAIL form with the TO phrase. SET LINE DOWN BY ... adds to LINE-COUNTER, while SET LINE UP BY ... subtracts from it. In each case, the value that results must not be less than the FIRST DETAIL value and must not be greater than the LAST DETAIL value (or their defaults; see PAGE LIMIT clause). If you use SET LINE to decrease LINE-COUNTER, your report's PAGE STATUS must be HOLD.
-
Format c (SET COLUMN) is used for altering the value of the horizontal margin. SET COLUMN TO ... sets it equal to the value given. SET COLUMN RIGHT BY ... adds to it, while SET COLUMN LEFT BY ... subtracts from it. In each case, the value that results must not be less than one and must not be greater than the LINE LIMIT, and any group produced must fit within the LINE LIMIT when the new left margin, resulting from SET COLUMN, is taken into account.
-
You cannot use any of these SET statements until a report is in an INITIATEd state.
Set Statement: Operation
-
The Page Buffer facility is designed to cope with the type of layout where you may not wish to store the groups starting at the top and working down to the bottom of the page. Look at the following layout, for example:
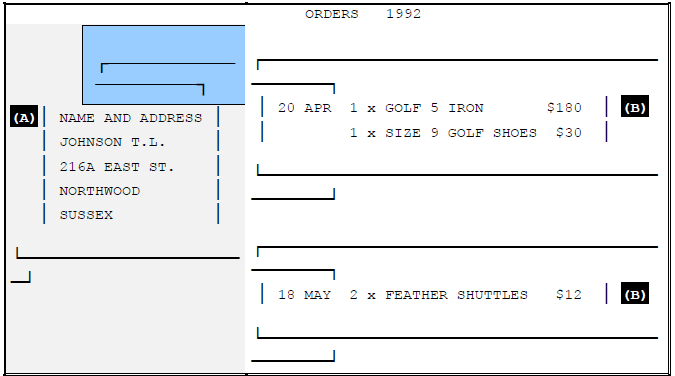
Because groups A and B can be of any size, it is practically impossible to define the layout line-by-line. The design has an attractiveness born of a revolt against slavish acceptance of the dictum that "printers cannot move backwards". The best way to take advantage of the facility is to GENERATE report groups as their data becomes conveniently available, addressing the page in random-access fashion. The Page Buffer facility enables you write code such as:
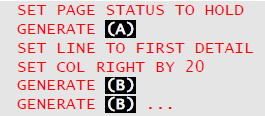
In fact, using this facility, you may return to any part of the page. You may also shift a group laterally (left or right) using SET COLUMN.
-
SET PAGE STATUS (Format a)
The HOLD option places your report in HOLD status. It will stay in HOLD status until you issue a SET PAGE STATUS TO RELEASE or until the report is TERMINATEd. When your report is in HOLD status, all the lines produced are stored in a page buffer instead of being output, giving you the opportunity to return to a previous higher position at any time.
-
You can issue the SET PAGE STATUS TO HOLD at any time - not just at the start of the page. You can then return to any vertical position on or below the position where you issue this command.
-
You may use the SET statements in a Declarative section. In this way you may re-position a non-DETAIL report group such as a CONTROL FOOTING, HOLD the page at the start of a PAGE HEADING, and so on.
-
When the report is in HOLD status, LINE-COUNTER advances as usual. Report writer performs the page-fit test on body (DETAIL and CH/CH) groups in the normal way by checking the value of LINE-COUNTER against the size of the group about to be printed. If the group cannot be fitted on the page, report writer will execute a page advance despite the HOLD status. NEXT GROUP NEXT PAGE and LINE NEXT PAGE work as normal. When a page advance takes place, all the lines in the page buffer are first printed. No data will be lost. The new page will still have HOLD status.
-
HOLD status does not change any of the logical processes of report writer. It just makes it legal for you to return to a higher line using the SET LINE statement. HOLD status only defers the actual time when output occurs, but the end result is always the same. For efficiency, the best time to RELEASE a page is just after the last upward SET LINE on a page.
-
You cancel HOLD status by means of the SET PAGE STATUS TO RELEASE statement. The page buffer will then gradually be emptied as you write more lines, until such a time as a page advance takes place or the report is TERMINATEd.
-
SET LINE (Format b)
The DOWN and UP options increase or decrease LINE-COUNTER by the amount stated. The TO option is used to place your next group in a fixed vertical position. For example, if your next group begins at absolute line 6 and your report has passed line 6, you may issue SET LINE TO 6. (If you do not do this, a page advance will take place.) Similarly, if you GENERATE groups with relative lines and wish to return to the FIRST DETAIL position that has a value of 6, then again you would issue SET LINE TO 6. The SET LINE TO FIRST DETAIL option is available as an alternative way of stating this.
The effect of SET LINE is cancelled by a page advance (except before the first page - SET LINE can therefore be done immediately after INITIATE).
-
SET COLUMN (Format c)
This statement changes the value of your report's left margin. If you have not issued a SET COLUMN statement, the margin will be 1. This is the normal value, indicating that the horizontal position is not to be shifted. The RIGHT and LEFT options increase or decrease the setting of the left margin, while the TO option sets the margin to the value you specify. Your report does not need to be in HOLD status for you to use this statement.
-
If the left margin has been set greater than 1, all the lines produced for the current page will be shifted to the right by the additional factor. For example, if you issue SET COLUMN TO 5, then "COLUMN 1" in any print line is actually positioned on column 5.
-
When report writer executes a page advance it resets the left hand margin to 1. Your SET COLUMN statements are therefore effective only within the current page.
-
All formats
Using the SET LINE and SET COLUMN statements, you can now re-position your group to any position on the page. You can fill th`e page in any manner. Your groups may overlap, provided that you do not overwrite a character in the page buffer with a different character. Spaces are excluded from this rule. Spaces behave as "cellophane", not as "white-out", so you can overwrite with a space without losing what was there before. You can also overwrite a character with the same character. In all other cases, the file handler will signal a run time message.
-
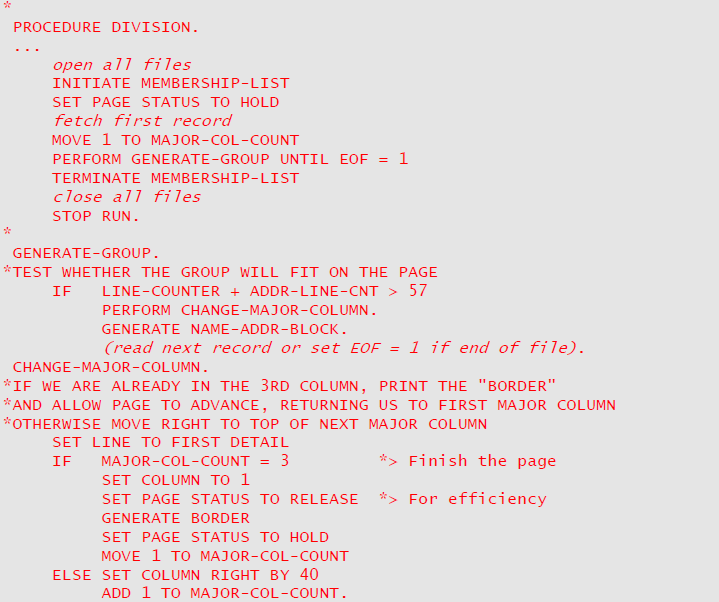
The example on the following page shows how you may set up a page in "snaking columns" and then place a border around the whole page:
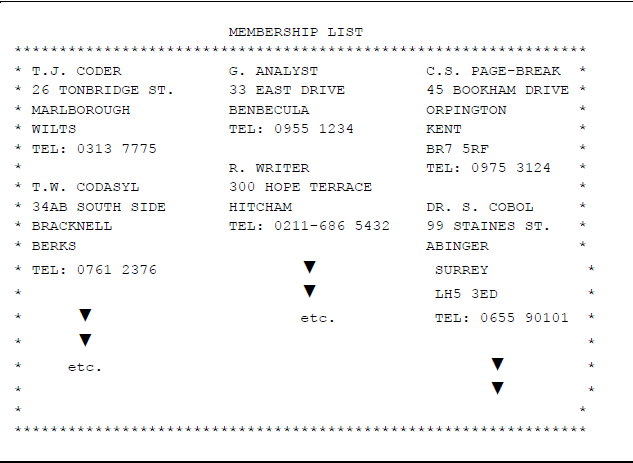
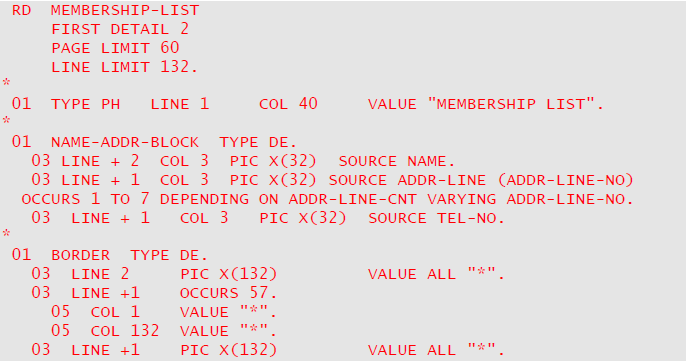
The following coding is suitable for this problem:
Compatibility
These forms of the SET statement are unique to new Report Writer.