Understanding Secure Shell
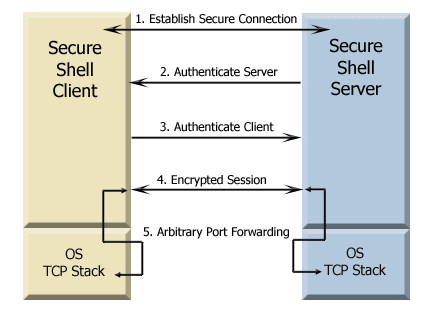
This diagram outlines the basic listitems involved in creating a Secure Shell tunnel and using it to transmit data securely.

-
Establish the secure connection.
The client and server negotiate to establish a shared key and cipher to use for session encryption, and a hash to use for data integrity checking. For additional information, see Data Protection.
-
Authenticate the server.
Server authentication enables the client to confirm the identity of the server. The server has only one chance to authenticate to the client during the authentication process. If this authentication fails, the connection fails. For additional information, see Server Authentication.
-
Authenticate the client.
Client authentication enables the server to confirm the identity of the client user. By default, the client is allowed multiple authentication attempts. The server and client negotiate to agree on one or more authentication methods. For additional information, see Client Authentication.
-
Send data through the encrypted session.
Once the encrypted session is established, all data exchanged between the Secure Shell server and client is encrypted. Users now have secure remote access to the server and can execute commands and transfer files securely through the secure channel. For additional information, see Secure File Transfer.
-
Use port forwarding to secure communications between other clients and servers.
Port forwarding, also known as tunneling, provides a way to redirect communications through the Secure Shell channel of an active session. When port forwarding is configured, all data sent to a specified port is redirected through the secure channel. For additional information, see Port Forwarding.