19.4 Manging NSS Volume using iManager
To manage NSS volume using iManager:
-
Section 19.4.1, Creating Unencrypted NSS Volumes using iManager
-
Section 19.4.2, Configuring Encrypted NSS Volumes using NSSMU
-
Section 19.4.3, Updating eDirectory Volume Objects using iManager
-
Section 19.4.4, Viewing the Details of an NSS Volume using iManager
-
Section 19.4.5, Viewing Properties of an NSS Volume using iManager
-
Section 19.4.8, Configuring the Name Space for an NSS Volume
-
Section 19.4.10, Renaming (Modifying) the Mount Point for an NSS Volume using iManager
19.4.1 Creating Unencrypted NSS Volumes using iManager
This section describes how to create an unencrypted volume with iManager. Encrypted volumes can be created only in NSSMU. For information on creating encrypted volumes, see Managing Encrypted NSS Volumes.
-
In iManager, click Storage > Volumes.
For instructions, see Section 10.2.5, Accessing Roles and Tasks in iManager.
-
Select a server to manage.
For instructions, see Section 10.2.6, Selecting a Server to Manage.
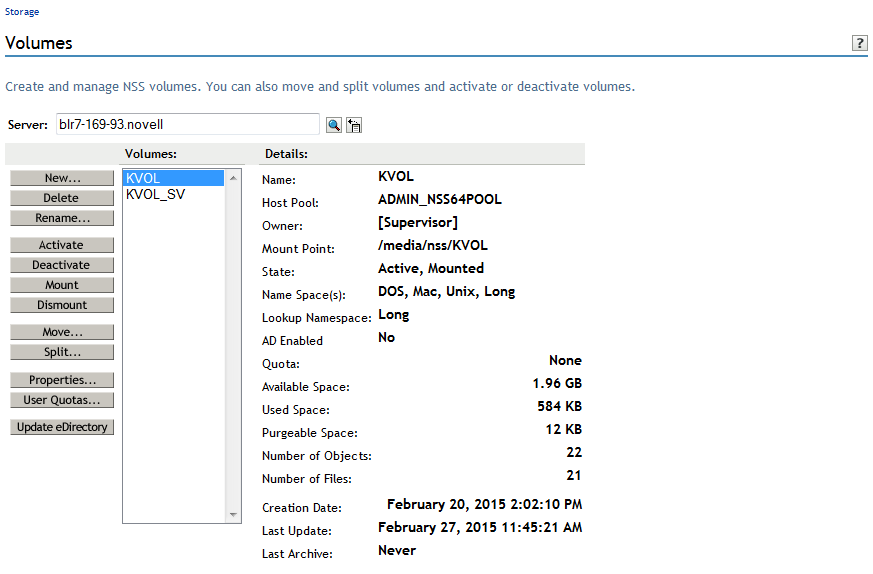
A list of volumes appears in the Volumes list, as illustrated in the following figure.
-
To create a new volume, click New.
This opens the New Volume Wizard to guide you through the process.

-
Specify a name for the new volume, then click Next.
If the name you provide is not unique, you receive an error message. For guidelines about naming volumes, see Section 6.4, Naming NSS Storage Objects.

-
Do one of the following to specify the pool to use:
-
Select an existing pool from the list where you want the new volume to reside.
-
If no pools exist, click New Pool, create a pool to use, select the pool.
-
If existing pools do not have sufficient space for the volume you want to create, click Cancel to close the Wizard. You must add more segments of free space to the pool, then return to the Volumes page to create the new volume.
-
If no pools exist and no space is available to create one, click Cancel to close the Wizard. You must add more devices to the server or free up space on existing pools, then return to the Volumes page to create the new volume.
-
-
Specify the size of the volume:
-
No Volume Quota: Select Allow Volume Quota to Grow to the Pool Size if you want the volume to expand to the size of the pool. This is the default.
Pools can be overbooked; each volume can potentially grow to the size of the pool. NSS allocates space as it is needed.
-
Volume Quota: Deselect Allow Volume Quota to Grow to the Pool Size, then type a Volume Quota size in MB for the volume if you want to limit the size of the volume.
-
-
Click Next.
-
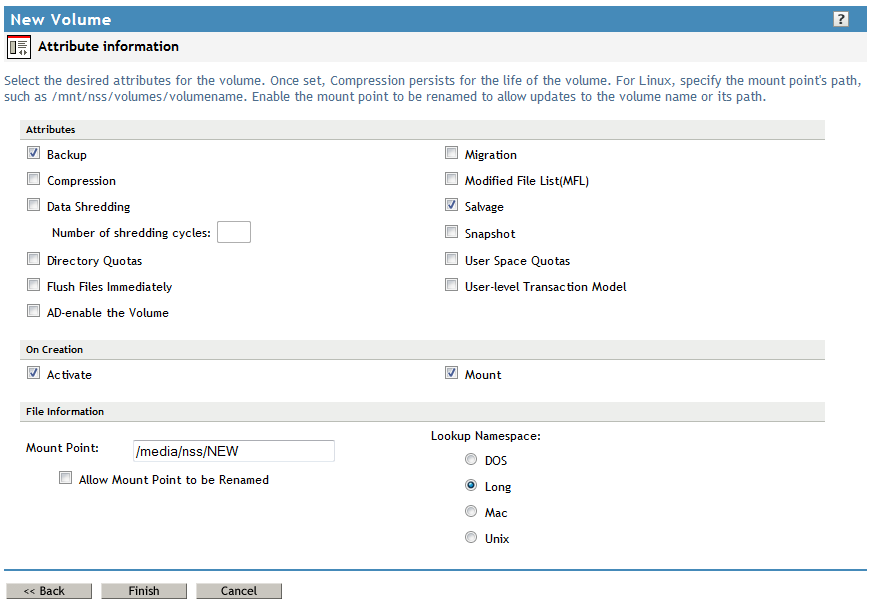
On the Attribute Information page under the Attributes section, set the attributes for the new volume you are creating. The Backup and Salvage attributes are selected by default.
For information about volume attributes, see Section 19.1, Understanding Volume Properties.
-
On the Attribute Information page under the On Creation section, set the following preferences:
-
Activate. Activates logical volumes as soon as you create them.
-
Mount. Mounts logical volumes as soon as you create them.
-
-
On the Attribute Information page under File Information, specify the following parameters:
-
Mount Point: For a Linux server, specify the mount point for the NSS volume, such as /media/nss/VOLA.
The default mount path for NSS volumes is /media/nss/volumename, where volumename is the name of the volume. You can optionally specify another path as the mount point.
-
Allow Mount Point to Be Renamed: Select this option if you want to allow the mount point to be renamed if the volume is renamed.
This feature works only if the volume is mounted in its default location (/media/nss/volumename).
-
Lookup Name Space: Select the name space to use when you mount the volume. The name spaces are UNIX, Long, DOS, or Macintosh. The default name space is Long.
The recommended setting is Long. This setting ensures that filenames are case insensitive whether the volume is mounted. It also improves performance over using UNIX, especially if you expect to store millions of files on the volume.
-
-
Click Finish.
-
If you enabled the Directory Quotas attribute, restart NCP2NSS by entering at a terminal prompt:
systemctl restart ncp2nss.service
19.4.2 Configuring Encrypted NSS Volumes using NSSMU
NSS Encrypted Volume Support allows you to create encrypted NSS volumes using NSSMU. For information, see Managing Encrypted NSS Volumes.
19.4.3 Updating eDirectory Volume Objects using iManager
In NetIQ eDirectory, each NSS volume is represented by a Volume object. Volume objects are leaf objects that represent a physical or logical volume on the network.
The Volume object’s properties contains the following information:
-
The server where the volume resides
-
The volume name recorded when the volume was initialized on the server
-
The volume’s owner (login username of the administrator who created it)
-
Space use restrictions for users
-
A description of the volume’s use
-
Statistical information on disk space availability, block size, directory entries, name space support, and so on.
Usually, NSS creates the NetIQ eDirectory Volume object when you create the volume, and it updates the properties of the volume as needed. The Update eDirectory option on the Volumes page allows you to add or replace a Volume object for a selected volume at the same context level as the server.
IMPORTANT:When you delete (or delete and replace) a Volume object in eDirectory, the home directory attribute is removed in the User objects for any users that reference that Volume. The home directory attribute points to a particular Volume object. When that Volume object is deleted, eDirectory needs to clean up all references to the object being deleted.
When you select Update eDirectory, NSS searches for the object.
-
In iManager, click Storage > Volumes.
For instructions, see Section 10.2.5, Accessing Roles and Tasks in iManager.
-
Select a server to manage.
For instructions, see Section 10.2.6, Selecting a Server to Manage.
-
In the Volumes list, select the volume you want to update.
Wait for the page to refresh and display the details.
-
Click Update eDirectory.
Wait while NSS searches for the Volume object in the server context.
-
Do one of the following:
-
If the Volume object does not exist, NSS adds the Volume object to the context level. Confirm the addition.
-
If the Volume object exists, NSS prompts you with two options: Delete and Replace the existing object or Retain the existing object. Select one option and confirm your choice.
-
19.4.4 Viewing the Details of an NSS Volume using iManager
-
In iManager, click Storage > Volumes.
For instructions, see Section 10.2.5, Accessing Roles and Tasks in iManager.
-
Select a server to manage.
For instructions, see Section 10.2.6, Selecting a Server to Manage.
-
In the Volumes list, select a volume that you want manage.
When the page refreshes, the details for the volume appear in the Details area. The volume must be mounted and active for the details to be available.
-
(Conditional) Activate the volume, select the volume, then click Activate.
19.4.5 Viewing Properties of an NSS Volume using iManager
After you set up and configure NSS volumes, you can view the properties, such as attribute settings, volume statistics, and volume usage.
-
In iManager, click Storage > Volumes.
For instructions, see Section 10.2.5, Accessing Roles and Tasks in iManager.
-
Select a server to manage.
For instructions, see Section 10.2.6, Selecting a Server to Manage.
-
In the Volumes list, select a volume that you want manage.
-
Click Properties.
The Properties page has three tabs: Attributes, Statistics, and Quota Usage. It opens by default to the Attributes tab.
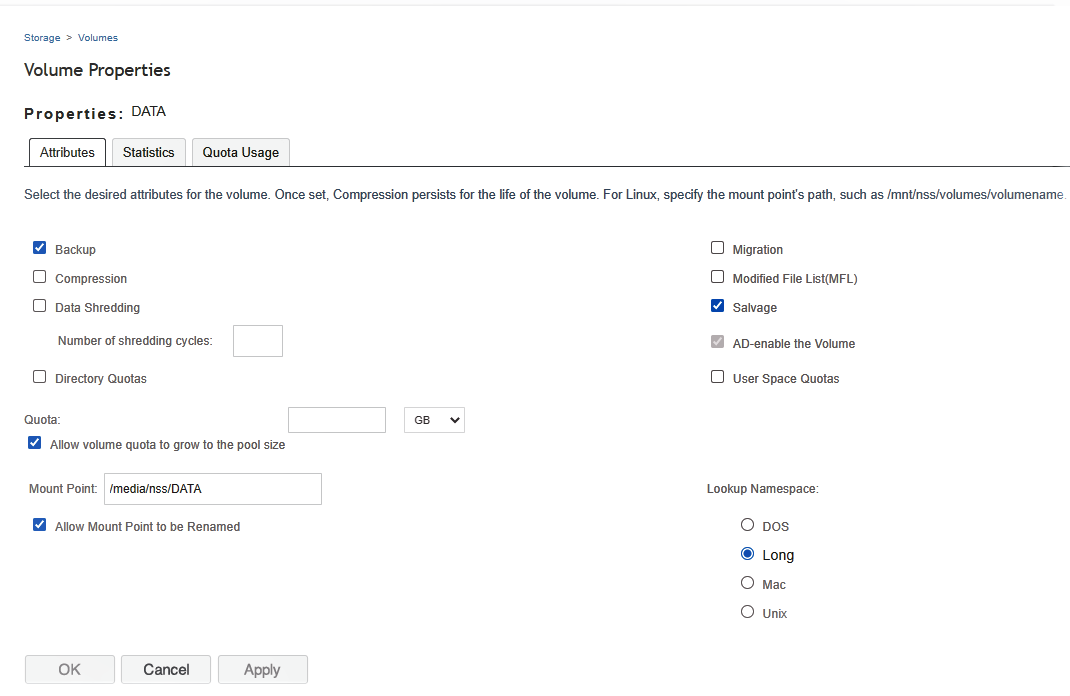
Use the Attributes page to view the volume’s attribute configuration, the volume quota, and the volume mount point. For information about modifying attributes, see Section 19.4.6, Modifying Attributes of an NSS Volume.
-
Click the Statistics tab to view the current space usage statistics for the selected volume.
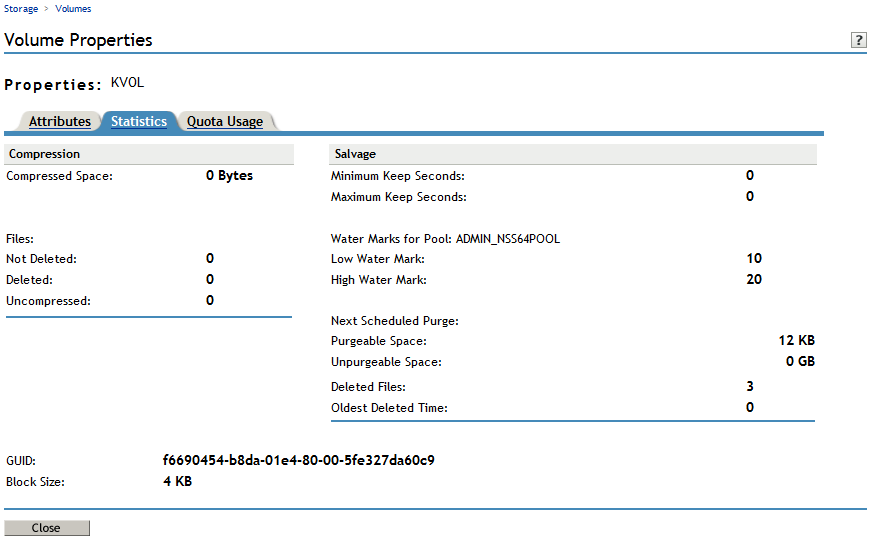
If the Salvage attribute is enabled, values are displayed for the salvage parameters. The low and high watermark displays the default settings for the pool-level watermarks for the pool where the volume resides. For information about managing salvage parameters, see Section 24.0, Salvaging and Purging Deleted Volumes, Directories, and Files.
If the Compression attribute is enabled, statistics are displayed for the compression data. For information about configuring compression parameters, see Section 22.0, Managing Compression on NSS Volumes.
-
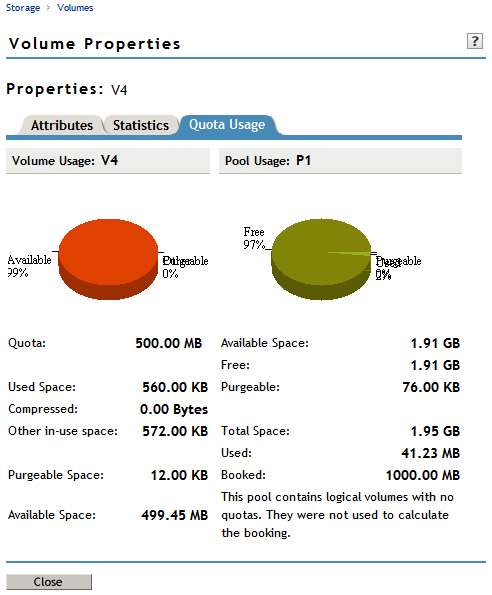
Click the Quota Usage tab to view the volume and pool space usage for the selected volume.
19.4.6 Modifying Attributes of an NSS Volume
After you set up and configure NSS volumes, you can modify most of the attribute settings. The Encrypted Volume Support attribute and the Compression attribute can be set only at the time the volume is created. If you try to modify those settings, iManager or NSSMU returns an error message.
You can also specify a Volume Quota or modify the mount point.
-
In iManager, click Storage > Volumes.
For instructions, see Section 10.2.5, Accessing Roles and Tasks in iManager.
-
Select a server to manage.
For instructions, see Section 10.2.6, Selecting a Server to Manage.
-
In the Volumes list, select a volume that you want manage.
-
Click Properties.
The Properties page has three tabs: Attributes, Statistics, and Quota Usage. Use the Attributes page to view or modify the attributes for the selected volume.
-
Do one or more of the following:
-
Select or deselect a modifiable attribute, then click Apply.
The Encryption and Compression attributes can be set only at the time the volume is created. If you try to modify those settings, iManager returns an error message.
For information about attributes, see Section 19.1, Understanding Volume Properties.
-
Specify a volume quota, then click Apply.
-
Specify the default Lookup Namespace to use when mounting the volume, then click Apply.
The next time the volume is mounted, this will be the name space used. The default name space is Long.
-
Specify a new Mount Point for your volume, then click Apply. For example:
/media/nss/VOL1
-
-
If you enabled or disabled the Directory Quotas attribute, restart NCP2NSS by entering at a terminal prompt:
systemctl restart ncp2nss.service
For information about setting quotas after you have enabled the Directory Quotas attribute or User Space Quotas attribute, see Managing Space Quotas for Volumes, Directories, and Users.
19.4.7 Modifying the NSS Volume Size
-
In iManager, click Storage > Volumes.
For instructions, see Section 10.2.5, Accessing Roles and Tasks in iManager.
-
Select a server to manage.
For instructions, see Section 10.2.6, Selecting a Server to Manage.
-
In the Volumes list, select a volume that you want manage.
-
Click Properties.
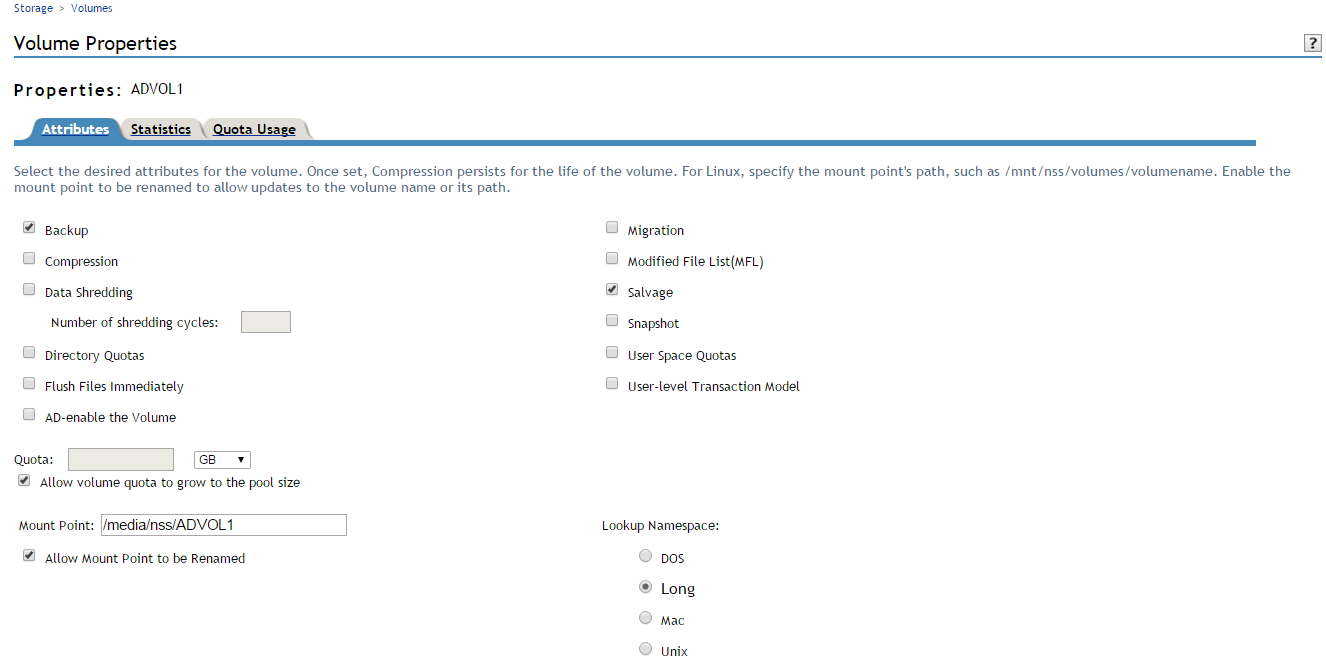
The Properties page has three tabs: Attributes, Statistics, and Quota Usage. It opens to the Attributes tab.
-
In the Quota field, do one of the following:
-
No Quota: Select Allow Volume Quota to Grow to the Pool Size. NSS pools allow overbooking so the administrative sum of all volumes’ quotas in a pool can exceed the physical pool quota.
-
Quota: Deselect Allow Volume Quota to Grow to the Pool Size, then specify the maximum size you want to allow volume to grow. The quota cannot exceed the pool size.
If you set a quota that is less than the volume’s current size, no files can be saved to the file until you purge files to make room on the volume.
-
-
Click Apply.
-
Click the Quota Usage tab to view the volume and pool space usage for the selected volume and to verify the new setting.

19.4.8 Configuring the Name Space for an NSS Volume
NSS supports the Long, DOS, UNIX, and Macintosh name spaces. By default, names on the NSS file system are case insensitive, which is supported by the Long name space. The Long name space is the default setting used when mounting NSS volumes. In order to mount a volume with a different name space, you must specify the name space explicitly in the mount command, or you can specify the name space to use as a property of the NSS volume.
On Linux POSIX file systems, the UNIX name space is typically used. If your volume contains large directories with millions of files, using the default UNIX name space on NSS volumes can cause volumes to mount very slowly. Using the Long name space allows the NSS volume to mount normally. Unless you need to support case sensitive filenames, we strongly recommend using the Long name space.
The preferred name space can be set when you create the volume and set its attributes, or at any time by modifying the Lookup Namespace attribute in the volume’s properties.
You can also mount the volume by specifying the name space to use as an option of the mount command. For instructions, see Section 19.5, Mounting NSS Volumes with Linux Commands.
To view or modify the Lookup Namespace attribute for the NSS volume:
-
In iManager, click Storage > Volumes.
For instructions, see Section 10.2.5, Accessing Roles and Tasks in iManager.
-
Select a server to manage to view a list of its volumes.
For instructions, see Section 10.2.6, Selecting a Server to Manage.
-
In the Volumes list, select a volume that you want manage.
-
Click Properties to view the volume’s properties.
The Properties page has three tabs: Attributes, Statistics, and Quota Usage.
-
On the Attributes page, view the current setting of the Lookup Namespace for the selected volume.
-
On the Attributes page, optionally modify the Lookup Namespace to use by selecting the radio button next to it.
-
Long (recommended, default)
-
DOS
-
UNIX
-
Mac
This is the new value that is applied automatically whenever you mount the volume.
-
-
Click Apply to save your changes.
-
On the Volumes page, click Dismount to unmount the volume.
Wait until the volume unmounts gracefully before continuing.
-
On the Volumes page, click Mount to mount the volume to mount it the new name space.
-
If you change the name space for an existing shared volume by using NSSMU or the NSS plug-in for iManager, you must modify the load script for the pool cluster resource to add the name space to the ncpcon mount command for the volume. Otherwise, the cluster assumes the default name space for mounting the volume. You can do this by using the /opt=ns=<long|unix|dos|mac> switch in the ncpcon mount command. After you modify the load script, you must take the pool cluster resource offline, then bring it online to apply the new name space setting for the volume.
For example, to specify the LONG name space, add the /opt=ns=long switch as follows:
ncpcon mount /opt=ns=long <VOLUMENAME>=<VOLUMEID>
For example, to specify the UNIX name space, add the /opt=ns=unix switch as follows:
ncpcon mount /opt=ns=unix <VOLUMENAME>=<VOLUMEID>
For more information, see
Configuring a Load Script for the Shared NSS Pool
in the OES 23.4: OES Cluster Services for Linux Administration Guide.
19.4.9 Renaming an NSS Volume
You can rename NSS volumes. For example, you might want to change the name of a volume to reflect the department or organization that uses it.
-
In iManager, Storage > Volumes.
For instructions, see Section 10.2.5, Accessing Roles and Tasks in iManager.
-
Select a server to manage.
For instructions, see Section 10.2.6, Selecting a Server to Manage.
-
In the Volumes list, select a volume.
-
Click Rename.
The Rename Volume Wizard opens.
-
Specify the new name of the volume.
-
Click Finish.
After the page refreshes, the volume appears in the Volumes list with its new name.
19.4.10 Renaming (Modifying) the Mount Point for an NSS Volume using iManager
The default mount point for NSS volumes is /media/nss/volumename. You must enable the Allow the Mount Point to Be Renamed option for the volume to allow the mount point to be renamed.
NOTE:Currently, renaming the mount point is not supported for clustered NSS volumes using NSSMU, NLVM and iManager. For more information on renaming, see Renaming the Mount Point Path for a Shared NSS Volume (Using a Custom Mount Point for a Shared NSS Volume)
in the OES 23.4: OES Cluster Services for Linux Administration Guide.
Renaming the Mount Point for a New Volume
The default mount point for NSS volumes is /media/nss/volumename. You can specify a different mount point (that is, modify the volume’s directory path) as you create the volume if you create the volume in iManager. Creating the volume in the NSSMU (nssmu) does not allow for the mount point to be changed during the volume setup, but you can change it afterwards.
Enabling the Mount Point for the NSS Volume to Be Renamed
The Allow the Mount Point to Be Renamed option enables the NSS volume’s mount point to be renamed. This option is disabled by default. Enable the option as you create the volume, or enable it at any time for an existing volume by modifying the setting on the Attributes page ( Storage > Volumes > Properties > Attributes) in iManager.
-
In iManager, click Storage, then click Volumes.
-
Select the server you want to manage to view a list of its volumes.
-
From the Volumes list, select the volume, then click Properties to view the volume attributes.
-
On the Attributes page, select Allow the Mount Point to Be Renamed.
-
Click Apply to save the change.
Renaming the Mount Point for an Existing NSS Volume
Whenever you change the mount point for an existing NSS volume, you must also restart NetIQ eDirectory to update the NetWare Core Protocol (NCP) Server cache. When an NSS volume is created, the NCP Server gets the path to the volume and caches it, assuming that it never changes. When you later run ncpcon and enter the volume command, it reports which volumes are still found at their respective mount points. Only the volumes that are still valid as compared to the list in cache are reported. Restarting eDirectory forces the NCP Server volume cache to update, so that the correct path is stored for reporting volume status.
-
Use either iManager or nssmu to change the volume’s mount point.
The following instructions are for iManager.
-
In iManager, click Storage > Volumes.
-
Select the server you want to manage to view a list of its volumes.
-
From the Volumes list, select the volume, then click Properties to view the volume attributes.
-
If the Allow the Mount Point to be Renamed option is not selected, select it and click Apply.
NOTE:Select this option if you want to allow the mount point to be renamed if the volume is renamed. This feature works only if the volume is mounted in its default location (/media/nss/volumename).
-
In Mount Point, type the new mount point.
The default mount point for NSS volumes is /media/nss/volumename. The new path should also include the volumename.
/mnt/nss/volumes/volumename -
Click Apply to save the change.
-
-
Open a terminal console on the server, then log in as the root user or equivalent.
-
Restart eDirectory by entering
systemctl restart ndsd.service
Restarting eDirectory causes the NCP Server’s volume cache to be updated.
19.4.11 Activating and Deactivating an NSS Volume
After you set up and configure NSS volumes, you can activate and deactivate volumes to make them available to users and applications. To view details of a volume, it must be active.
-
In iManager, Storage > Volumes.
For instructions, see Section 10.2.5, Accessing Roles and Tasks in iManager.
-
Select a server to manage.
For instructions, see Section 10.2.6, Selecting a Server to Manage.
-
In the Volumes list, select one or more volumes that you want to make active or deactive.
-
Click Activate or Deactivate.
After the page refreshes, you can see that each volume’s state matches the state you specified. If a selected volume is already in the specified state, no change occurs. The details of deactive volumes are not available.
19.4.12 Deleting an NSS Volume
Deleting a volume removes the data in the volume and frees the space to be used by other volumes in the same pool. When you delete a volume, it is salvageable until one of the following events occurs:
-
Volume Purge Delay times out. The deleted volume is purged automatically. For information, see Section 24.2.1, Setting the Purge Delay for All Deleted Volumes.
-
You manually purge the deleted volume. For information, see Section 24.7, Viewing, Salvaging, or Purging Deleted NSS Volumes in a Pool using iManager.
During the purge delay time, the deleted volume is salvageable, but the space belonging to the deleted volume is not available to other volumes and. When the purging process begins, the volume is no longer salvageable.
If it is necessary, you can restore a deleted volume before it is purged. See Section 24.7, Viewing, Salvaging, or Purging Deleted NSS Volumes in a Pool using iManager.
-
In iManager, click Storage > Volumes.
For instructions, see Section 10.2.5, Accessing Roles and Tasks in iManager.
-
Select a server to manage.
For instructions, see Section 10.2.6, Selecting a Server to Manage.
-
In the Volumes list, select one or more volumes that you want to delete.
Wait for the page to refresh and make the Delete option available for the selected volume.
-
Click Delete.
-
Click Yes to confirm the deletion, or click No to cancel the deletion.