Report Writer in Easy Steps
Step 1: Find the Report Groups
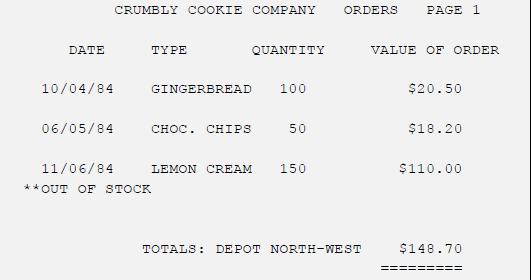
Your program may have one or several report layouts. Here is an example of one hypothetical report layout:
Your first task is to divide up the layout into report groups. A report group is a "block" of lines, produced in one operation. Your layout may be built up from any number of different report groups. You can allow the shape and contents of each report group to vary as much as you like but, if the variations become very complex, it will be easier to define two different report groups. The following guidelines should be used to define a report group:
- It may consist of from one up to any number of lines, and may have any number of fields.
- It normally fits on one page, rather than being split by a page boundary. Thereare exceptions to this rule in MULTIPLE PAGE groups and REPORT HEADING andFOOTING groups, described later.
- It may contain fields whose contents come from anywhere in the DATADIVISION, provided that all the fields are present in memory at the moment yourprogram generates the report group.
If your report structure corresponds to records in a main file or database, remember that, unless you have a special reason for reading ahead and buffering several records, a report group should correspond to one record from your main file or database. (However, there is also a summary reporting feature that enables your program to output one report group that summarizes a whole set of records.)
Mark each report group clearly. Only one instance of each group needs to be marked, because only one description of each group is needed. You might use square brackets in the margin of your layout. In this example, let's draw a rectangle round each report group.
Here is the result:
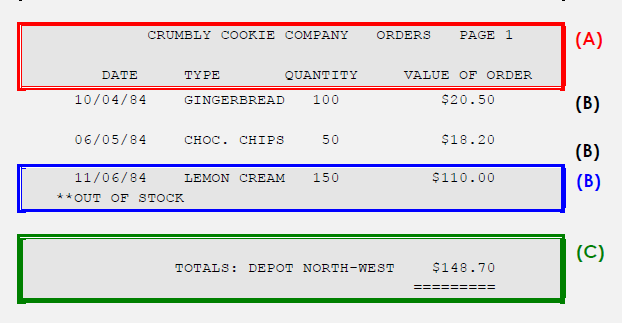
There are three instances of report group (B) in the picture. Only one instance needs a "box", and it is best to draw it around the most complex case, that is, the instance with the extra line "**OUT OF STOCK". (We want this line to be part of the same report group, rather than a report group in its own right, because we want to ensure that it will never be separated from the preceding line by a page advance.)
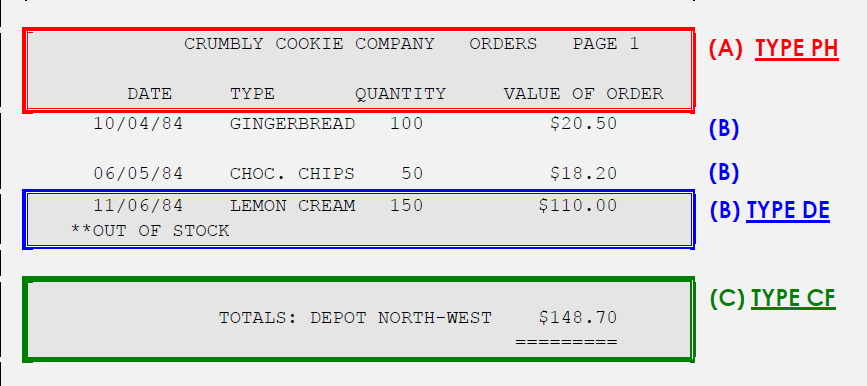
Step 2: Decide on the TYPE of Each Report Group
Each report group can appear in one of seven basic positions in your report, indicated by the TYPE clause. Here are their names and positions:
-
DETAIL or DE
This is the TYPE assumed by any group that is not of one of the special six described below. DETAIL groups usually contain the most basic data in the report. They are the only report groups that you GENERATE. TYPE DETAIL and the next two are known as body groups. (They fall between the PAGE HEADING and PAGE FOOTING, if any, on each page.)
-
CONTROL HEADING or CH
This group is generated automatically at the start of each different value of the corresponding control field (as explained in Step 3 below).
-
CONTROL FOOTING or CF
This group is generated automatically at the end of each different value of the corresponding control field.
-
PAGE HEADING or PH
This group will appear at the start of each page.
-
PAGE FOOTING or PF
This group will appear at the end of each page.
-
REPORT HEADING or RH
This group will appear once, on a page by itself or before the first PAGE HEADING (if any), at the very start of the printout.
-
REPORT FOOTING or RF
This group will appear once, on a page by itself or after the last PAGE FOOTING (if any), at the very end of the printout.
Each TYPE is optional. Your report may contain any number of different DETAIL groups, any number of different CONTROL HEADING and CONTROL FOOTING groups (up to one of each for each control level), but only one of each of the other four.
We can now assign the correct TYPEs to each group in our layout:
Step 3: Code the RD Entry
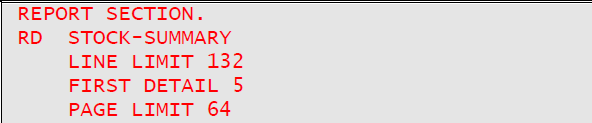
Your report groups are described in the REPORT SECTION, which is the last section in your program's DATA DIVISION. The REPORT SECTION may contain any number of Report Descriptions. Each of these begins with an RD entry that starts in the A-margin:

Follow this with a report-name of your choice. This name will be used to stand for the report as a whole, so choose a name that is appropriate:

Several clauses may follow your report-name. The optional LINE LIMIT clause gives the maximum number of columns you expect per line and is used as a safety measure against losing data due to line overflow. The FIRST DETAIL clause (or its alternative spellings FIRST DE or FIRST BODY GROUP) indicates on which line the main information of each page should start. The PAGE LIMIT clause is required if your report is divided into pages. It gives the maximum number of lines to be written to each page. The order in which you code these clauses and phrases does not matter.
There are other clauses available to mark out different regions of the page.
Our report has control totals. That is, after the change in value of a certain control field (DEPOT), we want COBOL-IT Report Writer to produce an extra report group (the CONTROL FOOTING). The data must arrive in the correct sequence as COBOL-IT Report Writer does not SORT your data itself. (You might use COBOL SORT for that.) The field is called a control and a change in its value is called a control break. You may nest as many different levels of control as you need. You may also have corresponding CONTROL HEADING groups to appear before the start of the detail lines for the new control value. (In our example, there is just one level of control and no CONTROL HEADING group). You indicate which fields are to be used to test for control breaks by means of the CONTROL (or CONTROLS) clause. Each control represents a different level. Your controls must be listed in hierarchical order from highest down to lowest. In our example it is simple because there is only one level:
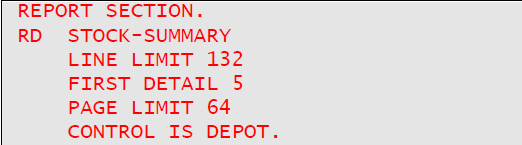
Because the CONTROL clause is the last clause of the RD entry, you write a period (".") after it. Here is another example of a CONTROL clause. This time, we have two control fields and also a special all-encompassing level, known as REPORT or FINAL, that may be used for producing grand totals for the whole report.

LINE LIMIT, FIRST DETAIL, PAGE LIMIT, and CONTROL are not the only clauses you can write in the RD entry. The others are described in the chapter Report Files and RD Entries. The order in which you code the RD clauses is irrelevant.
Step 4: Code the Report Group Descriptions
01-Level Entries
Each report group is coded as a series of COBOL entries. Each entry consists of a level-number, an optional data-name, any number of optional clauses, and a period. Each report group must start with a 01 level-number in the A-margin:

If the group is a DETAIL, follow this with a report-group data-name of your choice, followed by the optional word TYPE and the type of the group:
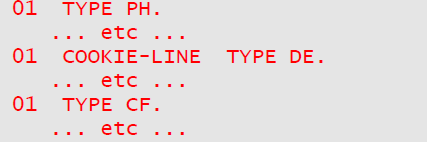
To make your program even clearer, you may spell out the TYPE clause in full; for instance: TYPE IS PAGE HEADING. Any number of entries, indicated by our "...", may follow the 01-level entry, as you will shortly see.
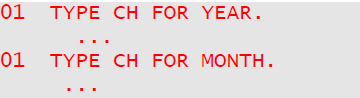
You indicate which level of CONTROL HEADING and CONTROL FOOTING you are describing by writing FOR name-of-control after CH and CF. (This is optional if there is only one level, or you want ALL levels in a CONTROL FOOTING). Taking our example with three levels above, you might code:
Lines and Columns
After each group's 01-level entry, code a series of LINE entries, each containing a series of COLUMN entries. COLUMN may be abbreviated as COL. (You will see, in the chapter Report Group Descriptions, that you can also code a dummy group without LINEs or COLUMNs.) You indicate that an entry is at a lower level by increasing the level-number. For instance, you might choose 03 for LINE entries and 05 for COLUMN entries:
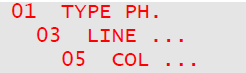
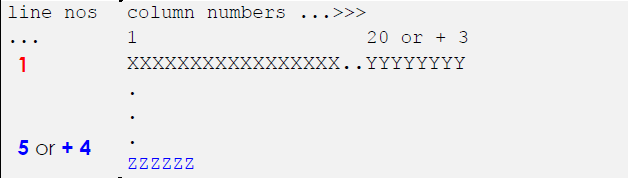
After the LINE or COL keyword you may choose one of two ways to specify positioning for your line or field by writing either integer or +integer.
-
LINE integer gives you an absolute, that is, fixed, LINE position, counting from1 at the top of the page, to the maximum given in your PAGE LIMIT. If youuse absolute LINE clauses in a group, the integers must increase. You mightuse this form for the PAGE HEADING in our example.
-
LINE + integer (+ can also be written PLUS) gives you a relative LINE position.It will cause the vertical position to move down that number of lines. Forexample, LINE + 1 means place on the next line. LINE + 2 means leave oneblank line. (This form is rather like WRITE... AFTER ADVANCING..., translatedentirely into data terms, of course.) You may mix absolute and relative LINEclauses in the same report group, provided that you begin with an absoluteLINE. LINE alone implies LINE + 1.

-
COLUMN integer gives you an absolute, i.e. fixed, COLUMN position for theleft-hand character of the field, counting character positions from 1 at theleft, up to the maximum given in your LINE LIMIT. You can also anchor thefield at its CENTER column by writing COLUMN CENTER integer, and you canfix the field at its RIGHT column by writing COLUMN RIGHT integer. If you usethese absolute COLUMN clauses, the integers must increase within a LINE.
-
COLUMN + integer (COLUMN can be shortened to COL and + can bewritten PLUS) gives you a relative COLUMN position. It will cause the currenthorizontal position to move right that number of positions from the lastcolumn of the preceding field (from zero if this is the first field) to the firstcolumn of the current field. For example, COL + 1 means place this field inthe next column without a gap, and COL + 2 means leave one columnblank.
Report Writer writes your report groups vertically down the page in the order in which they are GENERATEd. DETAIL and CONTROL groups (HEADING or FOOTING), which are known as body groups, are first checked to see whether all their lines will fit on the current page. If your report group begins with an absolute LINE, report writer will advance to a new page if that LINE number has been reached or passed. If your report group begins with a relative LINE, report writer checks the size of the report group. If there is no room, or if there is not enough room for the whole group, report writer will advance to a new page.
Advancing to a new page involves automatically generating your PAGE FOOTING, if you defined one, followed by your PAGE HEADING, if you defined one. If a body group (CH, DE or CF) begins with a relative LINE, it is positioned on the FIRST DETAIL line, irrespective of the value in the LINE clause. (If you did not code a FIRST DETAIL sub-clause, it is assumed to be the line immediately following our PAGE HEADING, or line 1 if there is no PAGE HEADING.)
Values and Sources
To complete your Report Group Descriptions, you need to specify the contents of the fields. The two most usual ways, which are sufficient for this example, are as follows:
If the contents of the field consist of fixed text, write:

If the contents of the report field come from a field in your COBOL DATA DIVISION, write:

Your SOURCE field may be defined in any section of your DATA DIVISION, or it may be a special register such as LINE-COUNTER. The SOURCE keyword may be omitted. You may use subscripts and qualifiers, for example: SOURCE BACK-PAY IN MASTER-RECORD (4). You may also use arithmetic expressions and the word ROUNDED , if needed; for example:

You must code a PICTURE clause with the SOURCE clause. This specifies the format in which you would like the field displayed and is the same clause as in elementary COBOL. It can be abbreviated as PIC. Here are two examples:

The rules for storing the field work exactly as for the MOVE (or the COMPUTE) statement of elementary COBOL. If your SOURCE refers to a CONTROL field, then you will obtain the value before the control break if report writer is currently processing CONTROL FOOTING groups. This is the only case where you do not obtain the value contained in the field at that instant.
Your layout may require a page number. This is held in a special register (a dedicated internal COBOL location) called PAGE-COUNTER. This location is set up automatically by report writer. There are also LINE-COUNTER and COLUMN-COUNTER special registers.
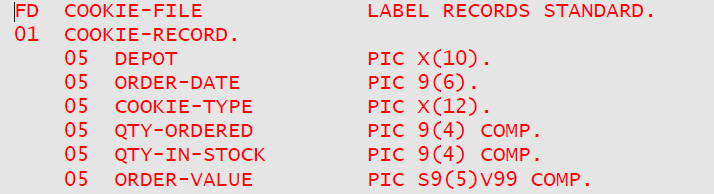
Suppose that the record that supplies data for the layout above is defined in a standard file as follows:
Now we are ready to complete the PAGE HEADING group and the first line of the DETAIL group for the layout above, using these new clauses.
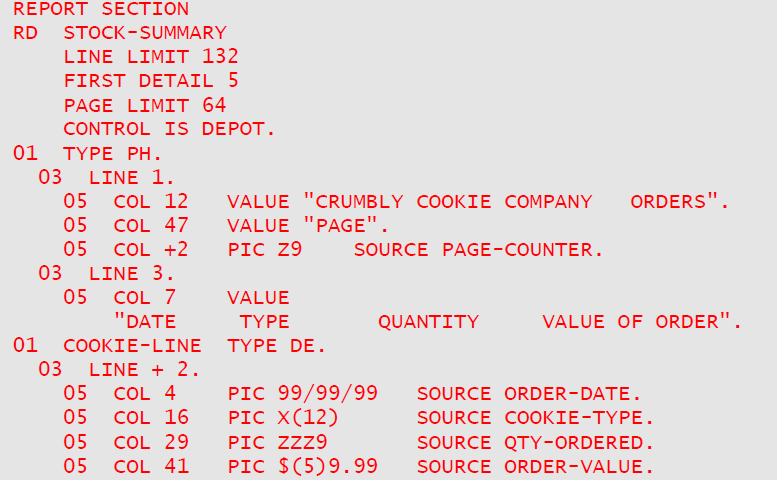 (A)
(A)
Conditional Items
There is one item in our layout that we do not want to produce every time. This is the message "OUT OF STOCK". We deliberately allowed for it by including it in the "box" we drew round the typical DETAIL group. It should only be produced if the condition

is true. To make any item depend on a condition's being true or false, use the clause:

Report writer will then automatically test the condition when it is about to produce the item. If the condition is false, the item is ignored. If you put the clause on a LINE entry, it is the whole line that is ignored. (You can in fact put it at any level. When a group field is ignored, so are all the fields within the group.) In the case here, we do want the whole line to be ignored if the condition is false, so the following would be a valid description for the second line for the DETAIL group:
 (B)
(B)
Totalling
The sample layout tells you to produce a total in the CONTROL FOOTING group. COBOL-IT Report Writer allows you to produce totals from virtually any numeric fields, and you may do it in any TYPE of group. To produce a total, follow these two simple steps:
- Put a data-name at the front of the entry you want totalled.
- In another entry, use the clause: SUM OF data-name instead of SOURCE or VALUE.
First, you must go back to our coding for the DETAIL group above and add a data-name to the entry for ORDER-VALUE. For example, you could re-write the last entry as:

where REP-ORD-VAL is a new data-name of your choice. Now you can code the CONTROL FOOTING group for our layout:
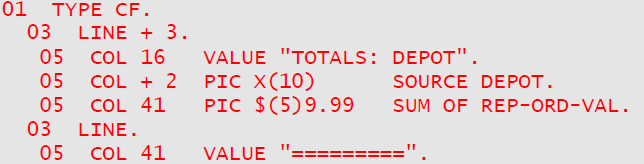 (C)
(C)
You may have any number of CONTROLS in your program, and you may have a CONTROL HEADING as well as a CONTROL FOOTING report group for each control.
Step 5: Code the SELECT...ASSIGN and FD
COBOL-IT Report Writer requires a standard COBOL file to which to write your output. So, to begin with, you need a SELECT...ASSIGN clause and an FD . The FD entry may contain any clauses that you would normally use for a report file, plus a new clause: REPORT IS name-of-report. You should not need a record description to follow. For our example, you might write:
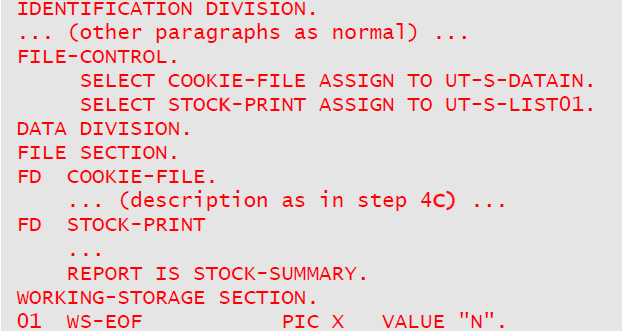 (D)
(D)
Step 6: Code the PROCEDURE DIVISION
Report Writer is entirely under the control of your program, but at a higher level than is the case with elementary COBOL. This means that no action will be taken until your program executes a report writer statement. There are three of these:
-
INITIATE name-of-report
This statement initializes your report at the start of the whole process. Your program must do this before it is allowed to execute any other report writer statements. It does not open the file. Name-of-report is the data-name you wrote right after the RD.
-
GENERATE detail-name
This statement generates one instance of a DETAIL report group. Detail-name is the data-name you used to name your DETAIL report group. The GENERATE also performs all the other actions that might be necessary before the DETAIL report group is output, namely:
It tests for control breaks (if your report has a CONTROL clause) and, if necessary, produces CONTROL FOOTING and CONTROL FOOTING report groups.
It checks that your DETAIL report group will fit completely on the current page (assuming that your report has a PAGE clause). If not, it produces your PAGE FOOTING report group (if there is one defined in your report), advances to a new page and produces your PAGE HEADING report group (if there is one defined in your report). Unless you explicitly allow it with a MULTIPLE PAGE clause, report writer never splits your report group over two pages.
If it is the first occasion after the INITIATE, the GENERATE statement will output any REPORT HEADING, your PAGE HEADING, and all your CONTROL HEADING groups before generating your DETAIL report group.
Your CONTROL HEADING and CONTROL FOOTING report groups are also subject to the page-fit test. They are treated similarly to DETAIL report groups. These three TYPEs are often referred to as body groups, because they fit into the "body" of the page (between the PAGE HEADING and FOOTING) and usually contain the most important information.
-
TERMINATE name-of-report
This statement ends your report and produces any final items that are required at the end of the report, namely:
-
All CONTROL FOOTINGs up to the highest level defined;
-
The last PAGE FOOTING (if defined);
-
The REPORT FOOTING (if defined).
-
To produce output for a simple report layout from standard files, the following logical structure should apply:

for each input record:

at end of file:

If your input is from a database, or reaches your program's DATA DIVISION by some means other than from a standard file, you will need to replace the OPEN and CLOSE for the input files and the READ by more appropriate statements.
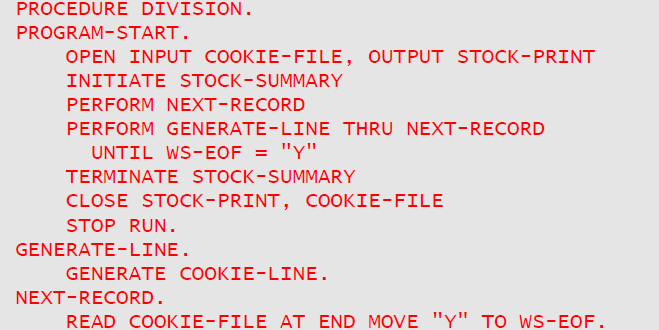
To produce a more complex layout, you would probably define several different DETAIL report groups and decide in your program when to GENERATE one or the other. For our example, the following would be a suitable complete PROCEDURE DIVISION:
Place this code after the code in the code samples (D), (A), (B) and (C) (in that order) and you have a complete program. You may use report writer "verbs" just as you would use any other PROCEDURE DIVISION statements. So your program may do many other tasks apart from just producing your report output.
(E)