Upgrading Deployed Capabilities
Accepting the Certificate
- On the CDF Management Portal, click DEPLOYMENT, and then select Deployments.
- Click the Three Dots
 (Browse) on the far right and then choose Reconfigure.
 - (Optional) If you have deployed Fusion in the tab, you can set a Fusion global search limit to specify the number of results a search can return. (The maximum is 10 million events.)
- Accept the certificate.
Considerations for Upgrading Intelligence
If you have deployed Intelligence and are upgrading it, consider the performing the following steps on the NFS before upgrading the deployed capability:
-
Ensure that you move your SQL loader scripts from:
/<arcsight_nfs_vol_path>/interset/analytics/vertica_loader_sql/0/<existing_folder_name>to/<arcsight_nfs_vol_path>/interset/analytics/vertica_loader_sql/0/1.<existing_folder_name>. -
If you are using custom data identifiers, ensure that you back up the
logstash-config-pipelineconfig map that is accessible through the Kubernetes dashboard.
Upgrading Deployed Capabilities
- (Conditional) Before upgrading Intelligence, review the considerations for an upgrade.
- To delete any pre-existing upgrade pods, run the following command from the master node:
kubectl delete deployments suite-upgrade-pod-arcsight-installer -n `kubectl get namespaces | grep arcsight-installer | awk ' {print $1} '`If the command returns an error message, it can be ignored and you may proceed to the next step. - Log in to the master node where you downloaded the upgrade files.
- Change to the following directory:
- Run the following commands to upload the images to the local Docker Registry. Use the
-F <image file>option on the command line multiple times for each image to upload. Adjust the-c 2option up to half of your CPU cores in order to increase the speed of the upload. An example is shown here for Fusion, Transformation Hub, and Recon capabilities../uploadimages.sh -c 2 -F {unzipped-installer-dir}/images/fusion-x.x.x.x.tar -F {unzipped-installer-dir}/images/transformationhub-x.x.x.x.tar -F {unzipped-installer-dir}/images/recon-x.x.x.x.tarYou will be prompted for a password for the docker container registry-admin user. The registry-admin password is initially set to the same password as the admin user for the CDF Management Portal during installation when Configuring and Running the CDF Installer; however, later changing the CDF Management Portal admin password does not change the registry-admin password as it is managed separately. - Add new metadata.
- Browse to the management portal at https://<virtual_FQDN>:5443, or at https://<master_node1_FQDN>:5443.
- Click DEPLOYMENT > Metadata and click + Add.
- Select
arcsight-installer-metadata-x.x.x.x.tarfrom your system. The new metadata is added to the system.
- Start the upgrade process.
- Go to DEPLOYMENT > Deployments. Notice the number 1 in the red circle in the Update column.
- Click the red circle and select your recently added metadata to initiate the upgrade.
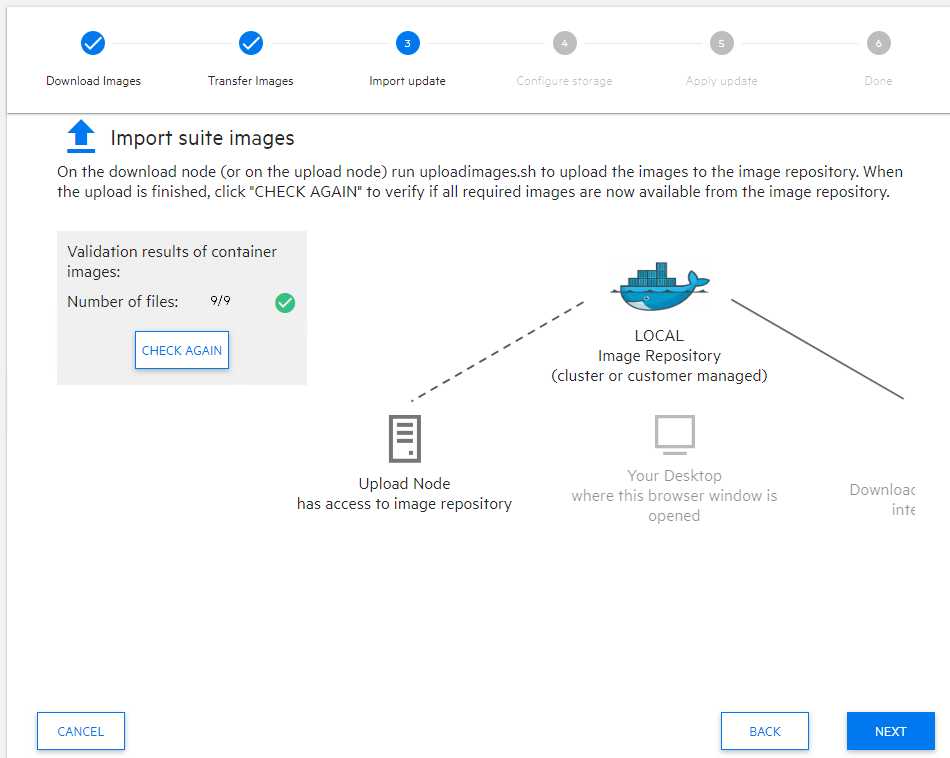
Minor version changes do not display like regular updates. (For example: 22.1.0.15 -> 22.1.0.16.) - From the Update to page, click NEXT until you reach the Import suite images page.
- Ensure that the validation results of container images show a complete number of files.
(Conditional) If you’ve deployed Transformation Hub, perform the following action:
On the Transformation Hub tab, select whether you want to enable the generation of verification events for parsed field integrity checks used by Recon. If enabled, set the accordingly (default value is recommended).
For more information about how the Event Integrity feature works, see Stream Processor Groups.
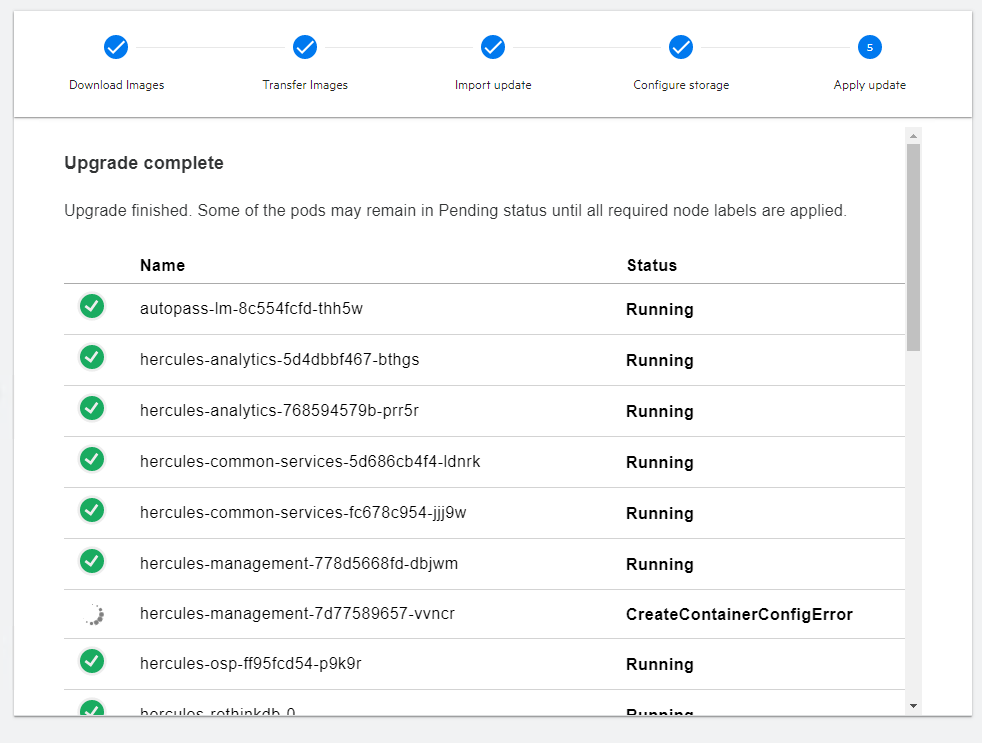
When enabling the generation of verification events for parsed field integrity checks feature, consider the guidelines in Adjusting the Partition Count for New Kafka Topics.- Click NEXT until you reach the Upgrade Complete page.
cd ${K8S_HOME}/scriptswhere {K8S_HOME} has a format similar to: /opt/arcsight/kubernetes/scripts. arcsight-installer-metadata-x.x.x.x.tar to the system where your web browser is running before performing the process below.