Takes you through the process of publishing, debugging, and executing the stored procedure you created in the previous tutorials, using the SQL Server Object Explorer in Visual Studio.
Before attempting to debug by stepping into the stored procedure code using the steps below, if you are using a UAC-enabled operating system, you must be running
Visual COBOL as an administrator.
Note: When connecting to your SQL Server, if Microsoft SQL Server 2012 prompts you with an Attach Security Warning, please click
Attach to clear the prompt.
- Requirements
- Before attempting this tutorial, you must complete the following tutorials in the order listed:
- Tutorial: Enable SQL CLR Integration
- Tutorial: Create a Sample Database
- Tutorial: Create and Configure a Database Project
- Tutorial: Create an ADO.NET Connection
- Tutorial: Code a SQL CLR Stored Procedure using OpenESQL Assistant
- Phase 1: Publish Your Stored Procedure to SQL Server
-
- In the Solution Explorer, right-click the
SQLCLRTutorial.Publish project; then select
Publish.
- On the Publish Database dialog box, click
Edit.
- In the
Server Name field, type
. (dot) to represent your local SQL Server instance.
- In the
Select or enter database name field, select
SQLCLR_Test from the drop-down list; then click
OK.
- On the Publish Database dialog box, click
Publish. When the publishing process is complete, the Data Tools Operations window shows a status of
Publish Completed Successfully.
- Phase 2: Debug Your Stored Procedure
- Now that your stored procedure is available for use, you can debug it from Visual Studio.
- From the SQL Server Object Explorer, click
Add SQL Server
 .
.
- In the
Server Name field, type
. (dot) to represent your local SQL Server instance; then click
Connect.
- On the SQL Server Object Explorer, right-click your SQL Server instance, represented by a dot followed by your local server information in parentheses, and check
Application Debugging and
Allow SQL/CLR Debugging. If a prompt appears, click
Yes to clear it.
- On the SQL Server Object Explorer, expand the database
SQLCLR_Test > Programmability > Stored Procedures; then right-click the
dbo.SQLCLRTutorial stored procedure and select
Debug Procedure.
- In the
Value field for the
@lkEMPNO name, type
000020.
- Check
Null for the
@lkFIRSTNME and
@lkLASTNAME names, and then click
OK.
Visual Studio connects to your SQL Server instance, creates a test SQL script, calls your stored procedure, and runs the debugger with your cursor on the
USE [SQLCLR_Test] statement of the test SQL script.
- Use the Visual Studio debugger to step through the lines of code in your stored procedure, examining variables and values, etc.
The Data Tools window on the
Results tab displays information returned from the debugger.
- To exit the debugger, click
Debug >
Stop Debugging.
- Phase 3: Execute Your Stored Procedure
- You can execute the stored procedure providing by providing the required input values, and see the output that results from the stored procedure call.
- From the SQL Server Object Explorer, right-click the
dbo.SQLCLRTutorial stored procedure, and select
Execute Procedure.
- If not already set, type
000020 into the
Value field for the
@lkEMPNO name, and check
Null for the other two names.
- Click
OK to execute the stored procedure.
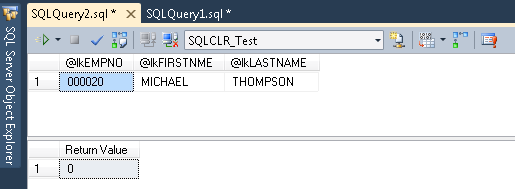
- View the results on the
Results tab:

This concludes this tutorial. Please continue with
Tutorial: Call a Published Stored Procedure.


 .
.


