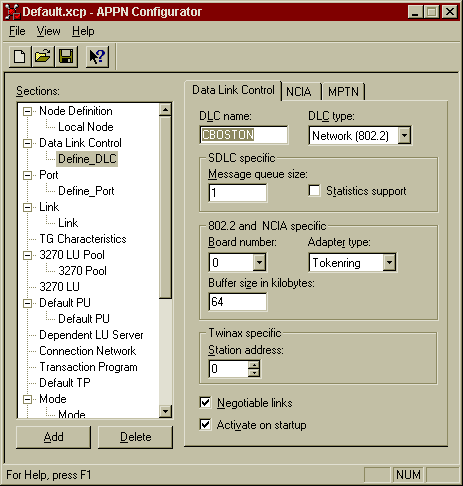
Select Data Link Control from the Sections window and then click the Add button. The Data Link Control Window will appear.
- Enter the DLC Name, a name to describe the DLC definition which will be unique within this node. For example, LANDLC since this is going to be a LAN connection.
- Enter the DLC Type, select Network (802.2) for a LAN connection. If an SDLC or COAX connection is required the corresponding option would be selected here.
- You may skip over the SDLC specific entry fields.
- In the 802.2 and NCIA specific entry fields enter the adapter number which will be used for this connection in Board number. If there is only one network adapter configured in this machine then select 0. To determine the network adapters installed double-click the Network icon in the Control Panel. The adapters are listed in ascending adapter number starting at zero.
- Select the appropriate Adapter type for the LAN network adapter, either Tokenring or Ethernet.
- You may allow the Buffer size in kilobytes to default to 64.
- You may skip over the Twinax specific fields.
- The Negotiable links check box should already be selected by default.
- The Activate on startup checkbox, we suggest initially be left unselected so that the DLC is tested by starting manually. Once this is tested this option can then be selected.


