16.4 Managing Action Plug-Ins
The Sentinel system includes several Action plug-ins by default, but you can download updates, documentation, and additional Actions from the Sentinel Plug-ins Web site. For more information on specific Actions, see the documentation that is available with the Action. Alternatively, you can view a specific Action’s documentation by clicking the Help button while configuring that Action in the Action Manager.
Although common Action plug-ins can be obtained from the Sentinel Plug-ins Web site, you can create and manage your own Action plug-ins. New Action plug-ins can be developed by using the Sentinel Plug-in SDK.
16.4.1 Understanding the Action Plug-In Manager Interface
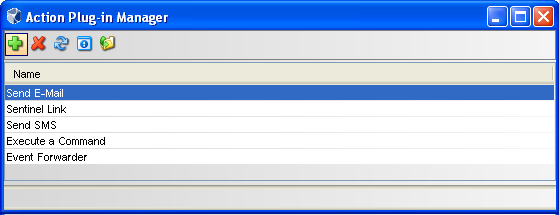
The Action Plug-in Manager window lists the available Action plug-ins and allows you to import and manage action plug-ins.
Figure 16-3 Action Plug-In Manager

The Action Plug-in Manager window includes the following options:
-
Add
 : Allows you to import or update an Action plug-in.
 -
Delete
 : Allows you to delete an Action plug-in.
NOTE:You can delete an Action plug-in only if there are no Action instances configured to use it. For example, if an Action is referenced by an Integrator, the Action cannot be deleted.
-
Refresh
 : Refreshes the list of plug-ins.
 -
View Details
 : Displays the plug-in details such as the version number, release date, and a brief description of the Action.
 -
Add Auxiliary file
 : Allows you to add an auxiliary file to the Action plug-in. Auxiliary files are occasionally required if a specific file is not available within the plug-in for licensing reasons, or if you want to customize or extend the Action in some way.
16.4.2 Importing an Action Plug-In
You can download and import an action plug-in package file or you can import an action plug-in file that is in a directory.
When you import a file from a directory, it is important to define the required objects correctly so that the Actions are available for the appropriate Sentinel features.
Downloading and Importing an Action Plug-In
-
Download the appropriate Integrator plug-in from the Sentinel Plug-Ins Web site.
-
Launch the Sentinel Control Center.
-
Launch the Action Manager:
-
If the Configuration menu is not enabled, click the Configuration tab, then click the Configuration menu > Action Manager or click the
 .icon in the toolbar.
 -
If the Configuration menu is enabled, click the Configuration menu > Action Manager or click the
 .icon in the toolbar.
-
-
Click Manage Plug-ins, then click the Import
 icon.
icon. -
To import an Action plug-in package file, select Import an Action plug-in file (.zip, acz), then click Next.
-
Click Browse to select the location of the package file.
The file must be in .zip of acz format.
-
.(Conditional) If you have selected an Action file that already exists, the Replace Existing Plug-in window is displayed. Click Next to replace the existing plug-ins.
-
Review the plug-in details, then click Finish.
Importing an Action Plug-In File from a Directory
-
Download the appropriate Integrator plug-in from the Sentinel Plug-Ins Web site.
-
Launch the Sentinel Control Center.
-
Launch the Action Manager:
-
If the Configuration menu is not enabled, click the Configuration tab, then click the Configuration menu > Action Manager or click the
 .icon in the toolbar.
 -
If the Configuration menu is enabled, click the Configuration menu > Action Manager or click the
 .icon in the toolbar.
-
-
Click Manage Plug-ins, then click the Import
 icon.
icon. -
Select Import an Action plug-in from directory.
-
Click Browse to select the location of the directory, then click Next.
-
Review the details and make changes as necessary.
If you have selected an Action file that already exists, the Replace Existing Plug-in window is displayed. Click Next to replace the existing plug-ins.
-
Select the objects you want to associate with the action, then click Next.
This affects where the Action is available in the Sentinel interface.
-
(Optional) Customize the plug-in by adding or editing the parameters.
For example, if you want to include the attachment option for the Send E-mail action, you can add a parameter named “Attachment” and configure it appropriately. Also, you must modify the code in the action script to handle the new parameter.
-
Click Add to add parameters that can be set when an Action is configured.
This option should be used for any file that expects to receive information as parameters.
-
Specify the parameter name.
The name used here should be identical to the one used in the JavaScript API method scriptEnv.getParameter("<name>") in the script that is being imported.
-
Select the parameter type from the Type drop-down list.
-
String: Passes the string value to the parameter.
-
Boolean: The parameter can take a True or False value.
-
Integrator: Select an Integrator for the action.
-
Event Tag: Select an Event Tag for the parameters.
-
Severity: Select a severity for the parameters.
NOTE:The Options area is available only for the String type parameters.
-
-
(Optional) Specify a description.
-
Click Next.
-
-
Review the plug-in details, then click Finish.