8.2 Installing in a Standalone Environment
8.2.1 Installing in a Standalone Workstation
-
Log in to the workstation as an administrator.
-
Run the NetIQSecureLogin.exe file.
-
Accept the license agreement.Click Next. The License Agreement page is displayed.
-
Select Standalone (Trial/Testing/Demonstration) as the datastore. Click Install. If dependant components like NICI, NMAS are not present, they are installed.
-
Click Next to view the Custom Setup screen.
-
The SecureLogin is by default installed in C:\Program Files\NetIQ\SecureLogin folder. If you want to change the location, click Browse and specify a different location. Select the features you want to install and click Next.
8.2.2 Upgrading from an Earlier Version
The previous versions of SecureLogin supported creating multiple SecureLogin accounts for a single workstation account.
To maintain backward compatibility, SecureLogin supports multiple users created in previous versions.
After upgrading, you are prompted to either continue using multiple accounts or choose one account and migrate to seamless standalone mode.
If you have been using SecureLogin in standalone mode in one account, you are automatically migrated to seamless standalone mode after providing your username and password on first log in.
Setting Up Multiple User Accounts
SecureLogin consolidates the accounts by leveraging the Windows account to verify the user. This results in one SecureLogin user for each Windows account.
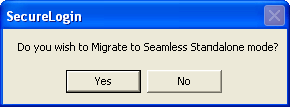
After upgrading, the following message appears.
Figure 8-1 Seamless migration message

-
If you wish to manage the users through their Windows accounts, click Yes and migrate to seamless standalone mode. This deletes all other user accounts but it does not delete the one you are requested to selected.
-
If you have previously configured SecureLogin with multiple users, click No to continue accessing them.
The SecureLogin Standalone dialog is displayed. The dialog box retains all the user accounts retained from the previous SecureLogin configuration.
You can then select from two options:
-
If you had earlier selected Yes, select the user or the account that will continue to be user future SecureLogin account.
-
If you had earlier selected No, select the user account that you require now. This list displays all the accounts retained for future log in.
Specify the password. SecureLogin is now active for the selected user and the SecureLogin icon appears in the notification area.
-
Managing SecureLogin After upgrading
For mobile users and notebook users, SecureLogin is managed through the Personal Management Utility. To start the Personal Management Utility, double-click the SecureLogin icon ![]() on the notification area, or right-click the icon and select Manage Logins.
on the notification area, or right-click the icon and select Manage Logins.
8.2.3 Creating a New User Account
When SecureLogin is started after a new installation on a standalone workstation, the Standalone dialog is displayed.
-
Click Create User. The Create User page is displayed
-
Specify the Username and Password.
-
Re-enter the password to verify.
-
Click OK.