34.2 Configuring Migration to a VM on a Citrix XenServer Virtual Host
You can use Citrix XenServer as the target virtualization platform in a semi-automated workload virtualization.
This section includes the following topics:
34.2.1 Downloading and Preparing the PlateSpin ISO Image (Citrix XenServer)
-
Download and prepare the PlateSpin ISO image for use with the target VM. Attended and unattended registration options are possible.
See Preparing the PlateSpin ISO Image for Target Registration and Discovery.
-
Save the downloaded image file in the following directory on the Citrix XenServer host:
/var/lib/xen/images
This ensures that the PlateSpin ISO image is available to the target VM as a bootable CD-ROM image.
34.2.2 Creating and Configuring the Target Virtual Machine (Citrix XenServer)
-
On Citrix XenServer, use the Virtual Machine Manager Wizard or the Create Virtual Machines program shortcut to create a new virtual machine.
Ensure that the new virtual machine is created with the following settings:
-
Virtualization method: Fully virtualized.
-
Operating System Type and Version: Specify the operating system type and version settings that matches the source workload. The wizard uses this information to set appropriate default values (such as the amount of memory needed) and resource limits for the VM.
-
Memory: Assign at least 384 MB of RAM to the VM. This ensures that the VM has sufficient resources during the migration and improves transfer speed. If the virtual machine requires less memory after the migration, reduce the assigned memory after the migration completes.
-
Disks: Assign disks such that the disk size of every disk is about 50 MB more than the corresponding disk on your source workload. The storage can be either a raw SAN LUN or a virtual disk. Also, create a Virtual CD-ROM assigned to the downloaded PlateSpin ISO image.
-
-
Ensure that the VM is configured to restart on reboot by exporting the VM’s settings from the xend database to a text file and making sure that the on_reboot parameter is set to restart. If not, shut down the VM, update the settings, and re-import them into the xend database.
For detailed instructions, see the XenServer 6.1.0 Virtual Machine User's Guide.
-
From the Virtual Machine Manager, launch the virtual machine console and monitor the boot process.
When the virtual machine completes the boot process, it prompts you for parameters that control the registration of the machine and its profile with PlateSpin Migrate. If you are using the unattended registration process, the required parameters are read from an answer file.
34.2.3 Registering the Virtual Machine with PlateSpin Server (Citrix XenServer)
After you create the virtual machine and prepare it to boot with the PlateSpin ISO, you are ready to register it as a target VM with your PlateSpin Server. See Registering and Discovering Target VMs on Virtual Hosts.
34.2.4 Migrating Your Source Workload to the Target Virtual Machine (Citrix XenServer)
-
Use PlateSpin Migrate Client to start an X2P migration job with your source workload being the job’s migration source and the target being the new VM on the Citrix XenServer hypervisor.
-
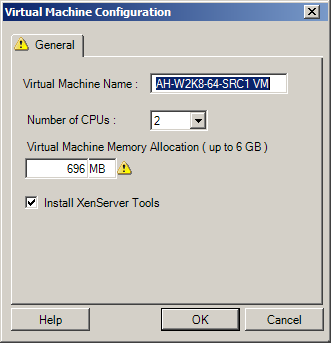
For host-specific target VM configuration options for the Virtual Machine Configuration dialog, see Target VM Configuration: Citrix XenServer.
-
Monitor the migration job in the Jobs view in PlateSpin Migrate Client.
When the job reaches the Configure Target Machine step, the virtual machine’s console returns to the boot prompt of the PlateSpin ISO image.
-
Shut down the virtual machine, reconfigure it to boot from disk rather than from the boot image, and deselect the VS Tools Installed option.
-
Power on the virtual machine.
The migration job resumes, reboots the target, and completes the workload configuration.
34.2.5 Target VM Configuration: Citrix XenServer
The following are configuration options specific to Citrix XenServer.

|
|
Virtual Machine Name: Specify the display name for the new virtual machine. Number of CPUs: Select the number of CPUs to assign to the target VM. For example, you can convert a single-processor workload to a multi-processor VM, or a multi-processor workload to a single-processor VM. Virtual Machine Memory Allocation: Specify a value for the amount of virtual RAM to be assigned to the virtual machine. Install XenServer Tools: Enable this option to install XenServer Tools during the migration process (recommended). |