19.7 Exporting and Importing NSS Volumes for NFS Access
NSS volumes and their directories are NFSv3 exportable and accessible from remote systems. NFSv4 is not supported for NSS, but exports for other file systems using NFSv4 can coexist with NSS exports using NFSv3.
19.7.1 Understanding NFS Export and Mount Options
Host Options
The following table describes options for specifying which servers on the network can import the NFS volume. For more information, see the exports(5) man page.
Table 19-1 Host Options for NFSv3 Export of NSS Volumes
|
Mount Option |
Description |
|---|---|
|
Single host |
Specify a single host by its fully qualified domain name or its IP address. |
|
Netgroups |
Specify NIS netgroups as @groupname, such as @trusted. |
|
Wildcards |
Specify a asterisk (*) to specify all hosts. Use the wildcard characters of asterisk (*) and question marks (?) in server names to match multiple servers. For example, proj*.example.com matches all hosts in the domain example.com that begin with proj. |
|
IP networks |
Specify all hosts on a network or subnetwork by specifying the IP address and netmask pair as address/netmask. For example: 10.10.10.1/255.255.252.0. |
Mount Options for Export via NFSv3
Table 19-2 describes mount options available for mounting NSS volumes for export via NFSv3. For more information, see the exports(5) man page and the mount(8) man page.
Table 19-2 Mount Options for NFSv3 Export of NSS Volumes
|
Mount Option |
Description |
|---|---|
|
rw |
Mount the NSS file system with Read/Write (rw) access. |
|
no_root_squash |
Disable root squashing for the superuser with the No Root Squash (no_root_squash) option. This allows root users on client computers to have root access on the server. With the No Root Squash option, mount requests for root are not mounted to the anonymous user (nobody). This option is needed for diskless clients. NSS volumes are logical volumes. They are not directly mounted on devices, but are associated with pools, which are mounted on devices. Because NSS volumes do not have a device directly associated with them, NFS treats the volume like a diskless client, which makes the no_root_squash option necessary when you mount NSS volumes. |
|
sync |
Specify the Sync (sync) option, which requires all file system writes to be committed to disk before the request can be completed. |
|
fsid=value |
Importing with the fsid option works around the fact that there is no device associated with a logical volume. You must import the NSS volume or directory with the FSID option set on it for export: fsid=n
Replace n with an integer value greater than 0. The numbers do not need to be sequential. For example, fsid=1 and fsid=10. Make sure to use a unique fsid number for each NSS volume or directory you are exporting. IMPORTANT:FSID=0 is reserved for NFSv4 as the pseudo root of the exported file system for exported volumes on the Linux server. |
Mount Options for Import via NFSv3
Table 19-3 describes mount options available for mounting NSS volumes for import via NFSv3. For more information, see the mount(8) man page.
Table 19-3 Mount Options for NFSv3 Import of NSS Volumes
|
Mount Option |
Description |
|---|---|
|
rw |
Mount the NSS file system with Read/Write (rw) access. |
|
sync |
Specify the Sync (sync) option, which requires all file system writes to be committed to disk before the request can be completed. |
|
noatime |
NSS also supports the optional use of the noatime for importing and mounting NSS volumes by using NFS. The noatime option disables the updating of the access time for files so that reading a file does not update its inode access time (atime). For more information, see Section A.24, noatime and nodiratime Support for Linux open, mount, nfsmount, and /etc/fstab. |
Additional Information
When you use NFS to export or import NSS volumes, other supporting services are needed, including DNS, NIS, and NFS. For information about configuring and managing these services, see the following links:
19.7.2 Exporting NSS Volumes for NFSv3
-
In a terminal console, log in as the root user.
-
In YaST, select Network Services, then select NFS Server to open the NFS Server Configuration page.
-
If NFS Server is not started and enabled, you must configure the NFS Server.
-
NFS Server: Select Start.
-
Firewall: Select Open Port in Firewall to allow access to the NFS service from remote computers, then click Firewall Details to specify the network interfaces where you want to open the port.
-
Enable NFSv4: Ensure that Enable NFSv4 is not selected if you are exporting only via NFSv3.
IMPORTANT:NFSv4 is not supported for NSS, but exports for other file systems using NFSv4 can coexist with NSS exports using NFSv3. If you enable NFSv4, make sure that you enter the NSS directories for export with options that use non-zero settings for their FSIDs, and do not bind the NSS directories to paths in the pseudo-root file system that you set up for NFSv4 exports.
-
Enable GSS Security: To enable Kerberos secure access to the server, click Enable GSS Security. A prerequisite for this is to have Kerberos installed in your domain and both the server and the clients are kerberized.
-
Click Next to continue to the Directories to Export page.
-
-
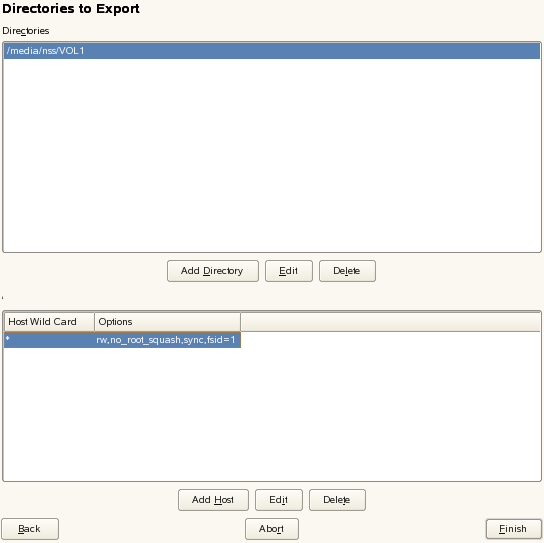
On the Directories to Export page, do the following for each NSS volume on the server that you want to export via NFSv3.
-
Under Directories, click Add Directory, to open a dialog box where you can configure the settings for a volume.
-
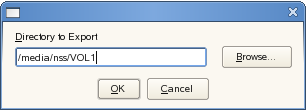
Specify the NSS volume that you want to export by typing the Linux path for the volume, or browse the Linux file system to locate and select the NSS volume, then click OK.
The default location of NSS volumes is /media/nss/volumename, such as /media/nss/VOL1.

-
In the Host Wildcard field, specify the servers where you want to be able to mount the NSS volume via NFSv3.
A default asterisk (*) wildcard indicates all servers. You can specify a single host, netgroups, wildcards, or IP networks. For information, see Host Options.

-
Enter the following required mount options:
rw,no_root_squash,sync,fsid=valueFor NFSv3, make sure you do not include the fsid=0 or bind=/pseudo_rootdir/volumename options. Not using these options allows the export to be processed as an NSFv3 export.
For example:
rw,no_root_squash,sync,fsid=1
Separate the options with commands and no spaces. For information, see Mount Options for Export via NFSv3.
-
Click OK to save your settings and return to the Directories to Export page.

-
-
On the Directories to Export page, click Finish to apply the settings.
19.7.3 Importing NSS Volumes
-
On the OES server where you want to import the NSS volume via NFS, open YaST.
-
In YaST, select Network Services, then select NFS Client to open the NFS Client Configuration page.
-
Near the bottom of the page, select Open Port in Firewall to allow access to the NFS service from remote computers, then click Firewall Details to specify the network interfaces where you want to open the port
-
Do the following for each NSS volume on remote servers that you want to import via NFS.
-
Click Add to open a dialog box where you can specify the information for the volume you want to import.
-
In NFS Server Hostname, specify the remote server where the volume resides. Type the fully distinguished name (such as servername.ou_context.o_context.com), or click Choose, select the NFS server from a list of servers, then click OK.
-
In Remote File System, specify the path on the remote server where the volume resides. Type the full path such as /media/nss/VOL1, or click Select to open the Exported Directories dialog box, then select the path from the list of NFS exported directories on the selected server, then click OK.
-
In Mount Point (local), specify the path on the server (the NFS Client location) where you want to mount the remote volume, such as /mnt/nfs/volumename, or click Browse to locate and select the location.
The Browse option allows you to create a new folder on the server for the target path.
-
Enter the following required mount options:
rw,sync
You can optionally specify the noatime option. For information, see Table 19-3 and the mount(8) man page.

-
Click OK to save your settings and return to the NFS Client Configuration page.
The entry you just made should appear in the list.

-
When you are done adding volumes to be imported, continue with the next step.
-
-
On the NFS Client Configuration page, click Finish to apply the settings.