4.7 Creating a Print Manager
You need to create at least one Print Manager for your print system. Depending on your network setup, you can create additional Print Managers, such as across a WAN link. The Print Manager must be running in order to create printers. For more information about placing Print Managers on your network, see Creating Additional Print Managers.
IMPORTANT:Based on the Print Manager configuration, the Print Manager creates a URL for each printer. When you create the Print Manager, you can specify a DNS name or an IP address for the iPrint Service of the same server where you are creating the Print Manager. You should use the DNS name because if the IP address changes, users must delete and reinstall the printers.
A Driver Store must exist before you can create a Print Manager. For more information, see Section 4.3, Creating a Driver Store.
-
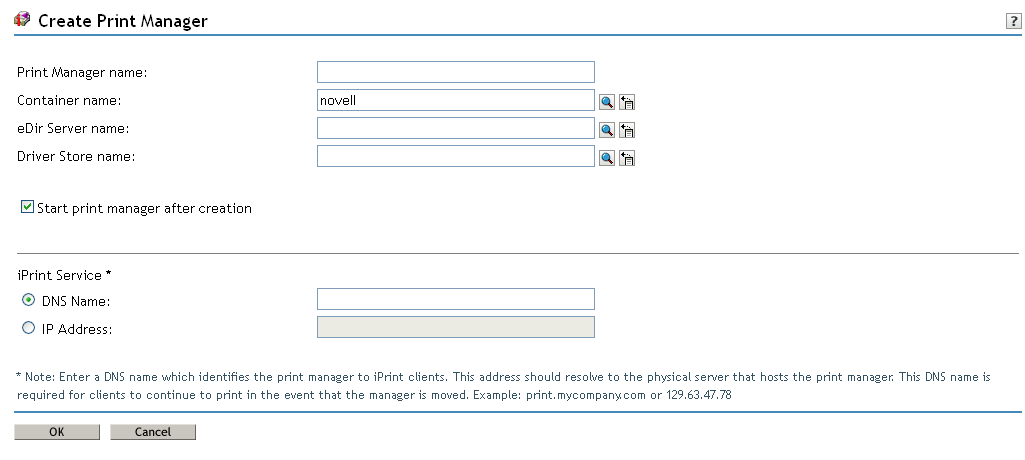
In iManager, click iPrint > Create Print Manager.

When you create the Print Manager the first time, you might receive an error about trusting a certificate. You need to click the iPrint Certificate Manager link and accept the certificate, then attempt to create the Print Manager again.
-
In the Print Manager name field, specify the name for your iPrint Manager object.
-
In the Container name field, specify the name of the container where you want the Print Manager object to reside.
HINT:Use the Object Selector
 to choose the container object from an object list. For more information on using the Object Selector, see
 Using the Object Selector
in the NetIQ iManager Administration Guide. Use the History Browser to browse through the list of objects you used recently.
 -
In the eDir Server name field, specify an eDirectory server with which you want the Driver Store to communicate.
For fault tolerance, you can specify more than one eDirectory server from the same tree. For more information, see Section 4.4, Changing the eDirectory Server Assignment.
-
In the Driver Store name field, specify the Driver Store you want this Print Manager to use to deliver printer drivers to iPrint clients.

-
Select the Start print manager after creation check box to automatically launch the Print Manager after creating it.
This option starts the iPrint Manager after the object is created and also starts the iPrint service after every server reboot.
If you do not select the Start print manager after creation check box, you should start the Print Manager manually after creating it. You do this by using Manage Print Manager > Manager Control in iManager or by entering systemctl start novell-ipsmd.service at a command prompt.
IMPORTANT:In a cluster setup, do not select the Start print manager after creation check box.
-
Use the iPrint Service panel to specify a DNS name (such as print.mycompany.com) to identify the iPrint service on the network.
This address should resolve to the physical server that hosts the Print Manager. Additionally, this address is used to create the iPrint printer's URL, which is installed on users' workstations during a printer installation.
If this URL changes, users must delete and reinstall their printers. The DNS name should not be the server's DNS name (such as server1.mycompany.com).
An IP address can be used if DNS is not configured for your network or if you use a secondary IP address. Using a primary IP address or the server's DNS name limits your ability to move the Print Manager. You should use DNS names, whenever possible, to avoid client issues, especially if you need to change the IP address in the future.
-
Click OK or Click Cancel to exit without saving any of your changes.
A CNAME is a DNS name that is tied to a Service and not tied to a Server Name. OpenText recommends that you bind the Print Manager to a CNAME and not to a server DNS name or a server IP address. If the Print Manager is bound to a CNAME, the iPrint printers installed to workstations automatically point to the new server when you migrate iPrint services. There are two methods to view which address or name the Print Manager is bound to:
-
Viewing the Installed Printer
-
Using ipsmd.conf
Viewing the Installed Printer
Look at the name of an iPrint printer installed to a workstation. The name looks similar to one of the following formats:
printer1 on ipp://servicename.company.com
or
printer1 on <Name>
or
printer1 on ipp://servername.company.com
or
printer1 on ipp://<ipaddress>
The first format is the recommended format.
Using ipsmd.conf
View the PSMHostAddress value within the /etc/opt/novell/iprint/conf/ipsmd.conf file. The only recommended value is a CNAME, such as servicename.company.com.
To conform to the CNAME recommendation:
IMPORTANT:Do not proceed with these steps if the Print Manager is bound to an IP address or a server DNS name.
-
Create a DNS entry for a Print Manager service name (CNAME) within the network's DNS configuration.
The CNAME must resolve to the IP address of the server hosting the Print Manager. If the Print Manager is hosted on a cluster, the CNAME must resolve to the IP address of the cluster volume.
-
/etc/hosts/ -Add the CNAME and server IP address to the server's /etc/hosts file.
-
ipsmd.conf - Modify the PSMHostAddress value within the /etc/opt/novell/iprint/conf/ipsmd.conf file from the server DNS or IP address to the Print Manager's CNAME.
-
Restart the Print Manager by using the systemctl restart novell-ipsmd.service command.
The iPrint clients detect the name change within the ipsmd.conf file, uninstall the iPrint printer, and re-install the iPrint printer to reflect the new name.