The CIS client on Mac allows users to preview the files uploaded to the cloud instead of the earlier issue of downloading them to the local storage.
Use the novcifs command line utility to set --block-unmanaged-cis-reads option to “yes”.
To install the latest version of CIS Client for Mac 1.1.8, you must uninstall the earlier version of CIS Client for Mac. Section 10.2.3, Uninstalling CIS Client.
To install the CIS client on a macOS Sonoma workstation:
Open the CISClient.pkg installer to launch the package.
Follow the prompt, read the agreement and click Agree to accept the end-user license agreement.
Click Install. The system prompts for administrator credentials; enter the password and click Install Software > OK to begin the installation.
The CIS client successfully installs within a few seconds.
Click Open System Settings when the system prompts o use a new network extension for CisAgent.
Navigate to Privacy & Security > Details, which prompts for the system password. Specify the password and click Modify Settings.
Turn on the CisAgent switches and click OK.
Click Allow when the system prompts to enable network filtering.
In the Privacy & Security tab, click Full Disk Access.
Turn on the EndpointSecurityExtension and CisAgent switches to provide full disk access.
Click the + button if you do not see CisAgent listed.
Click Restart to complete the CIS client installation.
To install the CIS client on a macOS Sequoia workstation:
Open the CISClient.pkg installer to launch the package.
Follow the prompt, read the agreement and click Agree to accept the end-user license agreement.
Click Install. The system prompts for administrator credentials; enter the password and click Install Software > OK to begin the installation.
The CIS client successfully installs within a few seconds.
Click Open System Settings when the system prompts to use a new network extension for CisAgent.
Turn on the CisAgent.app switch to enable the new network extension.
Navigate to System Settings > General > Login Items & Extensions > Endpoint Security Extensions and turn on the CisAgent.app switch to enable endpoint security extension.
In the Privacy & Security tab, click Full Disk Access.
Turn on the CisAgent and EndpointSecurityExtension switches to provide full disk access.
Click the + button if you do not see CisAgent listed.
Click Restart to complete the CIS client installation.
The steps to uninstall the CIS client on a Mac workstation are as follows:
Run the command:
sudo sh /Applications/CisAgent.app/Contents/Resources/Uninstall.sh
Restart the Mac workstation.
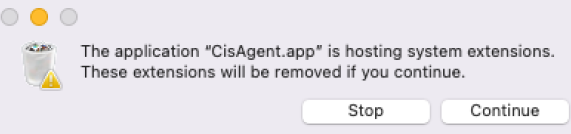
On restarting the machine, go to Application > right-click on CisAgent > Move to Bin. This prompts for a password. On specifying the password, a confirmation message to remove the system extensions is displayed, click Continue. This cleans up the workstation and uninstalls the CIS client.
After uninstalling the CIS client, ensure to restart the Mac workstation. Otherwise, the workstation would still behave as a managed CIS client (accessing and previewing the files uploaded to the cloud).
To view the log messages or activities, do one of the following:
In the console of MAC, search for cisagent.
OR
In the Terminal > enter the following command:
log show --predicate 'processImagePath CONTAINS "CisAgent"' --last 1d > cisclient.log
This saves the past 24 hours of log messages and activities to the cisclient.log file. The --last parameter is customizable, if this parameter is not specified, then all the CIS client log messages and activities are saved to the cisclient.log file.