7.1 Enabling Clusters for Business Continuity
You can enable two to four clusters to form a business continuity cluster. Enable BCC for each Novell Cluster Services cluster that you want to add to the business continuity cluster. When you enable a cluster for BCC, BCC adds an Auxiliary class to its Cluster object that provides the attributes NCC:BCC Peer and NCS:BCC Revision.
-
Log in to iManager as the BCC Administrator user.
-
Ensure that the BCC-specific Identity Manager drivers are running:
-
Go to the Identity Manager page.
-
Select Identity Manager Administration > Identity Manager Overview.
-
Search the eDirectory Container or tree for the BCC-specific Identity Manager drivers.
-
For each driver, click the upper-right corner of the driver icon to see if a driver is started or stopped.
-
If the driver is stopped, start it by selecting Start.
-
-
Go to the Roles and Tasks page.
-
In Roles and Tasks, select Clusters. > My Clusters.
-
In your personalized My Clusters list, select the check box next to the name of the cluster you want to manage.
-
Select Actions > Edit Properties to view the cluster’s properties.
You can also access the cluster properties with the Properties button on the Cluster Options tab when you manage the cluster.
-
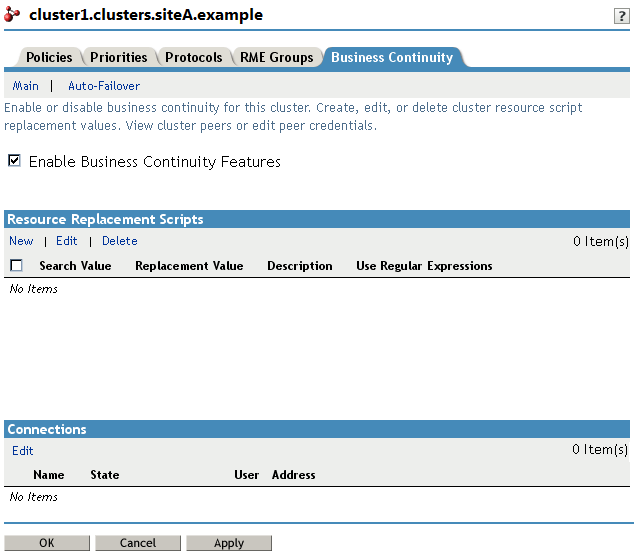
In the Properties dialog box, select the Business Continuity tab.
-
Select the Enable Business Continuity Features check box, then click OK.

-
Click OK when you are prompted to confirm.
A confirmation message is briefly displayed, and a BCC peer connection is added to the Connections table. However, because no credentials have been supplied so far, the connection cannot be established.

-
Repeat Step 5 through Step 9 for each cluster that you want to add to the business continuity cluster.
As additional peer clusters are enabled, the cluster is added in the Connections table.

-
Wait for the BCC Identity Manager drivers to synchronize.
You can use the cluster connections command to list the clusters. The drivers are synchronized when all of the peer clusters are present in the list.
-
Continue with Adding Peer Cluster Credentials.