11.1 File Management
You can create, list, move, change owner, set directory quota, modify attributes, rename, move, delete, list deleted files, salvage, and purge deleted files here.
11.1.1 How to view files and folders?
To view files and folders in a volume, perform the following steps:
-
Click
 and use any one option to select the servers.
-
Click the icon, specify the required server name and select it from the drop-down list to view the available volumes.
-
Click , select the required servers from the tree, and then click .
-
-
Click the Volume to view the files and folders in it.
11.1.2 How to create a new folder?
Ensure to complete the following prerequisites before creating a folder in UMC.
-
Users must have sufficient trustee rights to create folder at selected path.
-
Target path or folder must be in the same tree as the logged-in user.
To create new folder in a volume, perform the following steps:
-
Click
and use any one option to select the servers.-
Click the icon, specify the required server name and select it from the drop-down list to view the available volumes.
-
Click , select the required servers from the tree, and then click .
-
-
Click the volume >
 to create a new folder at folder level.
NOTE:You can perform the same action in a folder to create new sub folder.
-
Specify the new folder name and click .
-
(Optional) Select the newly created folder, click
 > to view the folder details and trustees.
 -
(Optional) Set the directory quota, owner, attributes, and trustees for the selected folder.
11.1.3 How to modify properties of a volume, file, or folder?
To modify the properties of a volume, file, or folder, perform the following steps:
-
Click
and use any one option to select the servers.-
Click the icon, specify the required server name and select it from the drop-down list to view the available volumes.
-
Click , select the required servers from the tree, and then click .
-
-
Select the volume or click the volume to select the required file or folder, click More Options
> .The properties page consists of and tabs.
Details tab
On the tab, you can modify Quota, Created By, and Attributes.
-
: Modify the existing quota in the field, select KB, MB, GB, or TB from the Units drop-down list, and then click .
-
: In this page, you can browse the server and select the required user or group to change the Owner.

-
: Turn on or turn off the toggle switch and click to modify the required attributes.
Trustees tab
On the tab, you can view, add, and remove trustees with option.
-
: This option refresh the list of trustees for the selected volume, file, or folder.
-
: This action guides to right management page to manage trustee rights for the selected volume, file, or folder.
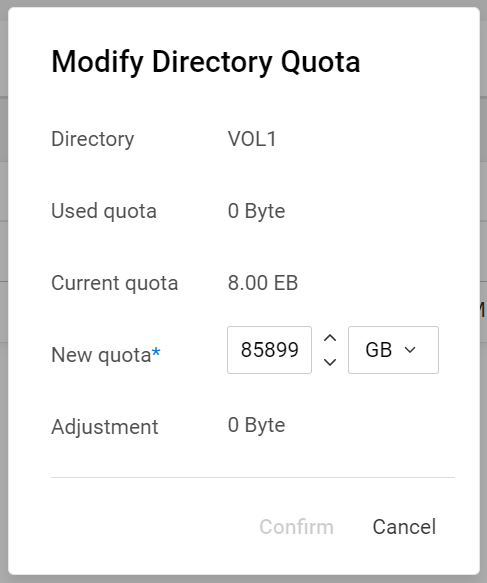
11.1.4 How to modify directory quota of a volume or folder?
The directory quota for a volume or folder is not enabled by default. To modify the directory quota, perform the following steps:
-
Click
and use any one option to select the servers.-
Click the icon, specify the required server name and select it from the drop-down list to view the available volumes.
-
Click , select the required servers from the tree, and then click .
-
-
Select the volume or click the volume to select the required folder, click More Options
> . -
On the tab > , click
 .
. -
In the box, update the new quota details, and then click .
11.1.5 How to modify owner of a volume, file, or folder?
To modify owner of a volume, file, or folder, perform the following steps:
-
Click
and use any one option to select the servers.-
Click the icon, specify the required server name and select it from the drop-down list to view the available volumes.
-
Click , select the required servers from the tree, and then click .
-
-
Select the volume or click the volume to select the required file or folder, click More Options
> . -
On the tab > , click
. -
On the page, browse the server to select the required user or group, and then click .
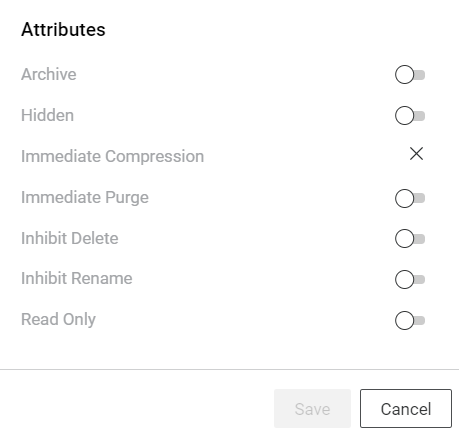
11.1.6 How to modify attributes of a volume, file, or folder?
To modify attributes of a volume, file, or folder, perform the following steps:
-
Click
and use any one option to select the servers.-
Click the icon, specify the required server name and select it from the drop-down list to view the available volumes.
-
Click , select the required servers from the tree, and then click .
-
-
Select the volume or click the volume to select the required file or folder, click
> . -
On the tab > , turn on or turn off the toggle switch, and then click .
11.1.7 How to view deleted files and folders?
To view deleted files and folders, perform the following steps:
-
Click
and use any one option to select the servers.-
Click the icon, specify the required server name and select it from the drop-down list to view the available volumes.
-
Click , select the required servers from the tree, and then click .
-
-
Select the volume or click volume to select the folder in it, click
, and then select .The list displays the deleted files and folders of the selected folder with the related information. You can salvage or purge these deleted files and folders if necessary.
-
: You can restore the deleted files and folders using the option in location.
-
: You can permanently delete the deleted files and folders using the option in location. Purged files and folders cannot be restored.
-
11.1.8 How to delete files and folders?
The deleted files and folders can be restored or permanently deleted from the location if required.
To delete files and folders in a volume, perform the following steps:
-
Click
and use any one option to select the servers.-
Click the icon, specify the required server name and select it from the drop-down list to view the available volumes.
-
Click , select the required servers from the tree, and then click .
-
-
Click volume name to select the required files and folders, click
, and then select . -
Click to delete the selected files and folders.
11.1.9 How to salvage the deleted files and folders?
To salvage or restore the deleted files and folders, perform the following steps:
-
Click
and use any one option to select the servers.-
Click the icon, specify the required server name and select it from the drop-down list to view the available volumes.
-
Click , select the required servers from the tree, and then click .
-
-
Select the volume or click volume to select the folder in it, click
, and then select -
In the list, select the files and folders to restore, and then click .
The salvaged files and folders are restored to their respective locations.
11.1.10 How to purge the files and folders?
To purge or permanently delete the files and folders, perform the following steps:
-
Click
and use any one option to select the servers.-
Click the icon, specify the required server name and select it from the drop-down list to view the available volumes.
-
Click , select the required servers from the tree, and then click .
-
-
Select the volume or click volume to select the folder in it, click
, and then select . -
In the , select the required files and folders to permanently delete, and then click .
The purge permanently deletes the selected files and folders from the volume and cannot be restored.
11.1.11 How to rename a file or folder?
To rename a file or folder, perform the following steps:
-
Click
and use any one option to select the servers.-
Click the icon, specify the required server name and select it from the drop-down list to view the available volumes.
-
Click , select the required servers from the tree, and then click .
-
-
Click volume to select the file or folder in it, click
, and then select . -
Specify the New Name and click .
The list displays the selected file or folder with the new name.
11.1.12 How to move files and folders in a volume?
To move files and folders in a volume, perform the following steps:
-
Click
and use any one option to select the servers.-
Click the icon, specify the required server name and select it from the drop-down list to view the available volumes.
-
Click , select the required servers from the tree, and then click .
-
-
Click volume to select the files and folders in it, click
, and then select . -
In wizard, the File Information page lists the selected files and folders for move, click .
-
In the Target Location page, select the folder to move the selected files and folders, and click .
(Optional) You can click
, specify the new folder name, and click  option to create new destination folder.
 -
In the Summary page, verify the and location, and then click .
NOTE: window is displayed, if the same file name exists in the destination location. To resolve this issue, see How to resolve file move conflicts?.
The selected files and folders are moved to the new target location.
11.1.13 How to resolve file move conflicts?
To resolve file move conflicts, perform the following steps:
-
Click
and use any one option to select the servers.-
Click the icon, specify the required server name and select it from the drop-down list to view the available volumes.
-
Click , select the required servers from the tree, and then click .
-
-
Click volume to select the files and folders in it, click
, and then select . -
In wizard, the File Information page lists the selected files and folders for move, click .
-
In the Target Location page, select the folder to move the selected files and folders, and click .
(Optional) You can click
, specify the new folder name, and click option to create new destination folder. -
In the Summary page, verify the and location, and then click .
Note: If the same file or folder names exists in the target location, window is displayed.
-
In the window, is selected as default, specify the or to rename all the conflicting files and folders.
You can also use to replace the conflicting files and folders or to ignore them.
-
Click to finish the process.