10.2 Creating a DST Shadow Volume with NSS Volumes
A DST shadow volume links two NSS volumes. Typically, one of the volumes contains data and one is newly created. For information about how to create NSS volumes, see the OES 2023: NSS File System Administration Guide for Linux.
This section describes how to create unshared DST shadow volumes. For information about using shared NSS volumes to create a shared DST shadow volume in a cluster environment, see Section 16.0, Configuring DST Shadow Volume Pairs with OES Cluster Services.
IMPORTANT:The following procedures use VOL1 for the primary storage area, and ARCVOL as the secondary storage area. Ensure that you substitute the actual names of the NSS volumes you are using in each of the steps.
10.2.1 Checking the Availability of an NSS Volume for Primary
Ensure that the volume you want to use as the primary is available and mounted.
-
Open OES Remote Manager for Linux in a web browser, then log in to the DST server as the root user.
-
Select View File System > Dynamic Storage Technology Options to view a list of mounted volumes.
-
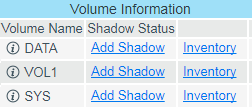
On the Dynamic Storage Technology page, ensure that the NSS volume that you want to use as the primary volume appears in the Volume Information list with a status of Add Shadow.

If it is listed and mounted, continue with Checking the Availability of an NSS Volume for Secondary.
Otherwise, the NSS volume might be unmounted, or its NCP/NSS bindings might be disabled.
-
Select Manage NCP Services > Manage Shares to view a list of active volumes, then do one of the following:
Volume
Status
Action
Listed
Not mounted

Click the Mount button next to the volume name, then continue with Checking the Availability of an NSS Volume for Secondary.
Not listed
Unknown
Click NCP/NSS Bindings to view the Available NSS Volumes list, then check to see if the volume is listed.
Listed: Continue with Step 5.
Not Listed: Continue with Step 6.
-
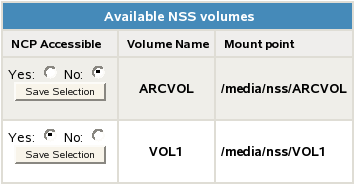
If the volume is in the Available NSS Volumes list and its NCP Accessible value is set to No, the volume’s NCP/NSS binding is disabled.
-
Volume is in use as a secondary in a DST volume pair: The most likely reason for the setting to be disabled is that the volume is already being used as the secondary volume in another shadow volume. If the volume is used in a DST pool cluster resource, the volume’s setting might appear in the list even when its resource is offline on the selected node. Because the volume is already used as a secondary volume, it cannot be used a primary volume. Return to Step 1 and begin again.
-
Volume was recently unlinked from another DST volume pair: If you are certain that the volume is not being used as the secondary volume in another DST shadow volume pair, you can enable the NCP/NSS Bindings setting:
-
Select Yes in the NCP Accessible column for the NSS volume, then click Save Selection to save and apply the change.
-
If the volume is not automatically mounted, select Manage NCP Services > Manage Shares to view the Volume Information list, then click the Mount button next to the volume name to mount it.
-
Continue with Checking the Availability of an NSS Volume for Secondary.
-
-
-
If the volume does not appear in the Volume Information list, and it does not appear on the NCP/NSS Bindings page in the Available NSS Volumes list, the volume’s pool is deactive or its pool cluster resource is offline.
Exit OES Remote Manager, then use NSS tools to activate the pool and mount the volume, or bring the pool cluster resource online. When the volume is mounted, return to Step 1 and begin again.
-
Continue with Section 10.2.2, Checking the Availability of an NSS Volume for Secondary.
10.2.2 Checking the Availability of an NSS Volume for Secondary
Ensure that the secondary volume is available and mounted.
-
Open OES Remote Manager for Linux in a web browser, then log in to the DST server as the root user.
-
Select View File System > Dynamic Storage Technology Options to view a list of mounted volumes.
-
On the Dynamic Storage Technology page, ensure that the NSS volume that you want to use as the secondary volume appears in the Volume Information list with a status of Add Shadow.
The secondary volume must be mounted in NCP in order to perform the next step.
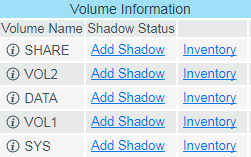
For example, the volume SHARE is the NSS volume that is planned to be used for the secondary volume. The volume is in the Volume Information list with a Shadow Status value of Add Shadow.

-
Continue with one of the following, depending on whether the secondary volume contains data:
Primary NSS Volume
Secondary NSS Volume
Continue with
New, empty volume
New, empty volume
Section 10.2.4, Disabling the NCP/NSS Bindings for the Secondary Volume
Existing volume
New, empty volume
Section 10.2.4, Disabling the NCP/NSS Bindings for the Secondary Volume
New, empty volume
Existing volume
10.2.3 Using an Existing Volume as Secondary
In a typical DST shadow volume, either both volumes are new, or the primary volume contains data and the secondary volume is empty. However, you can also use a new volume as primary and an existing volume as secondary.
When you create the DST volume, two default behaviors govern how the trustees and directory structure are replicated on the secondary volume.
-
DST automatically synchronizes the trustee database from the primary volume to the secondary volume.
-
The global policy for the REPLICATE_PRIMARY_TREE_TO_SHADOW parameter determines when the file tree structure is replicated from the primary volume to the secondary volume.
The default behavior is designed to handle the typical pair configurations. When the secondary volume contains the data, the existing trustees are overwritten when the trustees database is synchronized from the new primary volume. Instances of the directories are created on the primary volume as files are moved from the secondary volume to the primary volume. Empty directories are not replicated to the primary, so the file structure on the primary is not an exact match of the secondary.
This section describes some techniques you can use to get the existing volume’s trustees settings and file tree structure to the primary volume:
Manually Copying the Trustees Database to the New Volume
If the primary volume is a new empty volume, the trustee synchronization that occurs when you first link the volumes effectively removes the trustee settings on the existing volume. As a result, you must reconfigure trustees, trustee rights, and inherited rights from the merged view. If the secondary volume is the one with data, you should copy its existing trustee database to the primary volume before you create the shadow volume relationship. Then when the volumes are linked, the existing settings are used for the DST volume pair.
For all NCP volumes (NSS and NCP on Linux POSIX volumes), the trustee information is obtained at volume mount time from the ._NETWARE/.trustee_database.xml file. For an NSS volume, the Linux path to the file is /media/nss/volume_name/._NETWARE/.trustee_database.xml.
Before you create a DST shadow volume pair with a new volume as primary and an existing volume as secondary:
-
In OES Remote Manager, log in as the root user.
-
Do not allow users to access the volumes while you perform the following steps.
-
Select Manage NCP Services > Manage Shares to view a list of active volumes.
-
Dismount the two NSS volumes that you will be using for the DST shadow volume pair from NCP Server by selecting the Unmount button next to each volume.
This dismounts the volumes from NCP, but they are still mounted by NSS.
-
In a file browser, rename or delete the /media/nss/primary_volume_name/._NETWARE/.trustee_database.xml file on the primary volume.
-
Open a terminal console as the root user, then copy the trustee database file from the secondary volume location to the primary volume location by entering the following at a terminal console prompt:
cp /media/nss/secondary_volume_name/._NETWARE/.trustee_database.xml /media/nss/primary_volumename/._NETWARE/.trustee_database.xml
For example:
cp /media/nss/ARCVOL/._NETWARE/.trustee_database.xml /media/nss/VOL1/._NETWARE/.trustee_database.xml
-
Select Manage NCP Services > Manage Shares to view a list of active volumes.
-
Mount the primary volume and secondary volume for NCP Server by selecting the Mount button next to each volume.
-
At the terminal console prompt, enter the following command to synchronize the NSS trustee information that is now on the primary volume with NCP Server:
ncpcon nss resync=primary_volumename -
Continue with Section 10.2.4, Disabling the NCP/NSS Bindings for the Secondary Volume.
Manually Copying the Trustees Database to the New Volume and Replicating the Secondary File Tree Structure to the Primary
You can use the following procedure to copy the trustees database to the new volume before you create a DST shadow volume pair with the existing volume as secondary, and then replicate the secondary file tree structure to the primary volume after you create the pair.
-
Before you create the DST shadow volume pair, copy the trustees database from the existing volume to the new volume as described in Manually Copying the Trustees Database to the New Volume.
-
After you create the DST shadow volume pair, replicate the secondary file tree structure to the primary volume as described in Section 10.4, Replicating the Secondary File Tree Structure to the Primary Volume.
Getting DST to Copy the Trustees Database and Replicate the File Tree Structure to the New Volume
You can use the procedure in this section to get the both the trustees database and the file tree structure from an existing volume to a new volume before configuring the existing volume as secondary.
These instructions use OLDVOL1 and NEWVOL1 for the volume names. Modify the commands as needed to use the actual volume names on your system.
-
Log in to the server as the root user, then open a terminal console.
-
In OES Remote Manager, enable the REPLICATE_PRIMARY_TREE_TO_SHADOW global policy that allows the file tree structure to be replicated automatically from the primary to the secondary when the DST pair is created.
For information, see Section 7.1, Replicating Branches of the Primary File Tree in the Secondary File Tree.
-
Temporarily set up a DST shadow volume pair with the old volume as primary and the new volume as secondary. Do not allow users to access the volumes at this time.
For information, see Section 10.2.4, Disabling the NCP/NSS Bindings for the Secondary Volume and Section 10.2.5, Adding a Shadow to the Primary NSS Volume (Linking the NSS Volumes).
When you create the shadow volume pair, the .trustee_database.xml file is automatically copied from the primary volume (/media/nss/OLDVOL1/._NETWARE/.trustee_database.xml) to the secondary volume (/media/nss/NEWVOL1/._NETWARE/.trustee_database.xml), and the settings are synchronized with NCP Server.
The entire file tree structure of the old volume is replicated to the new volume. This can take a few minutes to an hour, depending on the number of directories and depth of the structure.
-
As the root user, open the /media/nss/NEWVOL1/._NETWARE/.trustee_database.xml file in a text editor, visually verify that it now contains trustees information from the old volume, then close the file.
-
Remove the DST shadow relationship between the two volumes.
For information, see Section 10.12, Removing the Shadow Relationship for a Non-Clustered DST Shadow Volume.
-
Continue with Section 10.2.4, Disabling the NCP/NSS Bindings for the Secondary Volume.
10.2.4 Disabling the NCP/NSS Bindings for the Secondary Volume
-
Open OES Remote Manager for Linux in a web browser, then log in to the DST server as the root user.
-
Select View File System > Dynamic Storage Technology Options to view a list of mounted volumes.
-
Select Manage NCP Services > Manage Shares, then click NCP/NSS Bindings.
-
In the Available NSS Volumes list, select No in the NCP Accessible column for the NSS volume that you want to use as the secondary volume.

-
Click Save Selection to save and apply the change.
-
Go to the Dynamic Storage Technology page, and verify that the secondary volume (for example, ARCVOL) is no longer listed.
-
Continue with Section 10.2.5, Adding a Shadow to the Primary NSS Volume (Linking the NSS Volumes).
10.2.5 Adding a Shadow to the Primary NSS Volume (Linking the NSS Volumes)
-
Open OES Remote Manager for Linux in a web browser, then log in to the DST server as the root user.
-
Use one of the following methods to go to the volume’s Share Information page of the NSS volume that you want to use as the primary storage area.
-
Select View File System > Dynamic Storage Technology Options to go to the Dynamic Storage Options page, then click the Add Shadow link next to the volume name of the NSS volume.
For example, click the Add Shadow link for VOL1.

-
Select Manage NCP Services > Manage Shares to open the Manage Shares page, then click the Information (
 ) icon next to the volume name of the NSS volume.
-
-
On the volume’s Share Information page, scroll down to the Volume Tasks area, then click Add Shadow Volume.

-
Specify the following information for the secondary storage area for the DST shadow volume, then click Create to define the shadow volume.

-
Shadow Path: Type the Linux path for the NSS volume that you want to use as the secondary storage area. The default Linux path where NSS volumes are mounted is /media/nss/volumename.
For example, to specify the NSS volume named ARCVOL as the secondary storage area, type /media/nss/ARCVOL in the Shadow Path field.
-
Create if not present: For NSS volumes, the volume must already exist. Ensure that this option is deselected (not checked) when shadowing NSS volumes.
IMPORTANT:This option is a placeholder for future capabilities to support shadow volumes for NCP volumes on Linux POSIX file systems (such as Ext3, Reiser, and XFS).
-
-
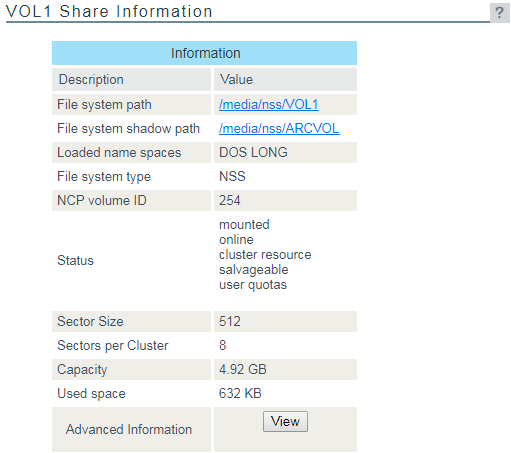
On the volume’s Share Information page, ensure that the File System Shadow Path information shows the shadow path you specified in Step 4.

-
Select View File System > Dynamic Storage Technology Options to go to the Dynamic Storage Options page, then verify that the Shadow Status for the volume is set to Shadowed and the View Log link is available.
-
Continue with Section 10.2.6, Moving Data between the Two Volumes.
10.2.6 Moving Data between the Two Volumes
-
In OES Remote Manager, select View File System > Dynamic Storage Technology Options to go to the Dynamic Storage Options page, then create one or multiple shadow volume policies for the shadow volume.
Shadow volume policies can be configured to move files according to the time since the file was last modified, accessed, or changed; by file names; by file types; or by file size. You can schedule policies to run automatically, or you can run them on demand.
For information about creating and scheduling shadow volume policies, see Section 11.0, Creating and Managing Policies for Shadow Volumes.
-
(Optional) Move selected data on demand by running customized inventory reports, then using the inventory detail reports to move selected files to either volume according to the time since the file was last modified, accessed, or changed; by file names; by file types; or by file size.
For information, see Section 13.5, Using Inventory Detail Reports to Move, Copy, or Delete Files on the Shadow Volume.