6.5 Creating a BCC Driver for a BCC Driver Set
Repeat the following process for each driver that you want to add to a BCC driver set:
-
In iManager, click Identity Manager Administration > Identity Manager Overview.
-
Select the search Icon to locate the driver set and select it to which you have assigned the driver set in the peer cluster.
-
On the Driver Set Overview page, select the driver set, click Drivers, then click Add driver from the drop-down menu.

-
On the Import Configuration page, specify where you want to place the new driver. Select In an existing driver set, verify that the driver set is the one you preselected, then click Next.

-
Import the BCC Cluster Resource Synchronization template.
The template contains the configuration required to create a BCC driver when applied to the eDirectory driver. It is installed as an Identity Manager template as part of the BCC installation process on the Identity Manager node.
-
Browse to select the Identity Manager node in the cluster, then click Next.
-
Open the Show drop-down menu and select Configurations not associated with an IDM version.
-
Open the Configurations drop-down menu and select the BCCClusterResourceSynchronization.xml file.

-
Click Next.
-
-
On the BCC Cluster Sync page, specify the driver information.
Each field contains an example of the type of information that should go into the field. Descriptions of the information required are also included with each field.
-
Driver name: For this driver instance, specify a unique name to identify its function.
The default name is BCC Cluster Sync. We recommend that you indicate the source and destination clusters involved in this driver, such as Cluster1 to Cluster2 BCC Sync.
-
Name of SSL Certificate: Specify a name for the certificate, such as Cluster1 to Cluster2 BCC Sync. The certificate is created later in the configuration process, after you have created the driver instance. (See Creating SSL Certificates.)
If you specify the SSL certificate that was created when you installed OES, you do not need to create an additional SSL certificate later.
-
DNS name of the other IDM node: Specify the DNS name or IP address of the Identity Manager server in the destination cluster for this driver instance. For example, type 10.10.20.21 or type node1.cluster2.clusters.siteB.example.
-
Port number for this connection: You must specify unique TCP port numbers for each driver instance for a given connection between two clusters. The default port number is 2002 for the cluster resource synchronization.
You must specify the same port number for the same template in the destination cluster when you set up the driver instance in that peer cluster. For example, if you specify 2003 as the port number for the resource synchronization driver instance for Cluster1 to Cluster 2, you must specify 2003 as the port number for the Cluster2 to Cluster1 resource synchronization driver instance for the peer driver you create on Cluster2.
-
Distinguished Name (DN) of this cluster: Browse to select the Cluster object for this cluster. For example, cluster1.clusters.siteA.example. The container name is case-sensitive, so it is best to browse for this name.
-
Distinguished Name (DN) of the landing zone container for this cluster: Browse to select the landing zone container where the cluster pool and volume objects in the other cluster are placed when they are synchronized to this cluster. The NCP server objects for the virtual server of a BCC-enabled resource are also placed in the landing zone. The container name is case-sensitive, so it is best to browse for this name.
-
-
Click OK.
The BCC Cluster Resource Synchronization template is imported and merged with the information to create the driver.
This can take a couple of minutes. Be patient and do not interrupt the process. Do not continue until it is complete.

-
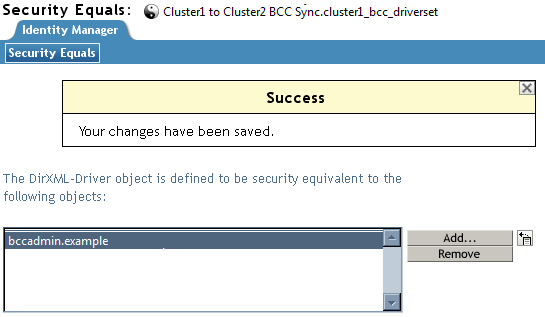
Make the Driver object security equivalent to the BCC Administrator User object.
The driver needs to have sufficient eDirectory rights in the Cluster context to create, delete, or modify objects related to BCC-enabled cluster resources. This is achieved by making the driver security equivalent to the BCC Administrator user.
-
On the confirmation page for the driver, click Define Security Equivalences.
-
Click Add.
-
Browse to select the BCC Administrator User object, then click OK.
-
Click Next.
The wizard confirms the equivalence of the driver to the selected BCC Administrator user.

-
Do not exclude administrator roles. Click Next.
In a BCC environment, there is no need to exclude administrator roles.
-
Review the summery of the driver configuration, then click Finish.
-
-
Verify that the Driver object is set as the security equivalent of the BCC Administrator user.
-
In iManager, select Directory Administration > Modify Object.
-
Browse to select the BCC Administrator User object, then click OK.
-
Click OK to view the properties of the selected user, then select the Security tab.
-
On the Security Equal to Me page, verify that the Driver object appears in the Equivalent to Me list.

-
Click Cancel to abandon the Modify Object task.
-
-
Repeat Step 1 through Step 8 above on the peer clusters in your business continuity cluster.
This includes creating a new driver and driver set for each cluster.
-
After you have configured the BCC drivers on the IDM node in each peer cluster, you must upgrade the drivers to the Identity Manager 4.8.
-
In iManager, click Identity Manager, then click Identity Manager Overview.
-
Search for the driver sets that you have added, then click the driver set link to bring up the Driver Set Overview.
-
Click the red Cluster Sync icon, and you should be prompted to upgrade the driver.
-