Dynamically Change the User Interface
You can dynamically show or hide user interface controls or change the actions associated with the controls.
If you prefer to run macros in pre-configured sessions instead of creating your own sessions, you can download the VBA Sample Sessions and open the dynamically-change-the-ui.rd3x (IBM) and dynamically-change-the-ui.rdox (Open Systems) files. The download package contains everything you need to run the macros in these files. See Download the VBA Sample Sessions.
You can show or hide controls based on user credentials or display them only for certain screens.
Display Controls Only for Certain Users
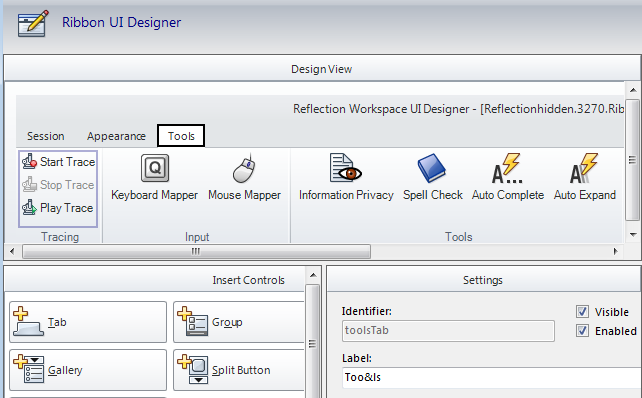
Lets' take a look at how to hide the Tools tab on the InfoConnect ribbon from users and display it only for administrators.
Note: You can manipulate any control that is configured with the UI Designer. InfoConnect does not provide programmatic access to other controls.
To create a macro that displays controls for administrators
Before you open Visual Basic, you'll need to get the identifier for the control you want to access in the InfoConnect UI Designer.
- Open a session in the InfoConnect workspace and then, on the Appearance tab, select UI Designer.
- In the InfoConnect UI Designer window, select the control you want to work with (for our example, we'll select the Tools tab).

- Note the identifier in the Settings pane. We'll use the "toolsTab" identifier to get access to this control in our macro.
- On the Session tab, select Visual Basic to open the Visual Basic Editor.
- Enter the following code into the ThisIbmTerminal or ThisTerminal (for Open Systems) code window.
| Display controls only for administrators |
Copy Code
|
Private Declare Function IsUserAnAdmin Lib "shell32" () As Long

Private Sub IbmTerminal_BeforeConnect(ByVal sender As Variant)
    Dim ui As UiMode
    Dim control As UiControl
    Dim userProfile As String
    Dim position As Long

    'Get the UiMode object that contains the controls for the active view.
    Set ui = ThisFrame.SelectedView.UiMode
    'Get the control. The control ID is displayed in the Identifier field on the UI Designer.
    Set control = ui.GetControlById("toolsTab")
    'Hide the tools tab unless the user is an admin
    If IsUserAnAdmin = 1 Then
        control.Visible = True
    Else
        control.Visible = False
    End If
End Sub
|
To run this sample
- Disconnect and then reconnect the session to hide the Tools tab.
- Open a Windows command prompt as an administrator, and then enter the following command to open InfoConnect.
Attachmate.Emulation.Frame.exe
- Open the session.
The Tools tab is displayed.
| Display controls only for administrators |
Copy Code
|
Private Declare Function IsUserAnAdmin Lib "shell32" () As Long
Private Function Terminal_Connecting(ByVal sender As Variant, ByVal ConnectionID As Long, ByVal connnectionType As Attachmate_Reflection_Objects_Emulation_OpenSystems.ConnectionTypeOption, ByVal connectionSettings As Variant) As Boolean
    Dim ui As UiMode
    Dim control As UiControl
    Dim userProfile As String
    Dim position As Long

    'Get the UiMode object that contains the controls for the active view.
    Set ui = ThisFrame.SelectedView.UiMode

    'Get the control. The control ID is displayed in the Identifier field on the UI Designer.
    Set control = ui.GetControlById("toolsTab")

    'Hide the tools tab unless the user is an admin
    If IsUserAnAdmin = 1 Then
        control.Visible = True
    Else
        control.Visible = False
    End If

    Terminal_Connecting = True

End Function
|
To run this sample
- Disconnect and then reconnect the session to hide the Tools tab.
- Open a Windows command prompt as an administrator, and then enter the following command to open InfoConnect.
Attachmate.Emulation.Frame.exe
- Open the session.
The Tools tab is displayed.
Show or Hide Controls on Specific Screens
You can dynamically show or hide user interface controls as screens change.
In this example, we'll create an InfoConnect demo session that displays a button that runs a macro only when a specific screen is recognized and hides the button on other screens.
To create a macro that shows or hides controls
- Open InfoConnect and create a demo session as follows:
- For an Ibm session, select Ibm3270 terminal and enter "demo:ibm3270.sim " in the Host name /IP address field.
- For an Open Systems session, select Vt terminal and enter "demo:UNIX" in the Host name /IP address field.
- Open the Visual Basic Editor, insert a code module, and copy the following code into the module.
| Print out some text on the screen |
Copy Code
|
'This macro gets a string from the screen and prints it to the Immediate window
Sub CopyData()
    Dim Data As String
    Data = ThisIbmScreen.GetText(13, 9, 69)
    Debug.Print Data
End Sub
|
| Print out some text on the screen |
Copy Code
|
'This macro gets the data above the Command prompt and displays it in a message box
Sub CopyData()
    Dim Data As String
    Data = vbCrLf & vbCrLf & Trim(ThisScreen.GetText2(1, 24, 19, 57))
    MsgBox Data

End Sub
|
- On the Appearance tab, select UI Designer.
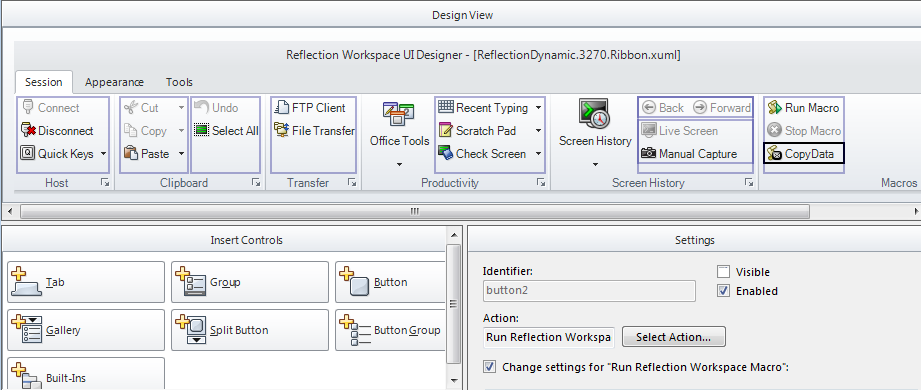
- In the UI Designer window, select the Session tab and then select the Macros group.
- Under Insert Controls, select Button.
- In the Settings pane, click Select Action to open the Select Action dialog box.
- In the Action list, select Run InfoConnect Workspace Macro, and then choose the Select Macro option.
- Select the CopyData macro.
- Back in the UI Designer Settings pane, unselect Visible.
- Note the Identifier for the button ("button2") displayed in the Settings window.

- Close the UI Designer and when you are prompted, save the custom UI file.
Note: The active session is automatically configured to use this custom UI file but you'll need to configure any other sessions to use this file instead of the default built-in. You'll also need to deploy the custom file to your users.
- Back in the Visual Basic editor, enter the following code into the ThisIbmScreen or ThisScreen (for Open Systems) code window.
| Show or hide control |
Copy Code
|
Private Sub IbmScreen_NewScreenReady(ByVal sender As Variant)
   Dim ui As UiMode
   Dim control As UiControl
   Dim screenID As String

   'Get the UiMode object that contains the controls for this view.
   Set ui = ThisView.UiMode

   'Get the control. The control ID is displayed in the Identifier field on the UI Designer.
   Set control = ui.GetControlById("button2")

   'Get the text to identify the screen
   screenID = Trim(ThisIbmScreen.GetText(1, 25, 13))

   Debug.Print screenID
   'When the appropriate screen is ready, make the control visible
   If screenID = "INTERNATIONAL" Then
      control.Visible = True
   Else
      control.Visible = False
   End If
End Sub
|
To run this sample
- After you add the button and the macro as shown above, close and reopen the session and use any credentials to log in.
- On the next screen, enter "kayak" .
The button should be visible on the ribbon, in the Macros Group.
- Press F3 to return to the previous screen.
The button should is not visible on this screen.
| Show or hide control |
Copy Code
|
Private Sub Screen_ControlKeySent(ByVal sender As Variant, ByVal Key As Attachmate_Reflection_Objects_Emulation_OpenSystems.ControlKeyCode)

    Dim ui As Attachmate_Reflection_Objects.UiMode
    Dim control As Attachmate_Reflection_Objects.UiControl
    Dim Screen As Attachmate_Reflection_Objects_Emulation_OpenSystems.Screen
    Dim Terminal As Attachmate_Reflection_Objects_Emulation_OpenSystems.Terminal
    Dim rCode As ReturnCode

    'Get the UiMode object that contains the controls for this view.
    Set ui = ThisView.UiMode

    'Get the control. The control ID is displayed in the Identifier field on the UI Designer.
    Set control = ui.GetControlById("button2")

    'Get the Screen and terminal variables.
    Set Terminal = ThisFrame.SelectedView.control
    Set Screen = Terminal.Screen

    'Wait for the string returned on the screen that has the data, with a timeout of 3000 ms.
    'This string is from the recorded macro code.
    rCode = Screen.WaitForString2("Command> ", 3000)

    'Show or hide the control
    If rCode = 1 Then
        control.Visible = True
    Else
        control.Visible = False
    End If

End Sub
|
To run this sample
- After you add the button and the macro as shown above, close and reopen the session and use any credentials to log in.
- Select the session tab.
- At the demo> prompt, enter "demodata".
The button is visible on the ribbon, in the Macros Group.
- Save the session and close it.
Concepts
These samples use events to control macro execution. The first sample handles the BeforeConnect (IBM) and Connecting (Open Systems) events to set the visibility of the control when the session connects. The second sample handles the NewScreenReady (IBM) and AfterControlKeySent (Open Systems) events to show or hide a control when a specific screen is recognized. For more about handling events and using screen recognition to control macros, see Using InfoConnect Events and Controlling Macro Execution.
These samples show how to show or hide the control. Another option is to enable or disable ("gray out") the control.
'When the appropriate screen is ready, enable the control
If screenID = "INTERNATIONAL" Then
     control.Enabled = True
Else
     control.Enabled = False
End If