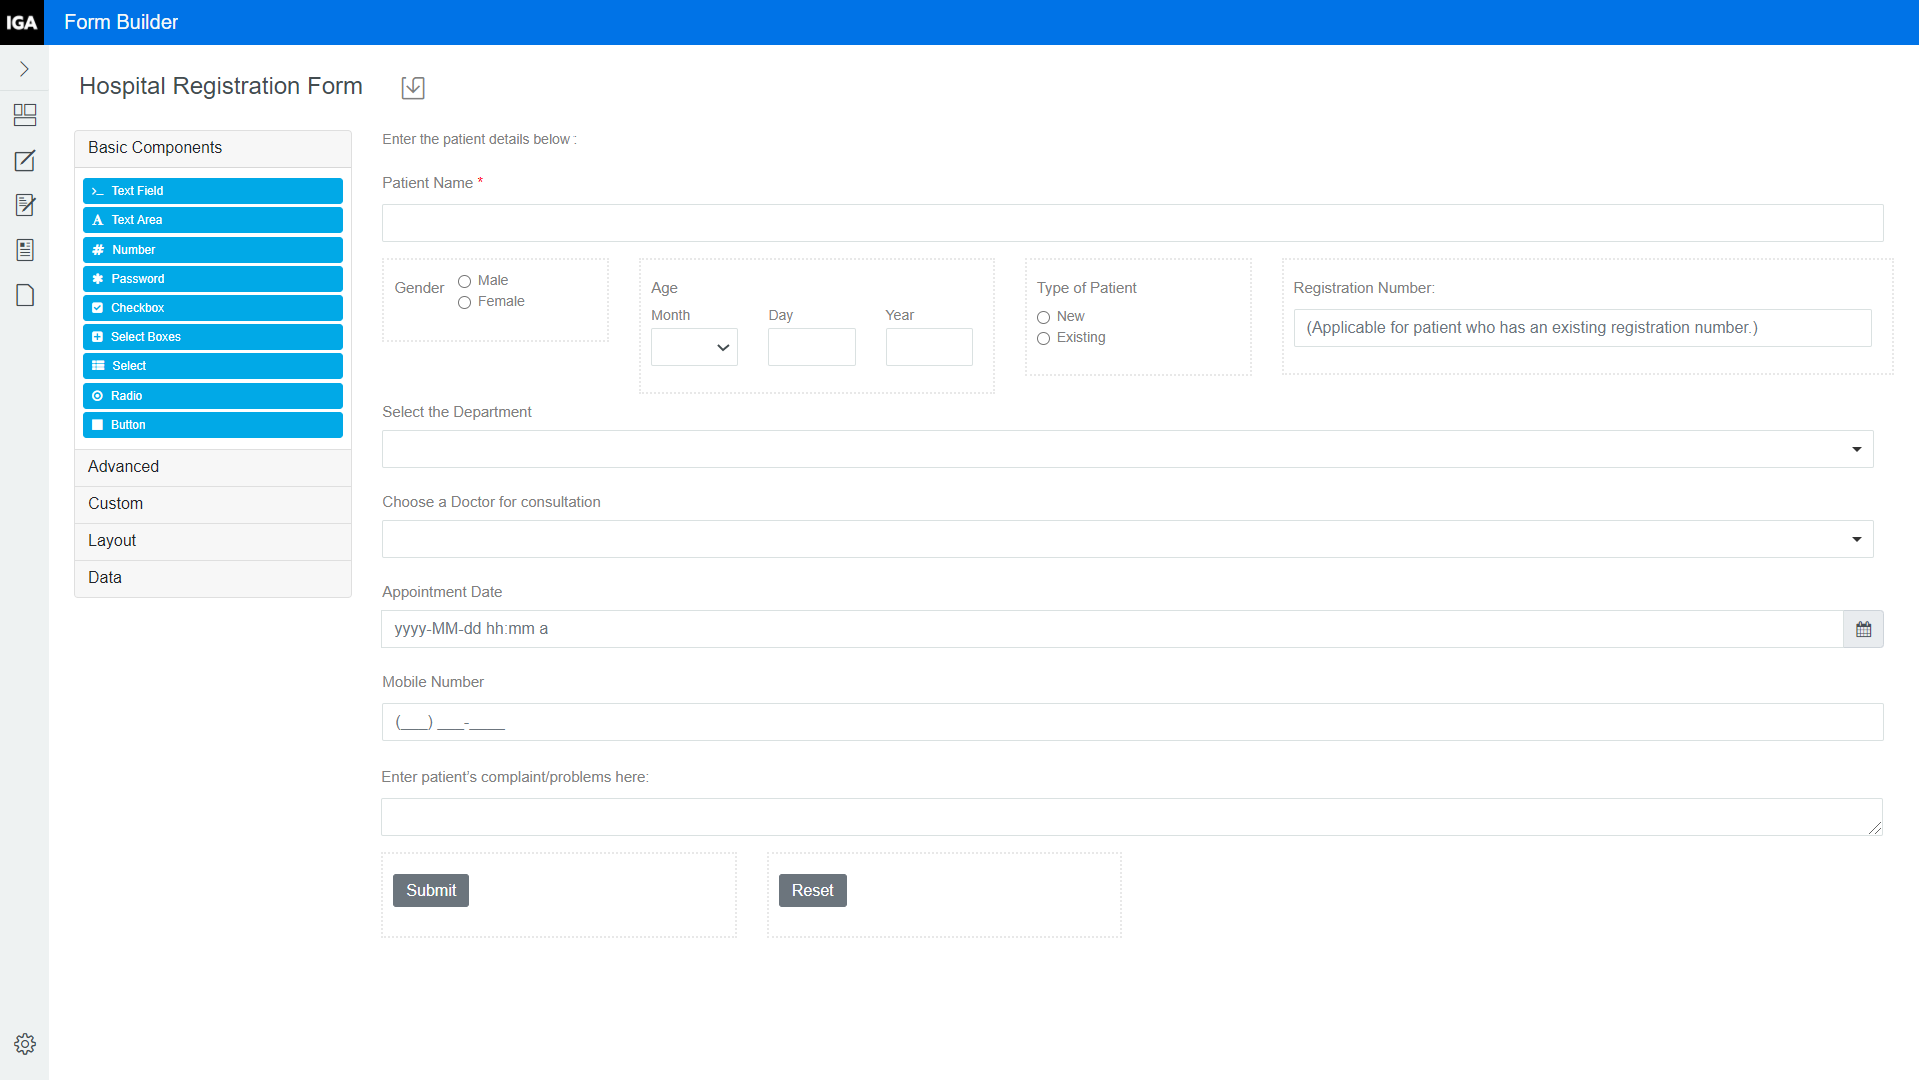
A.1 Example of Creating a Form
This section provides details about creating a form using an example. The following example explains the process of creating a hospital registration form that patients use for requesting an appointment with a Doctor.
The approval form can be created using the instructions mentioned in Creating a Custom Approval Form.
Let us discuss the widgets required to design the following hospital registration form.

Select the required widgets, drag and drop them into the workspace, and configure the settings. The following table lists the components and settings used to create the registration form:
|
Field Name |
Component/Widget Used |
Settings |
Reference |
|---|---|---|---|
|
Enter the patient details below |
Label Element (Custom) Used to add a non-editable, information-only field in the form. |
|
For more information, see Label Element. |
|
Patient Name |
Text Field (Basic) Used to provide a text input field in the form. |
|
For more information, see Text Field. |
|
- |
Columns (Layout) Used to split an area in the form into columns. Define the properties for each column, as required. Drag and drop components into each column to add fields in the form. |
By default, the Columns component splits an area into two columns. On the Display tab, click Add Column twice to add a third and fourth column. Change the Width of the columns depending on the fields to be added. Each of these four columns will be used to add the following fields in the form:
|
For more information, see Columns. |
|
Gender |
Radio (Basic) Used to provide a list of two or more options that are mutually exclusive. The user will be allowed to select only one option from the list. |
|
For more information, see Radio. |
|
Age |
Day (Advanced) Used to allow the user to input their date of birth in month, day, and year format. |
On the Display tab, type Age in the Label field. |
For more information, see Day. |
|
Type of patient |
Radio (Basic) Used to provide a list of two or more options that are mutually exclusive. The user will be allowed to select only one option from the list. |
|
For more information, see Radio. |
|
Registration Number |
Number (Basic) Used to restrict the user to input a numerical value. |
|
For more information, see Number. |
|
Select the Department |
Select (Basic) Used to provide values that will display as options in a drop-down list for selection. |
|
For more information, see Select. |
|
Choose a Doctor for Consultation |
Select (Basic) Used to provide values that will display as options in a drop-down list for selection. |
|
For more information, see Select. Values populated in Choose a Doctor for Consultation field depend on the user selection in the Select the Department field. Use the JS Editor to define the logic to calculate the value in this field. For more information, see Editing the Hospital Registration Form Using JS Editor. |
|
Appointment Date |
Date/Time (Advanced) Used to allow the user to input either a date or a time or both, as desired. |
On the Display tab, type Appointment Date in the Label field. |
For more information, see Date/Time. |
|
Mobile Number |
Phone Number (Advanced) Used to allow the user to enter a phone number in the form. |
On the Display tab, type Mobile Number in the Label field. |
For more information, see Phone Number. |
|
Enter patient’s complaint/problems here |
Text Area (Basic) Used to provide a multi-line input field in the form that enables the user to enter longer text. |
|
For more information, see Text Area. |
|
Submit |
Button (Basic) Used to perform actions within the form. |
On the Display tab, type Submit in the Label field and select the Action as Submit. |
For more information, see Button. |
|
Reset |
Button (Basic) Used to perform actions within the form. |
On the Display tab, type Reset in the Label field and select the Action as Reset. |
For more information, see Button. |
|
HINT:Each component has a Preview area on the right hand side that displays how the form would render when you make the changes or edits to any field. |
|||
You can create or make edits to an existing form using the JSON or JS editor. For more information about using the JSON Editor, see Editing a Form in the JSON Editor.
Editing the Hospital Registration Form Using JS Editor
In the hospital registration form, the Select the Department and Choose a Doctor for Consultation fields have to be designed in such a way that the options listed in the Choose a Doctor for Consultation field depends on what the user selects in the Select the Department field. This operation can be achieved using the JS Editor, which enables you to write logic to change the custom default value and to calculate the value of the component.
To define the logic for the Choose a Doctor for Consultation field:
-
Click
 in the Form Builder.
 -
Define the values to return for the getDoctors object as follows:
function getDoctors() { return [ {department: 'cardiology', doctors : ['Dr. Adam Hasting','Dr. Raymond Chase']}, {department: 'neurology', doctors : ['Dr. Robert Calling','Dr. Homes']}, {department: 'oncology', doctors : ['Dr. Steve Lambart','Dr. Shyama Mukerjee']}, {department: 'obstetrics', doctors : ['Dr. Daniel Cruise','Dr. Angelika Sun']}, {department: 'gynecology', doctors : ['Dr. Katie Homes','Dr. Ludwig Cunnings']} ] } -
Click
 to verify the behavior of the two form fields and preview how the final form would appear after rendering.
 -
Click
 on the Home screen.