2.4 Initial Configuration of Filr Appliances
After you have deployed the appliances and set a few basic system settings, such as passwords, you must perform an initial appliance configuration. The process varies, depending on which deployment scenario you are implementing.
2.4.1 Small Filr Deployment Configuration
Starting and configuring an all-in-one Filr appliance is quite straightforward, as illustrated in Figure 2-9 and explained in the table that follows it.
Figure 2-9 Configuring an All-in-One Filr Appliance

|
Letter |
Details |
|---|---|

|
Access and configure the Filr appliance through a browser. |

|
Log in to the administration console. |

|
Run the configuration wizard. When you finish, your all-in-one appliance is running and ready to provide Filr services. |
For more information, seeAll-in-One (Small) Deployment—Creating
in the OpenText Filr 23.4: Installation, Deployment, and Upgrade Guide.
2.4.2 Large Filr Deployment Configuration
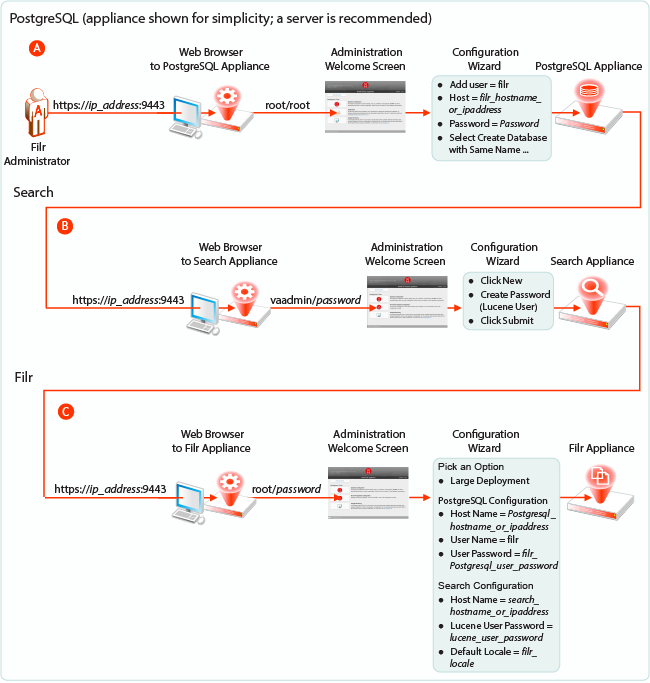
Starting and configuring the appliances for a large deployment is more involved than for a single appliance. However, the process is well documented and also very straightforward, as illustrated in Figure 2-10 and explained in the table that follows it.
Notice that the order of working with the three appliance types is reversed from the order in Figure 2-8.
Figure 2-10 Configuring Separate Appliances

|
Letter |
Details |
|---|---|

|
First, access and configure your database server as outlined in When you finish this step, your database is ready to provide services to the Filr appliance. |

|
Second, access and configure the Search appliances through a browser, logging in to the administration console, and running the configuration wizard. When you finish this step, your Search appliances are running and ready to provide indexing services for Filr. For details, see |

|
Finally, access and configure the Filr appliance through an administrative browser, logging in to the administrative console, and running the configuration wizard. For more information, see |
For more information, seeCreating an Expandable Filr Deployment
in the OpenText Filr 23.4: Installation, Deployment, and Upgrade Guide.