Creating the Target Group for Port 3000
- Using the Find Services search tool, locate and browse to the EC2 Dashboard.
- In the left navigation panel, under Load Balancing, click Target Groups.
- On the Target Groups management page, click Create target group.
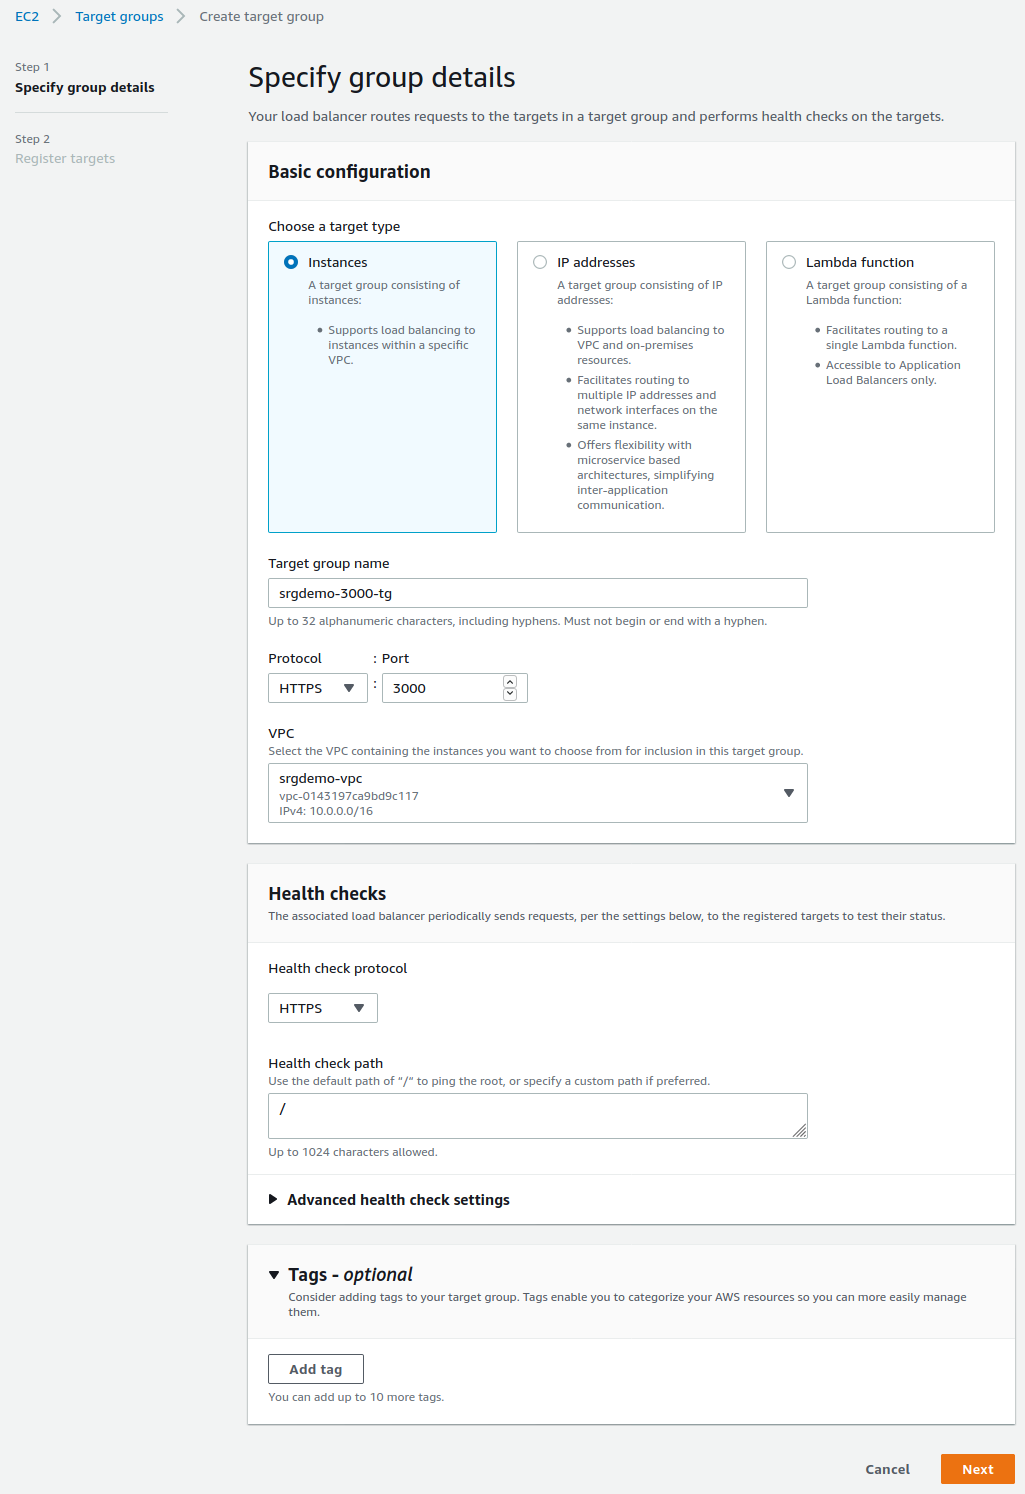
- On the Specify group details page, specify values for the following:
- Under Choose a target type, select Instances.
- Target group name: Choose a descriptive name for easier identification. For example srgdemo-3000-tg.
- Protocol: Change to HTTPS.
- Port: Specify 3000.
- VPC: Select your VPC.
- Tags: (Optional) Add descriptive tags as desired.

- Under Health Checks, leave the Health Check Protocol set to HTTPS.
- Click Next.
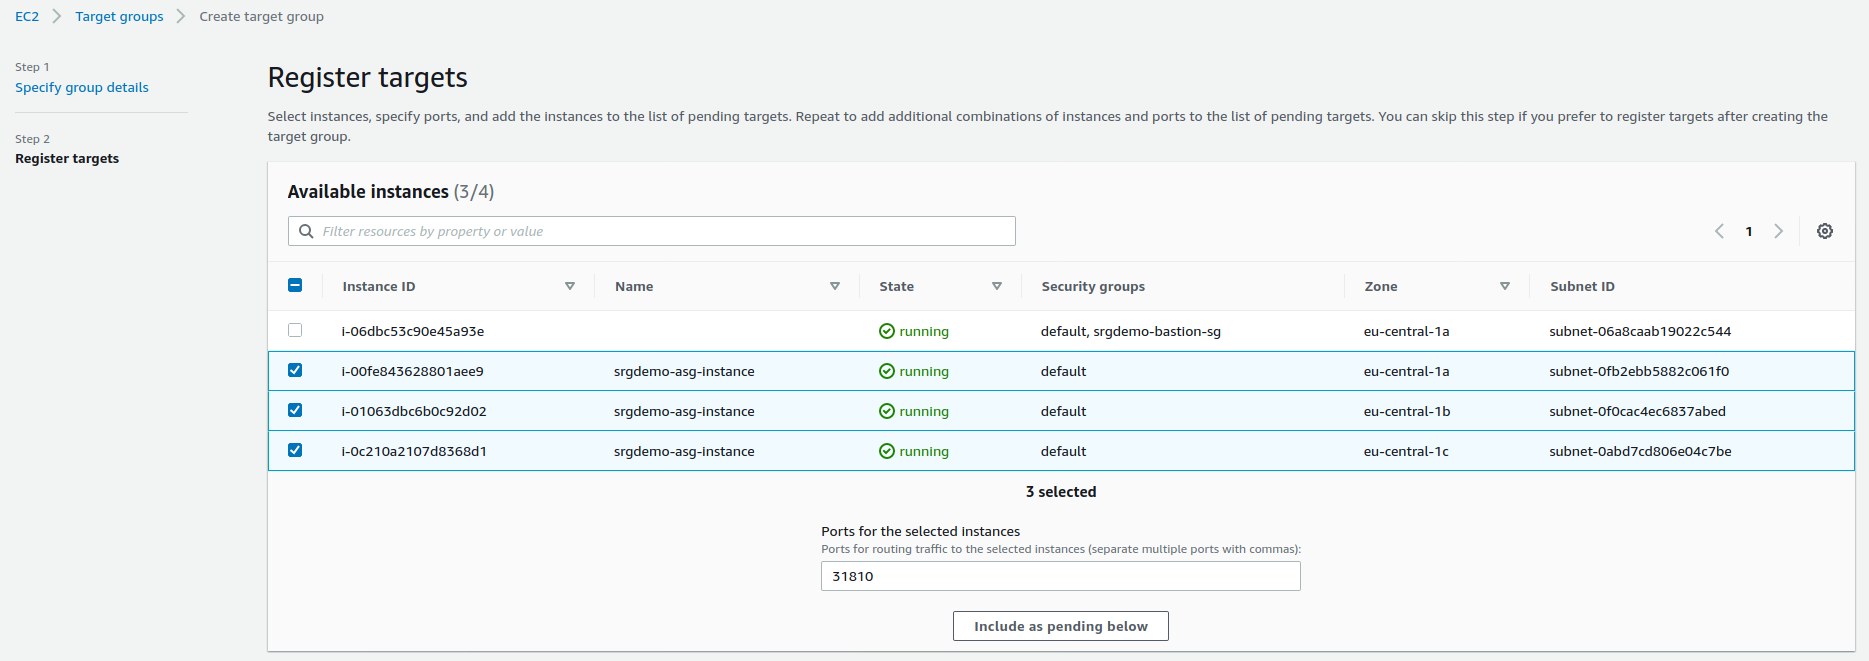
- On the Register targets page, set values for the following:
- Available instances: Select your worker node instances, but do not select the bastion.
- Ports: For the selected instances, use the value you retrieved previously for the bastion as the corresponding node port for port 3000 and recorded in the AWS worksheet.

- Click Include as pending below. All selected instances will be added to the list of pending instances.

- Click Create target group. You will be redirected back to the target group management page.
- From the list, select the newly created target group.
- From the bottom of the page, record its ARN in the AWS worksheet.
- Run the following command:
# aws elbv2 create-target-group \
--name <Target group 3000 Name> \
--protocol HTTPS \
--port 3000 \
--vpc-id <VPC ID> \
--health-check-protocol HTTPS \
--target-type instance
Where:
<Target group 3000 Name>: Choose some descriptive name such as srgdemo-3000-tg. Record the value in the AWS worksheet.
<VPC ID>: The ID of your VPC, as recorded in your AWS worksheet.
Example input and output:
# aws elbv2 create-target-group --name srgdemo-3000-tg --protocol HTTPS --port 3000 --vpc-id vpc-0143197ca9bd9c117 --health-check-protocol HTTPS --target-type instance
Target group for port 3000 description
{"TargetGroupArn": "arn:aws:elasticloadbalancing:eu-central-1:115370811111:targetgroup/srgdemo-3000-tg/c0684be94405b6b7",
"TargetGroupName": "srgdemo-3000-tg",
"Protocol": "HTTPS",
"Port": 3000,
"VpcId": "vpc-0143197ca9bd9c117",
"HealthCheckProtocol": "HTTPS",
"HealthCheckPort": "traffic-port",
"HealthCheckEnabled": true,
"HealthCheckIntervalSeconds": 30,
"HealthCheckTimeoutSeconds": 5,
"HealthyThresholdCount": 5,
"UnhealthyThresholdCount": 2,
"HealthCheckPath": "/",
"Matcher": {"HttpCode": "200"
},
"TargetType": "instance"
}
]
}
From the output, record the value of TargetGroupArn in your AWS worksheet.
Tagging the Target Group (CLI)
Optionally, you can tag the target group for easier identification.
To tag the target group using the CLI:
- Run the following command:
# aws elbv2 add-tags \
--resource-arns <Target group 3000 ARN> \
--tags Key=owner,Value=<owner>
Example:
# aws elbv2 add-tags \
--resource-arns arn:aws:elasticloadbalancing:eu-central-1:115370811111:targetgroup/srgdemo-3000-tg/c0684be94405b6b7 \
--tags Key=owner,Value=srgdemo
Adding Targets to the Target Group Using the CLI
To add targets to the target group:
- Run the following command:
# aws elbv2 register-targets \
--target-group-arn <Target group 3000 ARN> \
--targets Id="Instance 1 ID,Port=<Node port for 3000>" Id="Instance 2 ID,Port=<Node port for 3000>" Id="Instance 3 ID,Port=<Node port for 3000>"
Where:
<Instance x ID>: Use the instance IDs you gathered for instances of the Auto Scaling group. Refer to the AWS worksheet for these values.
<Node port for 3000>: Use the port number for 3000 from your AWS worksheet.
Example:
# aws elbv2 register-targets \
--target-group-arn arn:aws:elasticloadbalancing:eu-central-1:115370811111:targetgroup/srgdemo-3000-tg/c0684be94405b6b7 \
--targets Id="i-05662f9ef84c182ca,Port=30058" Id="i-07cfcd6716e9890b5,Port=30058" Id="i-08d819b5ccabe83cb,Port=30058"
Next Step: Creating the Application Load Balancer