Creating the Application Load Balancer
- Using the Find Services search tool, locate and browse to the EC2 dashboard.
- In the left navigation panel, under Load Balancing, select Load Balancers.
- On the Load Balancing management page, click Create Load Balancer.

- In the Application Load Balancer panel to the left, click Create.

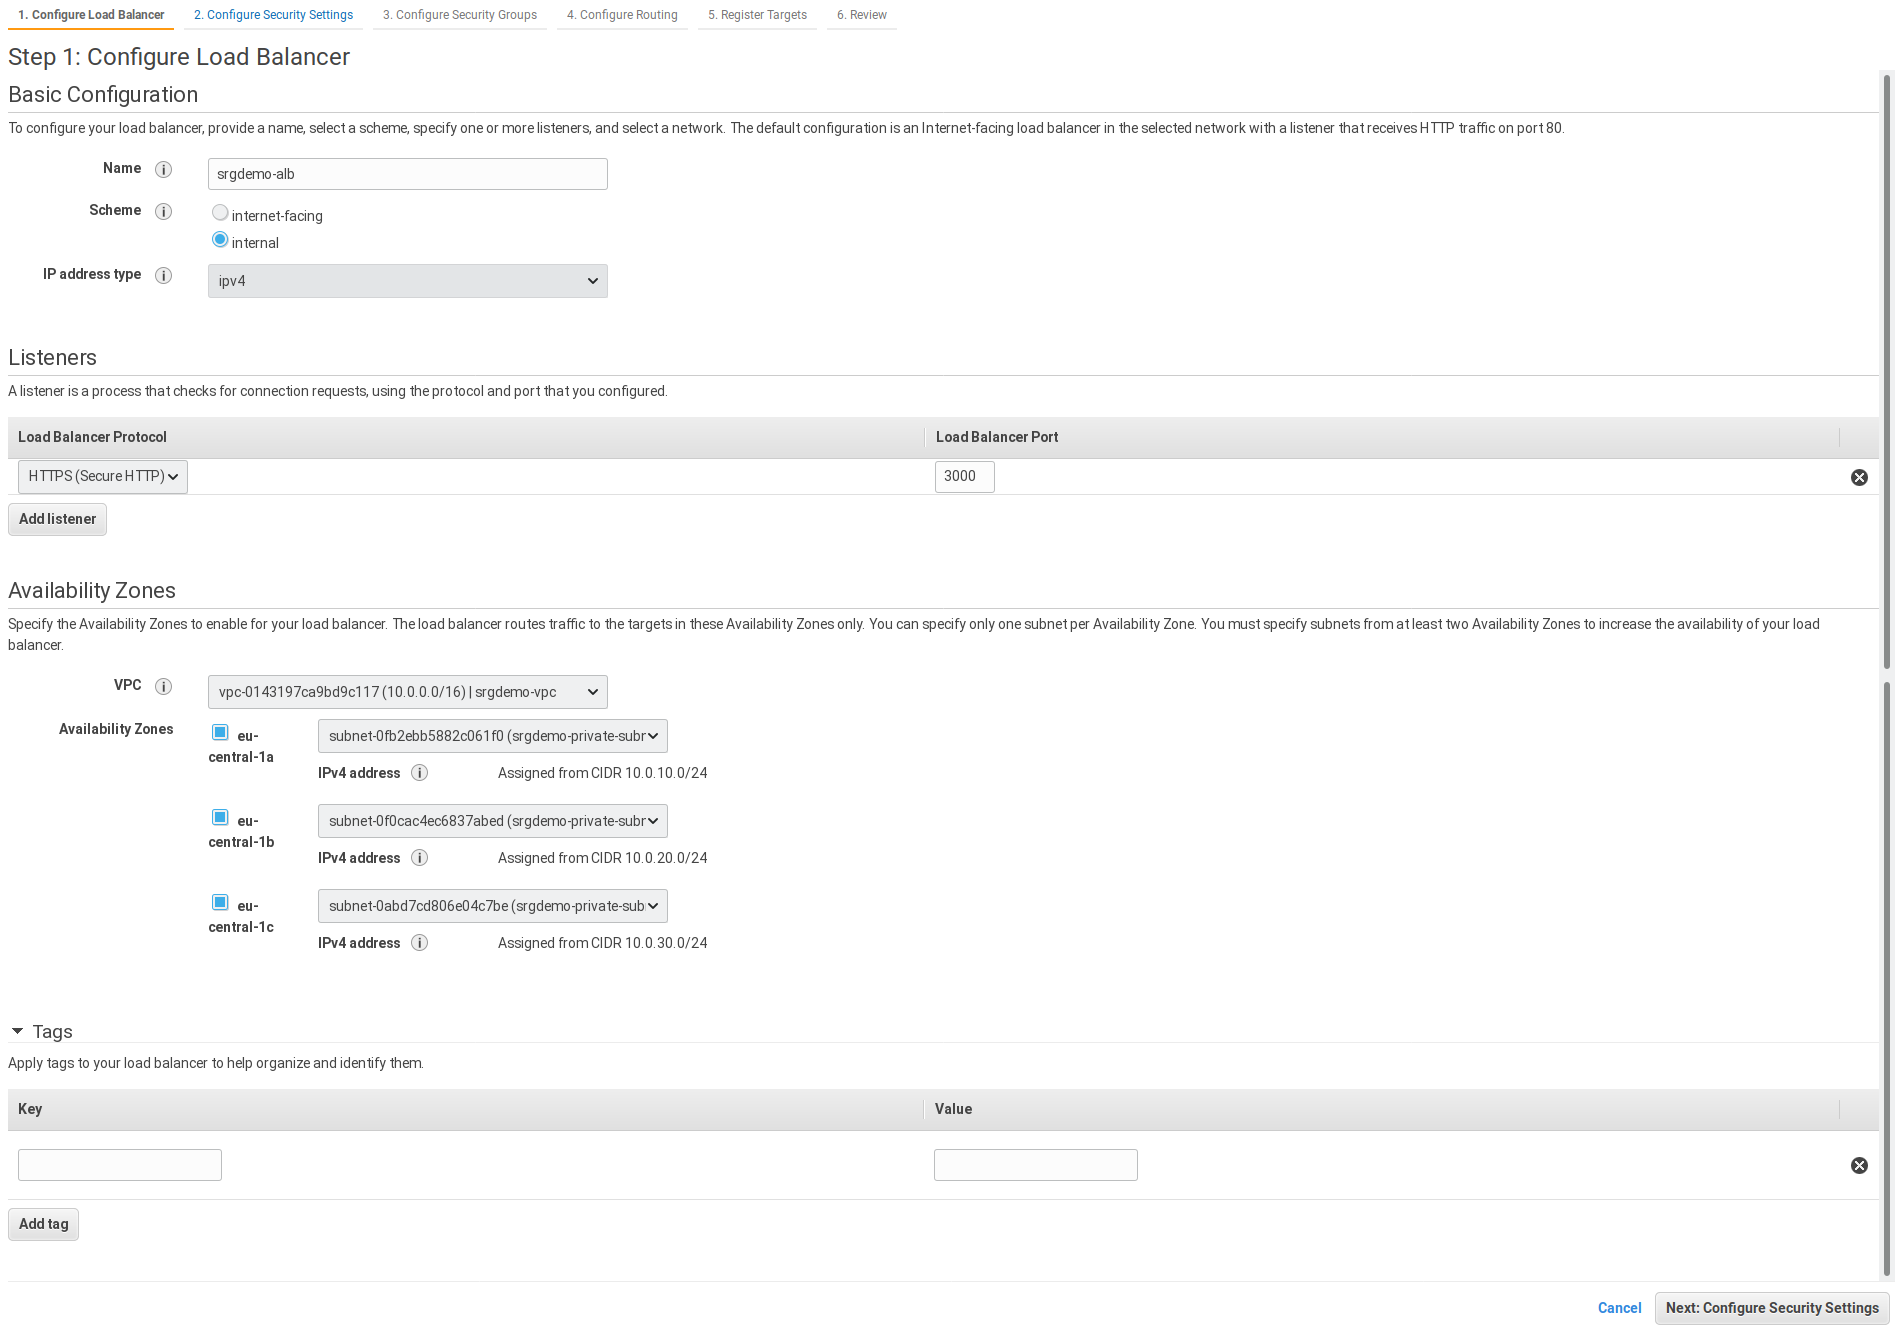
- On the Configure Load Balancer page, specify values for the following:
- Name: Select an ALB name
- Scheme: Set to Internal.
- Protocol: Select HTTPS.
- Port: Specify 3000.
- VPC: Select your VPC.
- Availability Zones: Select all three zones, then in each, specify the corresponding private subnet.
- Tags: (Optional) Specify any desired tags.
- Click Next: Configure Security Settings.

- On the Configure Security Settings page, specify values for the following:
- Certificate type: Select a certificate from ACM (recommended).
- Certificate name: Select the certificate that you previously created.
- Security policy: Leave unchanged.
- Click Next: Configure Security Groups.

- On the Configure Security Groups page, specify values for the following:
- Assign a security group: Leave set to Select an existing security group.
- In the list below, make sure only the Intra VPC security group created by your AWS infrastructure administrators (and recorded in the AWS worksheet) is selected.
- Click Next: Configure Routing.

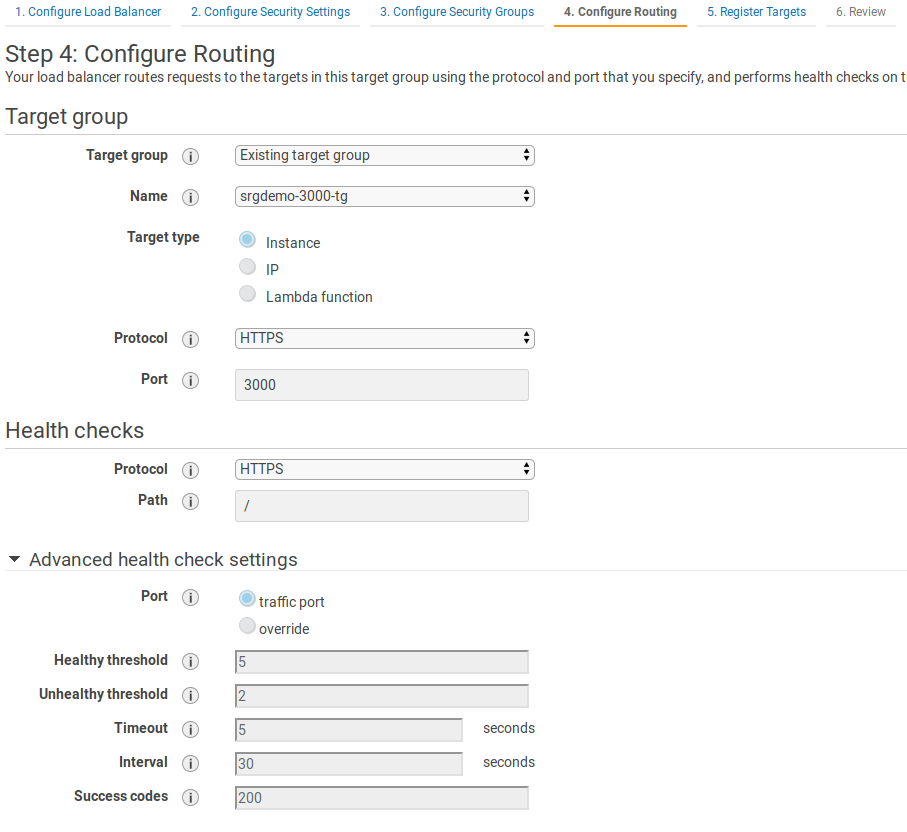
- On the Configure routing page, specify values for the following:
- Target group: Change to Existing target group.
- Name: Select the target group that you have previously created.
The remaining settings may be left at default values. - Click Next: Register targets.

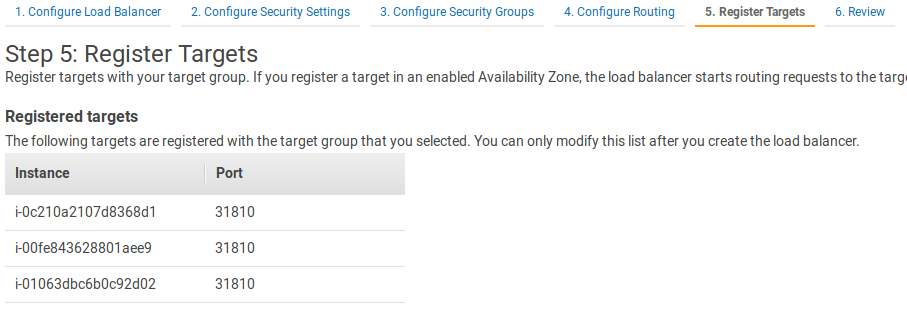
- On the Register targets page, verify your instance IDs and node ports.
- Click Next: Review.
- On the Review page, verify all settings and then click Create. An ALB creation status will be displayed but will not be updated because the page is not dynamic.) However, you might close the wizard.
- On the Description tab, select Edit attributes.
- For Idle timeout, specify a value of 300 in seconds, and click Save.
- Run the following command:
aws elbv2 create-load-balancer \
--name <ALB Name> \
--subnets <subnetIds> \
--security-groups <Intra VPC Security group Id> \
--scheme internal \
--type application \
--ip-address-type ipv4
Where:
<ALB Name>: Specify a name for easy application load balancer identification, and record it to the AWS worksheet.
<subnet Ids>: Use the space-separated IDs of all three private subnets in the VPC.
<Intra VPC Security group Id>: ID of the Intra VPC security group created previously and recorded in the AWS worksheet.
Example input and output:
#aws elbv2 create-load-balancer \
--name srgdemo-alb \
--subnets subnet-0fb2ebb5882c061f0 subnet-0f0cac4ec6837abed subnet-0abd7cd806e04c7be \
--security-groups sg-0ce3c569f73737b77 \
--scheme internal \
--type application \
--ip-address-type ipv4
{
   "LoadBalancers":[
      {
         "LoadBalancerArn":"arn:aws:elasticloadbalancing:eu-central-1:115370811111:loadbalancer/app/srgdemo-alb/8718b24107ef591b",
         "DNSName":"internal-srgdemo-alb-505957021.eu-central-1.elb.amazonaws.com",
         "CanonicalHostedZoneId":"Z215JYRZR1TBD5",
         "CreatedTime":"2020-06-15T09:16:12.480000+00:00",
         "LoadBalancerName":"srgdemo-alb",
         "Scheme":"internal",
         "VpcId":"vpc-0143197ca9bd9c117",
         "State":{
            "Code":"provisioning"
         },
         "Type":"application",
         "AvailabilityZones":[
            {
               "ZoneName":"eu-central-1c",
               "SubnetId":"subnet-0abd7cd806e04c7be",
               "LoadBalancerAddresses":[

               ]
            },
            {
               "ZoneName":"eu-central-1b",
               "SubnetId":"subnet-0f0cac4ec6837abed",
               "LoadBalancerAddresses":[

               ]
            },
            {
               "ZoneName":"eu-central-1a",
               "SubnetId":"subnet-0fb2ebb5882c061f0",
               "LoadBalancerAddresses":[

               ]
            }
         ],
         "SecurityGroups":[
            "sg-0ce3c569f73737b77"
         ],
         "IpAddressType":"ipv4"
      }
   ]
}
- Record the
LoadBalancerArn,DNSNameandCanonicalHostedZoneIdvalues in the AWS worksheet asALB ARN, ALB DNS name,andALB Canonical hosted zone ID. - Creation of the ALB takes approximately five minutes. To check the ALB creation status, run the following command using the
ALB ARNvalue:#aws elbv2 describe-load-balancers \
--load-balancer-arns <LoadBalancerArn> \
| jq -r '.LoadBalancers[0].State.Code' - Repeat Step 3 until the returned status changes to Active.
- After the status is Active, run the following command to increase connection idle timeout for Load Balancer:
For Example
aws elbv2 describe-load-balancers \
--load-balancer-arns arn:aws:elasticloadbalancing:eu-central-1:115370811111:loadbalancer/app/srgdemo-alb/8718b24107ef591b \
| jq -r '.LoadBalancers[0].State.Code'
aws elbv2 modify-load-balancer-attributes \
--load-balancer-arn <LoadBalancerArn> \
--attributes Key=idle_timeout.timeout_seconds,Value=300
Adding the Listener for Port 3000
This action will connect the ALB to NLB 3000 through the target group. Incoming requests to the ALB on port 3000 will be directed to the Kubernetes frontend-ingress-controller-svc service.
To add the listener:
Run the following command:aws elbv2 create-listener \
--load-balancer-arn <ALB ARN> \
--protocol HTTPS \
--port 3000 \
--certificates CertificateArn=<Certificate ARN> \
--default-actions Type=forward,TargetGroupArn=<Target group 3000 ARN>
Where:
<ALB ARN>: Use the ALB ARN recorded in the AWS worksheet.
<Certificate ARN>: Use the certificate ARN recorded in the AWS worksheet.
<Target group 3000 ARN>: Use the target group for port 3000 ARN recorded in the AWS worksheet.
Example input and output:
aws elbv2 create-listener \
--load-balancer-arn arn:aws:elasticloadbalancing:eu-central-1:115370811111:loadbalancer/app/srgdemo-alb/8718b24107ef591b \
--protocol HTTPS --port 3000 --certificates CertificateArn=arn:aws:acm:eu-central-1:115370811111:certificate/691ec232-98ff-45ed-8e69-1d15c0447538 \
--default-actions \
Type=forward,TargetGroupArn=arn:aws:elasticloadbalancing:eu-central-1:115370811111:targetgroup/srgdemo-3000-tg/c0684be94405b6b7
"Listeners":[
   {
      "ListenerArn":"arn:aws:elasticloadbalancing:eu-central-1:115370811111:listener/app/srgdemo-alb/8718b24107ef591b/32a42e4edb52466b",
      "LoadBalancerArn":"arn:aws:elasticloadbalancing:eu-central-1:115370811111:loadbalancer/app/srgdemo-alb/8718b24107ef591b",
      "Port":3000,
      "Protocol":"HTTPS",
      "Certificates":[
         {
            "CertificateArn":"arn:aws:acm:eu-central-1:115370811111:certificate/691ec232-98ff-45ed-8e69-1d15c0447538"
         }
      ],
      "SslPolicy":"ELBSecurityPolicy-2016-08",
      "DefaultActions":[
         {
            "Type":"forward",
            "TargetGroupArn":"arn:aws:elasticloadbalancing:eu-central-1:115370811111:targetgroup/srgdemo-3000-tg/c0684be94405b6b7",
            "ForwardConfig":{
               "TargetGroups":[
                  {
                     "TargetGroupArn":"arn:aws:elasticloadbalancing:eu-central-1:115370811111:targetgroup/srgdemo-3000-tg/c0684be94405b6b7",
                     "Weight":1
                  }
               ],
               "TargetGroupStickinessConfig":{
                  "Enabled":false
               }
            }
         }
      ]
   }
]
}
Next Step: Directing the Route 53 RecordSet to the ALB