Creating and Attaching the Data Disk to Nodes
By default, AKS nodes are created with a temporary data disk. Disk size depends on the --node-vm-size parameter and might not fit your needs.
In this section, you prepare the Azure managed disk and attach it to the nodes which will host Transformation Hub.
This process has three parts.
- Creating the Managed Data Disk
- Attaching the Disk to the AKS Node
- Formatting and Mounting the Attached Disk
Creating the Managed Data Disk
- Create a resource of type Managed Disks.
- In the
Subscriptiondrop-down, select your subscription. - In the
Resource groupdrop-down, select your AKS resource group. - In
Disk namefield, specify a name for the managed disk. - Based on the location you specified earlier, in the
Regiondrop-down, select the region. -
Based on the expected workload, in the
Sizedrop-down, select the size.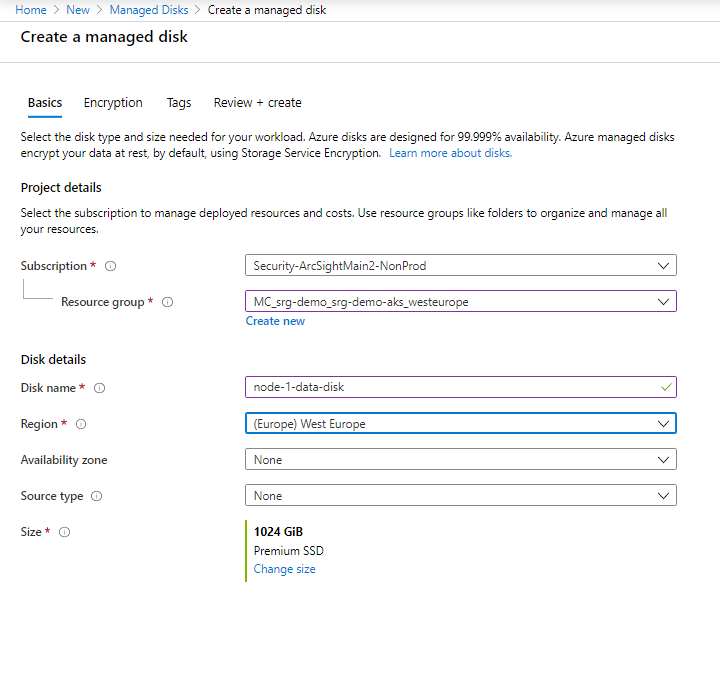
- Click Review + create.
- After validation, click Create.
- When the deployment finishes, click Download to get the json file with deployment results. Inside the archive is the deployment.json file.
- For use in attaching this disk to the AKS node, make note of the
primaryResourceIdvalue. - Repeat Step 1 through Step 9 for each AKS node.
The AKS resource group is in the format MC_<your_resource_group>_<aks_name>_<location>.
Required permissions: create disk
-
Get the AKS resource group and store it in an environment variable for later usage:
CLUSTER_RESOURCE_GROUP=$(az aks show --resource-group <RESOURCE GROUP> --name <AKS NAME> --query nodeResourceGroup -o tsv)
For example:
CLUSTER_RESOURCE_GROUP=$(az aks show --resource-group srg-demo --name srg-demo-aks --query nodeResourceGroup -o tsv)
-
Create the managed disk by running the following command:
az disk create --name <DISK NAME> --resource-group $CLUSTER_RESOURCE_GROUP --size-gb <DISK SIZE>
For example:
az disk create --name node-1-data-disk --resource-group $CLUSTER_RESOURCE_GROUP --size-gb 1024
-
From the results, get the
idvalue. It will be used later to attach the disk to the AKS node.The value will resemble the following:
/subscriptions/af379ae8-90b3-4368-8fe7-b6a55ab17720/resourceGroups/MC_srg-demo_srg-demo-aks_westeurope/providers/Microsoft.Compute/disks/node-1-data-disk
- Repeat Step 1 through Step 3 for each expected AKS node.
Attaching the Disk to the AKS Node
-
Get the virtual machine scale set and store it to an environment variable:
VMSS=$(az vmss list -g $CLUSTER_RESOURCE_GROUP | jq -r .[0].name)
If you open a new session, run commands to set theCLUSTER_RESOURCE_GROUPenvironment variable first. -
Attach the disk to instance by running the command:
az vmss disk attach --resource-group $CLUSTER_RESOURCE_GROUP --vmss-name $VMSS --instance-id <INDEX OF INSTANCE> --disk <DISK ID>
Where:
-
<INDEX OF INSTANCE>is number of node in cluster, starting from 0
-
<DISK ID>disk resource ID, obtained during creation.
For example, the following command would attach the disk to the instance with aninstance -idof 0.az vmss disk attach --resource-group $CLUSTER_RESOURCE_GROUP --vmss-name $VMSS --instance-id 0 --disk /subscriptions/af379ae8-90b3-4368-8fe7-b6a55ab17720/resourcegroups/MC_srg-demo_srg-demo-aks_westeurope/providers/Microsoft.Compute/disks/node-1-data-disk -
- Repeat Step 1 and Step 2 for the rest of the disks and node instances
Formatting and Mounting the Attached Disk
-
Upload the
id_rsato your jump host.Use theid_rsafile you generated when creating the Azure Kubernetes Service. - Make
id_rsaread only by running the following command: -
Get the node's private IP by running the following command:
kubectl get nodes -o wide
For example:
NAME                                STATUS   ROLES   AGE   VERSION    INTERNAL-IP   EXTERNAL-IP
aks-nodepool1-84569686-vmss000000   Ready    agent   79m   v1.15.10   10.240.0.4    <none>
aks-nodepool1-84569686-vmss000001   Ready    agent   79m   v1.15.10   10.240.0.5    <none>
aks-nodepool1-84569686-vmss000002   Ready    agent   79m   v1.15.10   10.240.0.6    <none>
-
Make an SSH connection from the jump host to an AKS node (use the internal IP address).
Successive commands will be executed on the AKS node to which you are connected.
For example:
ssh -i id_rsa azureuser@10.240.0.4
- On the same AKS node, become
root. -
Find the device for the data disk by running the following command:
fdisk -l
This command gives you a list of existing disks. Usually the one added is/dev/sdc. -
Using
fdisk /dev/sdc, create a new primary partition on the whole device and set it as type 83 - Linux.For example (input and output):
fdisk /dev/sdc Welcome to fdisk (util-linux 2.23.2). Changes will remain in memory only, until you decide to write them. Be careful before using the write command. Device does not contain a recognized partition table Building a new DOS disklabel with disk identifier 0xc6a2cea5. The device presents a logical sector size that is smaller than the physical sector size. Aligning to a physical sector (or optimal I/O) size boundary is recommended, or performance may be impacted. Command (m for help): n Partition type: p primary (0 primary, 0 extended, 4 free) e extended Select (default p): p Partition number (1-4, default 1): First sector (2048-536870911, default 2048): Using default value 2048 Last sector, +sectors or +size{K,M,G} (2048-536870911, default 536870911): Using default value 536870911 Partition 1 of type Linux and of size 1024 GiB is set Command (m for help): w The partition table has been altered! -
After saving the new partition table, create the file system by running the following command:
mkfs.xfs /dev/sdc1
-
Create the mount point by running the following command:
mkdir /opt/arcsight
-
Get the partition UUID by running the following command:
blkid /dev/sdc1
For example:
/dev/sdc1: UUID="3696c212-1778-43d5-9d27-d9164686c327" TYPE="xfs"
-
Add an entry to the
/etc/fstabfile to have this new partition mounted after restart.For example:
UUID=3696c212-1778-43d5-9d27-d9164686c327 /opt/arcsight xfs defaults 0 0
-
Mount a new disk partition by running the following command:
mount -a
-
Verify it is properly mounted by running the following command:
df -h
For example (output):
Filesystem      Size  Used Avail Use% Mounted on
udev            7.9G     0  7.9G   0% /dev
tmpfs           1.6G  812K  1.6G   1% /run
/dev/sda1        97G  9.4G   88G  10% /              <- Azure temporary drive
tmpfs           7.9G     0  7.9G   0% /dev/shm
tmpfs           5.0M     0  5.0M   0% /run/lock
tmpfs           7.9G     0  7.9G   0% /sys/fs/cgroup
/dev/sda15      105M  3.6M  101M   4% /boot/efi
/dev/sdb1        32G   48M   30G   1% /mnt
tmpfs           7.9G   12K  7.9G   1% /var/lib/kubelet/pods/7194d3a7-cc84-42bd-accb-30b09fcd1d27/volumes/kubernetes.io~secret/kube-proxy-token-cnxn8
overlay          97G  9.4G   88G  10% /var/lib/docker/overlay2/3e04813889c25709c31206a48ee82fa67d677b76a6b1aab5e7d7246b911a3bee/merged
shm              64M     0   64M   0% /var/lib/docker/containers/bc0dd2ea23a9c0640e10ad4664addeb437f4ad4ac0830260eef942f70bcb0c0a/mounts/shm
overlay          97G  9.4G   88G  10% /var/lib/docker/overlay2/b8290059f18b2f9d311395abcf12ccb377ed7107db5fa5fccc46b6fc594e7da8/merged
tmpfs           1.6G     0  1.6G   0% /run/user/1000
/dev/sdc1       1.0T  1.1G 1023G   1% /opt/arcsight   <- your new partition for Arcsight products
- Repeat Steps 4 through Step 12 for all remaining nodes and their disks.
chmod 400 id_rsa
Next Step: Preparing a Private DNS Zone