Archiving a Report
Note: If you do not want to archive empty reports:
By default, the scheduler archives reports even if they are empty. If you do not want this behavior, enter this property in server.properties:
report.scheduler.archive_empty_reports=false
Refer to the Administrator’s Guide’s Configuration section, topic on Managing and Changing Properties File Settings, for instructions on how to change settings properly.
Where: Navigator > Resources > Reports
To archive a report:
-
Right-click the report and select Schedule for Archiving > Report.
The report editor opens at the Jobs tab.
-
Click Add and select either Schedule Report or Schedule Delta Report.
Tip: The option to Schedule a Delta Report job is available only for certain types of event-based reports, and only when a previously-run report is available in the archives. Otherwise, clicking Add on the Jobs tab takes you directly to the job scheduler to schedule a standard report. For more information about delta reports, see Running a Delta Report.
-
Enter a name and description for the job.
-
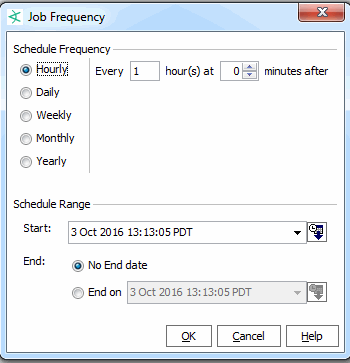
In the Jobs scheduler, click the link labeled Click here to set up schedule frequency to open the Job Frequency dialog, and configure the schedule.

In the Job Parameters section, select or enter values for the parameter fields as necessary. For date parameters, enter values in the text fields, click the drop-down arrows or click the time buttons to select a time range. For time data, you can enter a specific value, such as 8:54:00 AM or you can use special timestamp variables.
Click OK to save changes to the Job schedule.
To view all scheduled jobs, click the Open scheduled jobs list tool button (
 ). The scheduled tasks are listed in the Viewer panel under “Current Jobs.”
For more information on setting up and viewing scheduled jobs, see Scheduling Report Tasks.
-
Back in the report editor Jobs tab, under the Job Parameters section, enter values for the report parameters by clearing the Use Default check marks, or keep the defaults. You can set the report format, e-mail options, output parameters, start and end times, and so on. These are the same parameters described in Setting Default and Custom Report Parameters.
If you chose any parametized condition while creating this report, that condition is displayed at the top of the tab. An example of a parameterized condition is: detect time between
$CurrentDate-1dand$CurrentDate. If such parameters exist, they are used for both immediate as well as scheduled generation of reports. While scheduling reports for archiving, these parameters are displayed in the Edit Parameters UI. It is possible to independently modify the dates specified in the parameter text fields. in addition to relative dates, you canspecify absolute dates as parameter values. Examples of valid absolute dates are:01/01/2015 and 01/01/2016 11:00:00 AM. -
Click Apply or OK on the report Editor to save your changes for this report.