Organizing your projects
When using this kind of setup, it is good practice to separate out your application into two or more projects: a main project that drives the application and contains the interface elements, and one or more other projects that contain the application logic; these must be link library projects.
It is the link library projects that the unit testing library project(s) can interact with. You can have more than one unit testing library project interacting with a link library project, but it is advisable that a unit testing library project only links to one link library project. One unit testing library project testing more than one link library project is possible, but can become complicated, with output required to point to a common location for all projects.
- Each test case contains a procedure pointer linking into the code under test that is located within link library project.
- The unit testing library projects and the link library project under test share the same output directory.
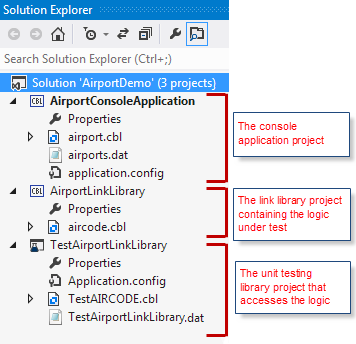
In the example AirportDemo solution shown below, the AirportConsole project (a Console Application project type) is used to launch and drive the application, and contains the interface coding. This project then calls into the AirportLib project (a Link Library project type) to perform its calculations, condition tests, etc..., so together they provide a complete application. To unit test the application's logic, a separate unit testing library project (TestAirportLib) calls into the link library project (AirportLib) to ascertain the code is working as it should. You could also add additional unit testing library projects to this solution, also calling into the same link library project.

Unit testing library projects can also be self-contained: that is, the logic that they are testing resides in the same project as the test cases. However, the model described above ensures that you are testing on the very latest sources, and reduces the amount of duplicate code that may be required.