Lifecycle Scenarios in View Compare/Merge
The topics below present examples of some typical full-lifecycle scenarios using View Compare/Merge for cross-view change management.
View Compare/Merge Usage with a Simple Project
In this example, you have a small project and a small team, making it is generally safe (for example, not disruptive) to perform new development directly in the main view. The only other views you may need are release views for maintenance purposes. In this scenario, your primary use of View Compare/Merge is to propagate patches from or to the release views.
Below is an example of using View Compare/Merge with a simple project.
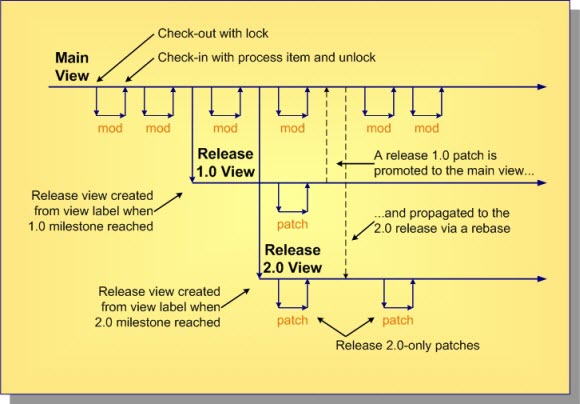
In this scenario, you perform all new development with direct modifications in the main view. When a release milestone is reached, you create a view label as the reference point for defining a release view. To fix bugs in a given release, you make changes directly in the release view. If you make a patch in one release that must be propagated to the main view and another release, first deliver it to the main view using a View Compare/Merge promote, then propagate it to the second release with a View Compare/Merge rebase. (Alternatively, if the patch did not apply to the main view, you could use a View Compare/Merge replicate to propagate it directly from one release view to another.)
Using View Compare/Merge with Activity and Sandbox Views
In most circumstances, direct modification to the main view is not advisable due to the potential instability it may cause. Activity and sandbox views provide a place where development can occur without disrupting the stability of the parent view. These view roles also provide a way to discard work when there is a chance that it could be cancelled and never delivered to the main view.
The primary difference between activity and sandbox views is scope:
- Activity views generally serve a group of developers and a specific purpose such a single, large enhancement.
- Sandbox views generally serve an individual developer or a very small team and can be used for many iterations of bug fixes and enhancements.
Both activity and sandbox views can have short or long life spans.
When activity and sandbox views are used, all new, fully-verified and approved changes should make their way to the main view. Release views should be created from the main view to provide streams for maintenance work. It even makes sense to sometimes create a release view from another release view, for example when a “dot release” will be shipped then maintained separately from its parent release. An example of recommended View Compare/Merge best practices with activity and sandbox views is shown below.
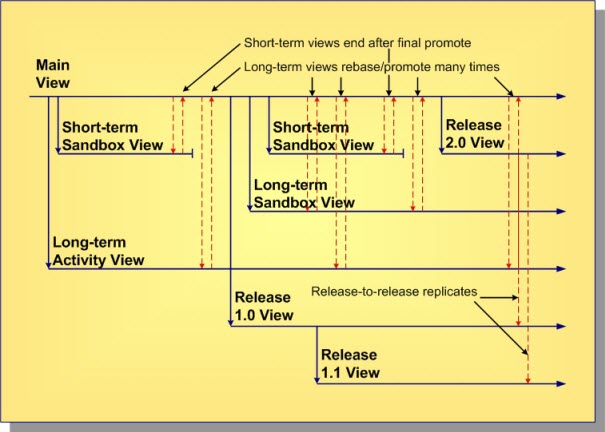
In this example, two short-term sandbox views are created from the main view. (The “mod” and “patch” cycles shown in the previous example are omitted here to reduce clutter.) After the work is complete in these views, they are promoted to the main view and become inactive (and eventually deleted). A long-term activity view and a long-term sandbox view are also shown. These views “live” beyond a single release. Therefore their work may be promoted to the main view several times.
This example demonstrates the recommended best practice of always rebasing a view just prior to promoting it. This causes the child view to merge changes from the parent so they can be integrated and tested.
This example also shows release 1.0 and 2.0 views being created from the main view, but a release 1.1 view is created as a child of the release 1.0 view. Also shown is a patch made in the release 2.0 view and being “back ported” directly to the release 1.0 and 1.1 views using replicate merges.
Using View Compare/Merge in High Concurrency Projects
Suppose you have a large project involving many sub-teams, each developing a separate component of a final application or suite. You may find it impractical to have each team use its own activity view and then integrate the changes in the main view. The integration and stabilization of large projects can be lengthy, causing long periods of instability in the main view, which is not good.
To address the needs of large development projects, we introduce the notion of an integration view. An integration view is a branch-all view that is positioned between the main view and one or more activity views. When the time is right, the “grandchild” activity views are promoted to the integration view, where integration testing occurs. When the integration view passes all applicable tests, it is finally promoted to the main view, delivering its changes. An example using integration views is shown below.
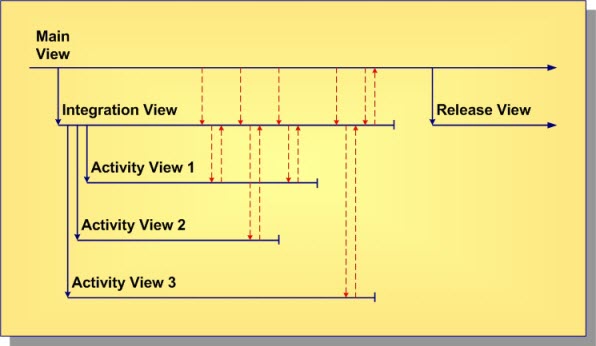
Notice that the integration view is created first as a child of the main view. An activity view for each major component or sub-team is then created as a child of the integration view. The reason for creating the integration view first as a parent of the activity views is so that View Compare/Merge promote merges can be used to propagate changes from the activity views. Promote is the best merge technique for new development because it uses rules that are designed for propagating changes “up” the view hierarchy. For example, new items are reverse-shared instead of shared, causing the parent view to take ownership of the main (1.x) artifact branches. If the integration view was created after the activity views, it could not be their parent, so you would have to propagate changes with VView Compare/MergeCM replicate, which uses share as the default action for new items instead of reverse-share.
If changes occur in the main view while work is done the activity views, the activity views should periodically be rebased to accept those changes. However, they cannot be rebased from the main view since it is not their parent. Instead, you must rebase the integration view first. Rebasing the integration view should be very easy (no merge conflicts should be found) since no changes should occur directly in the integration view until the integration work is ready to begin.
After an activity view has been rebased, it can be promoted to deliver its changes to the integration view. You could immediately retire an activity view once it has been promoted, choosing to resolve any integration issues and fix bugs in the integration view. However, for complex integrations, you may choose to promote, rebase and adjust, then promote an activity view several times. Eventually, though, you should shift the integration effort to the integration view since it has the big picture. When the integration view passes all tests, promote it the to main view, and create a release view.