8.7 Renaming the Mount Point Path for a Clustered LVM Volume
For a clustered LVM volume, you can rename the mount point path by modifying the mount point variable in the cluster load, unload, and monitor scripts.
-
Open iManager in a web browser, then log in as a cluster administrator user.
-
In Roles and Tasks, select Clusters > My Clusters, then select the cluster that you want to manage.
If the cluster is not in your personalized list, you can add it. Click Add, browse to locate and select the cluster, then click OK.
-
On the Cluster Manager page, select the check box next to the resource, then click Offline. Wait for the status to report that it is offline, then continue.
-
Modify the mount point path value in the load, unload, and monitor scripts for the LVM volume group cluster resource:
-
On the Cluster Manager page, select the resource’s name link to open its Cluster Properties page, then click the Scripts tab.
The Scripts tab automatically displays the load script.
-
Modify the load script:
-
In the load script, type the new value for the mount point in the MOUNT_POINT variable:
MOUNT_POINT=/media/ext3/vol44 -
Ensure that the following command is added above the mount command line in the load script in order to create the path on nodes if it does not exist.
# create the mount point if it does not exist on the node ignore_error mkdir -p $MOUNT_POINTYou can alternatively make the new path by using the mkdir command in a terminal console on each node. If the master node is not the most preferred node, ensure that you make the path before you bring the resource online.
-
Click Apply.
-
-
Click the Unload Script link, type the new value for the mount point in the MOUNT_POINT variable, then click Apply.
MOUNT_POINT=/media/ext3/vol44 -
Click the Monitor Script link, type the new value for the mount point in the MOUNT_POINT variable, then click Apply.
MOUNT_POINT=/media/ext3/vol44 -
At the bottom of the page, click OK to close the Properties page and save your changes.
The changes do not take effect until the resource is brought online.
-
-
Bring the resource online in order for the script changes to take effect.
-
In Roles and Tasks, select Clusters > Cluster Manager.
-
Select the check box next to the resource, then click Online.
-
Verify that the resource comes online and reports a Running state.
If the resource goes into a Comatose state, it is probably because you made a mistake in the lines you added or modified in the scripts. Take the resource offline, go back and correct the scripts, then try to bring it online again.
-
-
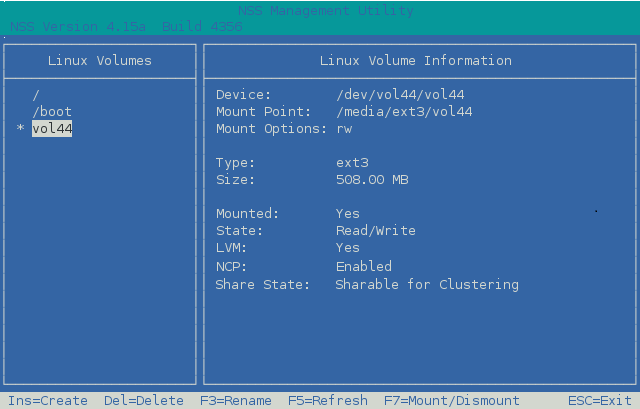
In NSSMU, verify that the new mount point is used when the clustered LVM volume resource is brought online:
-
Log in as the root user to the node that is hosting the resource, then start NSSMU by entering:
nssmu
-
From the NSSMU main menu, select Linux Volumes, then press Enter.
-
In the Linux Volumes list, select the clustered LVM volume.
-
View the volume details to verify that the mount point has changed.
For example, the mount point is /media/ext3/vol44.

-
Press Esc twice to exit NSSMU.
-