3.1.1 Step 1: Run the automated installer.
Consider installing your entitled activation files along with the automated installer.
-
From your product download location, locate the automated installer for your system’s platform. (In the file name, <nnn> is the build number.)
Operating System
Automated Installer
Linux 64-bit
mss-12.6.<n>.<nnn>-prod-linuxx64.sh
z Linux
mss-12.6.<n>.<nnn>-prod-unix-nojre.sh
Windows 64-bit
mss-12.6.<n>.<nnn>-prod-wx64.exe
-
(Optional.) If you are entitled to Add-On Products, we recommend installing the current activation file(s) when you run the automated installer.
To install or update your Add-On Products at a later time, see Installing Activation Files.
To install the activation files now:
-
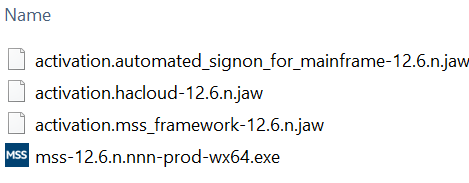
Download the current version of the activation file for each of your Add-On Products from the Micro Focus download site (where you downloaded Host Access Management and Security Server).
Activation files are in this format: activation.<product_name-version>.jaw
-
Place each activation file in the directory with the MSS installer.
On Windows, for example: to install the Automated Sign-On for Mainframe Add-On, place the activation file in the same folder as the installer, mss-12.6.<n>.<nnn>-prod-wx64.exe.

-
-
Run the MSS installer.
-
Select a language to use during installation.
-
Click Next to continue. The installer lists the products that will be enabled.
-
Read and accept the license agreement.
-
Destination directory: Accept the default installation directory, browse to a new directory, or enter the directory where you want to install.
-
Select the components to install, and then click Next.
Host Access Management and Security Server. Check this box to install the Administrative Server, which includes the MSS Administrative Console and Metering Server, and the default servlet runner.
-
Security Proxy Server, when entitled, can be installed now or later.
-
Terminal ID Manager is enabled, when entitled.
-
-
Start Menu directory: On Windows, select the directory where you want to create the program shortcuts. You also have the option to create shortcuts for all users, or to suppress the creation of a Start Menu directory. Click Next.
-
During a new installation, the automated installer copies files to the designated directory and launches a configuration utility.
Continue with Step 2: Enter configuration information.
(During an upgrade, the installer retains your settings, and you will not be prompted to run a configuration utility. For more information, see Upgrading to Version 12.6 SP1 Update 2 (12.6.12).)