Control Access to Settings and Controls with Microsoft Group Policy
As an administrator, you can limit users' ability to modify their workspace or session documents by setting permissions from the Microsoft Group Policy Management Console, using group policy templates.
Note
You can restrict access to InfoConnect controls only on systems on which the Windows User Access Control (UAC) is enabled. If the UAC is disabled, the configuration settings that restrict access do not apply.
InfoConnect installs a set of group policy templates (ADMX files) to the following directory:
Program Files\Micro Focus\InfoConnect\Configuration\GroupPolicy
Note
To use this feature, you must be running Windows 7, Windows 8.1, or later on an administrative machine. For more information about managing group policy, see Managing Group Policy ADMX Files Step-by-Step Guide.
ADMX files
ADMX files are divided into language-neutral files (.admx) and language-specific resource files (.adml), available to all Group Policy administrators. These factors allow Group Policy tools to adjust their UI according to the administrator's configured language.
Reflection setup.exe installs ADMX files to:
...``\``install_dir``\Configuration\GroupPolicy\ADMX
It installs ADML files to the following directory:
...\install_dir\Configuration\GroupPolicy\ADMX\en-us
InfoConnect provides the following ADMX Group Policy files. Each of these files has a corresponding ADML language file.
| This file | Controls access to |
|---|---|
ACTIONS.admx | Actions |
APPLICATION.admx | InfoConnect Workspace settings |
IT27.admx | T27 terminal settings |
IUTS.admx | UTS terminal settings |
IALC.admx | ALC terminal settings |
RD3X.admx | 3270 terminal settings |
RD5X.admx | 5250 terminal settings |
RDOX.admx | VT terminal settings |
ReflectionWorkspace.admx | Root-level ADMX file |
ReflectionSecurity.admx | TLS and PKI settings |
Note
This folder may not include all of these files. It includes only the files required to support the edition of InfoConnect you have installed. This directory also includes the ReflectionPCIDSS.admx file. This file is used to configure information privacy through Group Policy and is not used to control access.
Install Group Policy Templates
Before you deploy group policy definitions, set and test them on a local test machine.
To deploy ADMX & ADML files on a local test machine
-
Copy the
.admxfiles fromHELLIP\install_dir\Configuration\GroupPolicy\ADMXto the central store (%systemroot%\PolicyDefinitions) -
Copy all required locale
.admlfiles to:%systemroot%\PolicyDefinitions\<locale> -
Open the Group Policy Object Editor (
gpedit.msc) -
Under either Computer Configuration or User Configuration, browse to Administrative Templates | Reflection Desktop or Administrative Templates | Reflection Security.
-
In the Group Policy Management Editor, navigate to the setting or feature you want to configure.
-
Enable the Group Policy settings you want to restrict access to.
Note
For more about using ADMX files to set group policy, see Managing Group Policy ADMX Files Step-by-Step Guide.
Set Access with Group Policy
To set access with Group Policy Object Editor
-
In the Group Policy Management Editor, navigate to the setting or feature you want to configure.
The following example shows all shipping ADMX files loaded into the GPO Editor under User Configuration. Group Policies can be set at the machine (Computer Configuration) or user (User Configuration) levels.

-
Enable the Group Policy settings you want to use.
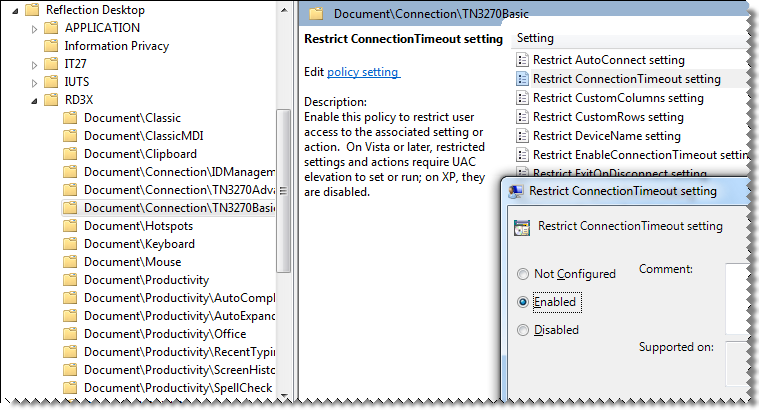
The following example shows the following:
-
The current node is the RD3X Document\Connection\TN3270Basic group.
-
All the settings for this group are listed in the right-hand panel.
-
The Restrict ConnectionTimeout setting policy is Enabled . This setting for 3270 display sessions is restricted.

Registry keys are added when policy settings are Enabled. These keys remain in the registry when policy settings are Disabled. No key is present when policy settings are Not Configured.
The following example shows the registry corresponding to the example above, with the Restrict ConnectionTimeout setting policy setting enabled.HKEY_CURRENT_USER\Software\Policies - need screenshot of registry settings
-