Session Documents
Terminal session settings are saved to session documents. Session documents are specific to each terminal type (*.ialc, *.iuts, *.it27, *.rd3x, *.rd5x, or *.rdox). (The options available depend on your Rocket® InfoConnect (formerly a Micro Focus product) product.)
For ALC, UTS, and T27 sessions, session documents include a link to a path that includes required connection information. Path definitions are saved in the InfoConnect database.
For 3270, 5250, and VT sessions, the session documents include all host connection information.
In addition to basic connection information, a number of session customization options are available. These include themes (to change display options such as font and color), keyboard maps, mouse maps, hotspots, quickpads, and ribbon (or menu) customization. By default these customizations are saved to separate files and a pointer to the customization file is saved to the session document. It is also possible to save sessions as compound documents that include these customizations.
Document Settings
Document settings are specific to each terminal type and can be configured from the Document Settings dialog box.
To open the Document Settings dialog box
-
Start a terminal session.
-
Open the Settings window.
The steps depend on your user interface mode:
User interface mode Steps Ribbon or InfoConnect Browser With a session open, from the Quick Access Toolbar, click  .
.TouchUX With a session open, tap the Gear icon  and then select
  Document Settings.
Classic MDI With a session open, go to Options > Settings.
The Document Settings options available depend on your session type.
Changes you make to the following are always saved in the session document: Host Connection, Terminal Configuration, File Transfer, Productivity, Printer Settings .
Changes you make to the following are saved by default to separate customization files: Themes, QuickPads, Hotspots, Ribbon, Keyboard Map, Mouse Map. These settings are included in the session document if you save it as a compound document.
Session documents are saved to the glossentry_title. Associated customization files are saved to subfolders in the user data folder.
To control access to the settings you configure, see Lock Down InfoConnect To Restrict Access to Controls.
Deploying session settings
To ensure that users can find their sessions and that these sessions include all customizations, save your sessions as compound documents and install them to the InfoConnect user data folder. When you deploy session documents to this folder, users will see the sessions listed when they open documents from the Workspace without having to browse their file system.
-
If you deploy session documents to a non-default location, ensure that you have configured it as a trusted location. You can provide easy access to these files by configuring shortcuts to launch the sessions directly.
-
If you do not save session settings in compound documents, all required customization files must be deployed along with your session files to the correct folder location(s).
Deploying sessions using the Installation Customization Tool
You can use the Installation Customization Tool to create a companion package that installs your session documents and optionally creates shortcuts to launch the sessions. See Create a Companion Package to Install Customized Settings Files.
An advantage of deploying settings using the Installation Customization Tool is the ability to modify the Setup program to include your customizations. See Customize the Setup installation.
Deploying sessions using a centralized management server
If you have installed a centralized management server, you can use it to manage and deploy session documents. Deploying this way provides several advantages:
-
Manage sessions centrally and update session settings as needed.
-
Limit session access to specific users or groups using a directory server (LDAP/Active Directory).
-
Use the Security Proxy to encrypt session data and enforce access control.
See Centrally Manage Sessions.
Compound Documents
When you save a session as a compound document all customizations are included in a single file. This means that your compound file will include all the settings in any associated theme, keyboard map, mouse map, hotspot, ribbon, or QuickPad file. This option enables administrators to deploy session files with all required customizations included in a single file.
Note
If you do not save session settings in compound documents, all required customization files must be deployed along with your session files to the correct folder location(s).
To save an individual session as a compound document
-
Open a terminal session and make the modifications you want to include with this session.
-
Open the Save As dialog box.
The steps depend on your user interface mode.
User interface mode Steps Ribbon From the File menu or the InfoConnect button  (if using the Office 2007 Look and Feel), select Save As.
InfoConnect Browser From the InfoConnect menu, select Save As. TouchUX Under FILE, tap Save As. Classic MDI From the File menu, select Save As. -
For Save as type, select the compound option for your session type, then click Save.
To save all sessions as compound documents
-
Open the Workspace Settings dialog box.
-
Click Configure Workspace Defaults.
-
Under Workspace, select Save session as compound document.
Note
To control access to settings, see Lock Down InfoConnect To Restrict Access to Controls.
Set up Session Templates
Templates provide an untitled copy of the original, giving you a quick and easy way to create pre-configured documents, while ensuring that your original file remains unchanged.
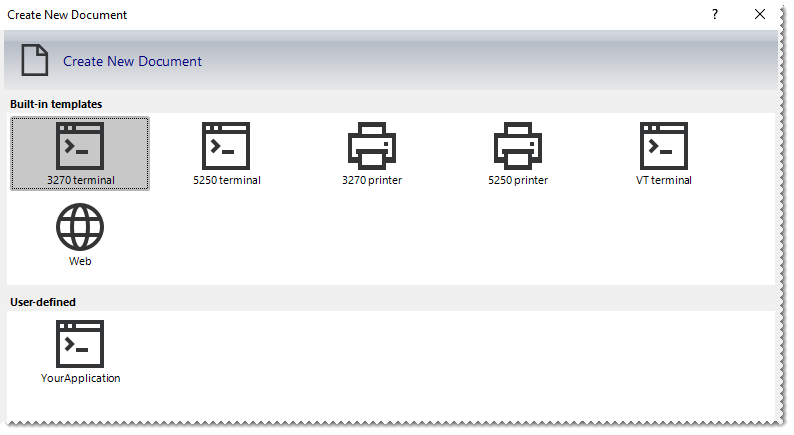
You can also use templates to control the types of sessions that users can create. For example, you can create templates that have pre-configured SSL/TLS settings. These templates appear in the Create New Document dialog box, under User-defined.
Create a Session Template
After you configure a session document, you can share and reuse your settings by saving the document as a template.
To create a session template
-
Open the session document that you've configured.
-
The steps depend on your user interface mode.
User interface mode Steps Ribbon On the File menu or the InfoConnect button  (if using the Office 2007 Look and Feel), choose Save As and then Save Template.
Classic MDI From the File menu, select Save As Template. -
Name the template file with an
.rsftextension. -
To lock down settings you have configured in the template, see Lock Down InfoConnect To Restrict Access to Controls.
To make changes to the template, you must replace the template file — save the file that contains your changes using the same filename and extension as the template.
Note
To deploy templates, install the .rsft files to the templates folder:
%appdata%\Micro Focus\InfoConnect\Desktop\v18.0\templates\
Templates saved to this location appear in the Create New Document dialog box, under User-defined.
Control the Types of Sessions Users can Create
You can use templates to control the types of sessions users can create. First you'll need to create custom templates and lock down their settings as shown in Create a Session Template.
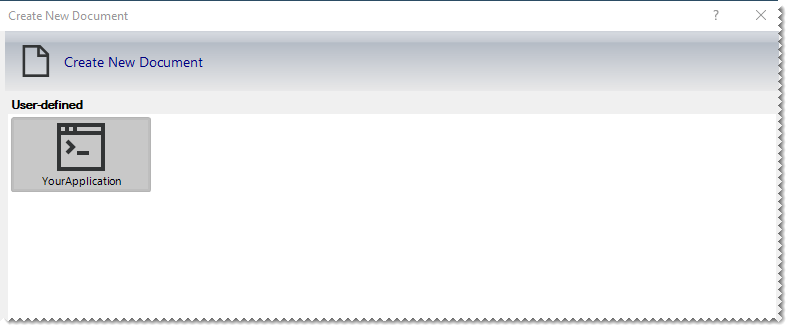
Then you'll need to configure the workspace to hide the built-in templates that are distributed with InfoConnect, as shown below.
When you open InfoConnect after creating a custom template, the built-in templates are displayed along with your custom template.

You'll need to configure the workspace to hide these templates.
To hide builtin templates
-
From the File menu, choose InfoConnect Workspace Settings.
-
On the InfoConnect Workspace Settings window, click Workspace Defaults.
-
In the Configure Workspace defaults dialog box, select Hide built-in templates for new documents.
-
Test the configuration by creating a new document. When the Create New Document dialog box opens, the built-in templates are not displayed.

-
Deploy this workspace setting using one of the methods described in Customize the InfoConnect Workspace.