Loading DLL files
The application's compiler generates DLL files from your source code. In the Windows environment, DLL code is controlled by the operating system. Once a DLL has been loaded, it is locked to the loading process, in this case CICS, and no other process can overwrite the DLL file.
When you modify existing code you need to use the procedure described below to replace an existing DLL file with the new file that you compile. To configure and load a replacement DLL file:
- Create a staging folder to hold your updated DLL files, and compile your DLLs to this folder.
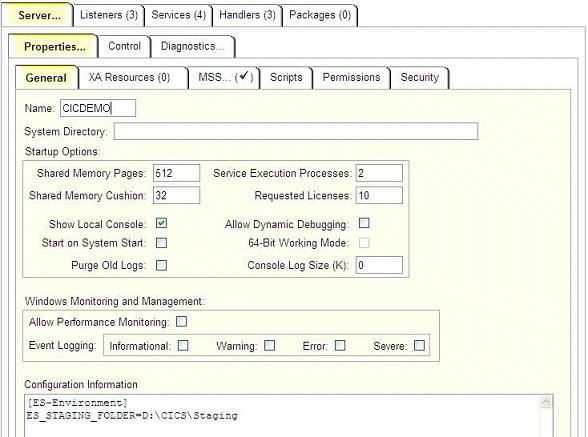
- On the enterprise server running the CICS application, from the Enterprise Server Administration screen, select the Server > Properties > General tab.
- In the Configuration Information field, define an environment variable,
ES_STAGING_FOLDER that sets the staging directory. For example, to define the staging directory as
D:\CICS\Staging, you would use the following entry:
[ES-Environment]
ES_STAGING_FOLDER=D:\CICS\Staging
See the figure below for an example.
- Click Apply to set the environment variable.
- Use the CICS
CPMT transaction to set that a new version is available.
The transaction replaces any existing DLLs that your application uses with the DLLs in the staging directory. For example, to load a new version of MYPROG.DLL, you would use the following CPMT CICS transaction:
CPMT NE MYPROG
Use this process only for updating programs that are currently in use by CICS. For new programs, you must copy or compile your new program directly into the appropriate production folder.
The environment variable ES_STAGING_FOLDER is not supported for NEWCOPY and Phase In for a PAC environment. The caspac command should be used instead. See caspac for more information.
