Adding files to your Visual Studio project
The source files of the demonstration application are stored in subfolders named after the file type (for example, bms, cbl, copybook, jcl) in the C:\MFETDUSER\Bankdemo\Sources directory. The Visual Studio project is in the C:\MFETDUSER\Bankdemo\Projects folder. You will be adding the source files to the Visual Studio project.
The other folders that are not so obvious are:
| Folder Name | Use |
|---|---|
| System\catalog | Stores the catalog. |
| System\catalog\data | Stores the data files. |
| System\DATA | Contains printer output. |
| System\loadlib | Stores the executable files once the application is built. |
| System\Logs | Contain various log files indicating the progress of your application execution. |
| System\sysloadlib | The demonstration application contains around 65 COBOL programs (in executable form only). All the executable files for these programs are stored here. As part of this tutorial, you are only going to build eight of the COBOL programs. |
| System\RDEF | Contains the resource definition files for the Bankdemo enterprise server. |
| System | Contains some resource definition data for CICS – this has been exported from the Mainframe and converted into a suitable form for the Workstation. |
Configuring directives scanning
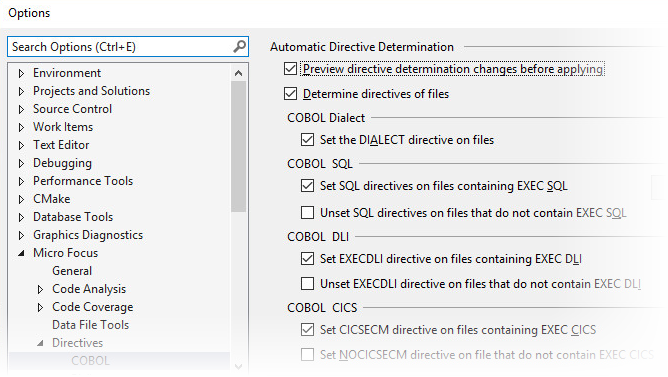
By default, the IDE is configured to automatically scan any new source files you add to the project. It assesses the code, determines what Compiler directives are required and then, by default, offers to set those directives on the files.
To check what directives will be set:
- In Visual Studio, click .
- Scroll down to and expand
Micro Focus Tools, expand
Directives, and click
COBOL.
This page enables you to configure what directives are set on the COBOL files that you add to your project. The directives scanning determines the dialect, what EXEC CICS and EXEC SQL statements are used in the COBOL source files and sets directives as detailed on this page.

- Ensure all options are selected.
The Preview directive determination changes before applying options ensures that you can review and approve the directives that will be set on the files after a directives scan.
- Click OK.
Adding COBOL source files
To add the COBOL programs to your project:
- In Solution Explorer, right-click the BankDemo project and click .
- Browse to
C:\MFETDUSER\Bankdemo\Sources\cbl.
By default, the file type filter is set to Enterprise Files (*.cbl; *.cpy; *.cob).
- Select all .cbl files in this folder and click
Add.
This adds all COBOL programs from the cbl subfolder.
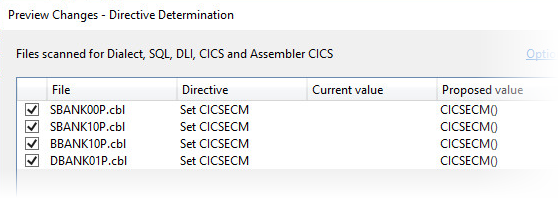
Previously, you ensured the IDE is configured to scan the COBOL files you add into the project and set directives for dialect, EXEC CICS and SQL. When the files are being imported in the project, the IDE scans them for CICS and SQL settings. You can see that the Output window shows some messages about scanning the files. At the end of scanning, the IDE shows a Preview Changes - Directive Determination offering to set any missing directives as required. Review the directives and click Apply.
 Note: In most cases, you add the actual COBOL programs to your Visual Studio project. Optionally, you could have left the source files in the original location and could have created links to them. This might be useful if you have large source files. In such cases, you would have used the Add As Link command to add the files to your project:
- Select all .cbl files in this folder and click
Add.
- Look in the
Output window to see the result of the directives scan and what directives have been set on the files.

If there are any issues such as the IDE not being able to determine the dialect because of missing copybooks, these are reported here.
- If, at any stage, you need to perform a directives scan of the COBOL sources in the project to set Compiler directives on them, right-click the BankDemo project, and click Determine Directives.
Adding the copybook files
The copybook files in the C:\MFETDUSER\Bankdemo\Sources\copybook folder are used by the COBOL programs in the project. Your project is preconfigured to look for the copybook files in that location so the compilation will not fail. To see where this is set:
- Click to open the project properties.
- Click the Dependency Paths tab, and ensure Type is set to COBOL Copybook Paths. The folder that is listed on that page is the folder that includes the copybook files.
The copybook files are not compiled when you build the application which is why it is not necessary to add them to the project. However, as an exercise, you can add one of the copybooks to the project in the same way you added the COBOL files.
Adding BMS source files to your project
You need to add the demonstration's BMS file to the project. To do this:
- In Solution Explorer, right-click the BankDemo project and click .
- Browse to C:\MFETDUSER\Bankdemo\Sources\bms folder.
- The file extension filter should be set to
Enterprise Files but, as an exercise, you can set it to
BMS Files (*.bms).

- Click the
.bms file and click
Add.
This adds the BMS file to the project.
Adding JCL source files
To add the JCL file to your project:
- In Solution Explorer, right-click the BankDemo project and click .
- Browse to C:\MFETDUSER\Bankdemo\Sources\jcl folder.
- Set the file type filter to JCL/VSE Files (*.jcl; *.vse).
- Click the .jcl file and click
Add.
This adds the JCL file to the project.
Adding data files
The demonstration application includes a number of data files. To see how you can edit data files, you only need to look at one of these files so you do not need to add a folder for it to the project. To add the data file to your project:
- In Solution Explorer, right-click the BankDemo project and click .
- Browse to C:\MFETDUSER\BankDemo\System\catalog\data.
- Set the file type filter to All Files (*.*).
- Select the EBC.BNKACC.DAT, EBC.BANKACC.PRO, and EBC.BNKACC.STR files, and then click Add.
Viewing the project details
The Project Details window shows a list of all files in your project or in the entire solution together, explore details such as the file type, location, COBOL dialect, number of errors or warnings and whether there are file directives that differ from and override the directives set on project level. This can help you identify problems quickly. To open the window:
- Right-click your solution (or the project) in Solution Explorer and click
Project Details.

- Click either one of the columns to sort the list, clicking
 ,
Sync with Active Document, to enable the window to highlight the file which is opened in the editor or is selected in Solution Explorer.
- Right-click a COBOL program in the list to either compile it, access its properties or adjust its Compiler directives using either Determine Directives or Use Project Defaults.
Grouping the files of the same type in Solution Explorer
In Solution Explorer, you can view an actual representation of the files and folders in a project or toggling the Virtual View to sort the files by file type:
- In Solution Explorer, click BankDemo.
- Click
 in the Solution Explorer toolbar to toggle Virtual View on or off.
In Virtual View, you see virtual folders in the project for the different file types - COBOL programs, BMS or JCL files:

Note that there is no folder for the copybooks as they are not added directly to the project in the IDE.
Viewing the copybook dependencies
Solution Explorer shows which copybooks are used by your source programs. To view the copybook dependencies of a COBOL program, simply expand the node for that program:

Summary
You created a Visual Studio project, added the COBOL files, the BMS and the JCL files of the demonstration program as links to the project and added the path to the folder that contains the copybooks to the project's properties.
Next, you are going to explore the settings available in the IDE and then you are going to edit some of the source files.