Unit Testing the Batch Application
To execute the JCL, you need to run the application in an instance of the Micro Focus Enterprise Server (sometimes abbreviated to Enterprise Server). This demonstration includes a pre-configured enterprise server instance called Bankdemo which you need to import in Enterprise Server and start before you execute the Bankdemo application.
Importing the Bankdemo server
To import the definition of the Bankdemo logical server (LSER):
- Click the Server Explorer tab in the upper left pane of the IDE.
If the tab is not visible, click . Select Micro Focus > Server Explorer and then click OK.
- In Server Explorer, right-click
Local [localhost:86] and click
Open Administration Page.
Note: On versions of Windows Vista or later, if you experience issues connecting to localhost, connect to 127.0.0.1 instead.
- Click Import in the left upper corner of Enterprise Server Administration.
- On the
Import server information page and under
Recent directories click the directory for the BANKDEMO server.
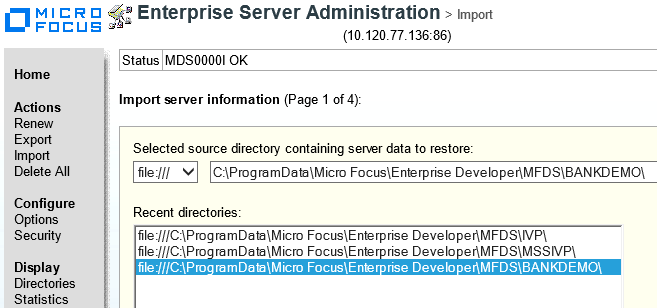
This adds the path to the Selected source directory containing server data to restore field.
- Click Next three times, and then click OK to import the BANKDEMO server.
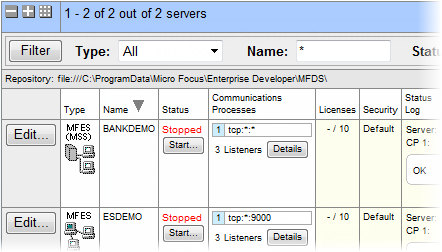
- The system returns to the main
Enterprise Server Administration page.
You can see the Bankdemo server appears in the list of servers. You need to start it before you can execute the online Bankdemo application.
Associate the Bankdemo Enterprise Server with your project
Ensure your application is associated with the BankDemo server:
- In Server Explorer, right-click Local, and click Refresh to show the BankDemo server.
- Right-click the BANKDEMO server, point to
Associate with project, then select
BankDemo.

Configure the IDE settings for Enterprise Server
Configure the IDE to start the associated BankDemo server automatically as follows:
- Click .
- Expand Micro Focus, and click Enterprise Server.
-
Set
the following options on this page to
Always in order to enable the IDE to start or stop the associated server, and to enable dynamic debugging, for when it is not enabled in
the server:
- Automatically start the associated server - this ensures the IDE will start the server if it is not running when you execute the application.
- Automatically stop servers started by Eclipse when closing Eclipse - this enables the IDE to stop servers when you close Eclipse.
- Automatically enable dynamic debugging - this ensures the IDE will check whether the server has dynamic debugging enabled and, if it is not, will enable it when you start debugging.
- Click OK.
Starting the Bankdemo Enterprise Server and Showing the Server Log
These are the steps to start the server manually, and are included for completeness. You do not have to start the server manually, as you have configured the IDE to start the server automatically.
- In Server Explorer, right-click
BANKDEMO, then click
Start.
Note: You might receive an Enterprise Server Sign On dialog prompting you to provide connection details for the BANKDEMO server. This is a standard security dialog. Click OK without specifying any sign on details. Also, you may skip enabling password recovery.
You may receive a Windows Security Alert blocking the MF Communications process. Click Allow access.
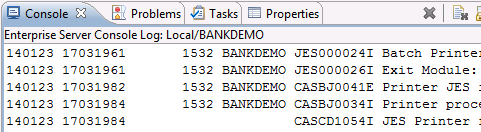
You can check the Console view to ensure that the BANKDEMO server has started successfully.
- Right-click the BANKDEMO server in Server Explorer, and click
Show Console Log.
Check the Console view as it now shows the messages from the server log:
- Right-click
the BANKDEMO server again, and then click
Refresh to see that the server has started.
After several seconds, the server status on the Enterprise Server Administration page also changes to Started. You are now ready to execute the JCL.
Executing JCL
The JCL provided in your demo causes the COBOL application to read a file, sort the data and produce a report. The .jcl file, ZBNKSTMT.jcl, is in the Sources > jcl folder of the project. To submit this job:
- In the Application Explorer view, expand the jcl folder.
- Right-click the
.jcl file and select
Submit JCL to associated Server.
Note: If you have not started the Bankdemo server yet, since you configured the IDE to start the server automatically, you receive a notification that the server will be started. Click Yes to confirm this.
Check the Console view in the Eclipse IDE to see that this job has been submitted.
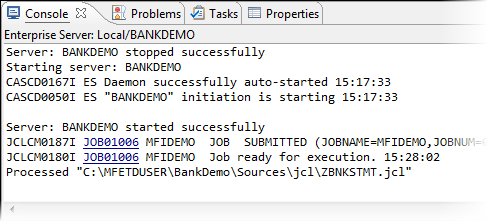
- Click one of the links to show the spool details for the job.
You now need to check the results of submitting the job.
Viewing the Catalog and the Spool
You can open the catalog and the spool directly from within the IDE.
To view the catalog:
- In Server Explorer, right-click the BANKDEMO server and click
Show Catalog.
This opens the catalog.
- Click
List to view all file entries in the catalog.
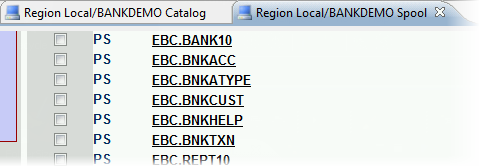
- Click a file name (for example, EBC.BNKACC) to preview the contents of the file.
To view the spool:
- In Server Explorer, right-click the BANKDEMO server, and click
Show Spool.
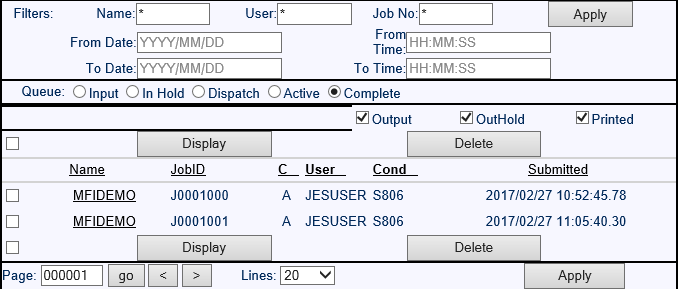
This shows the spool with the Complete button selected to see a list of all jobs in the completed queue. Your job is the last in the list.
- Check the check box next to your job, and click
Display.
This opens a page with a variety of information for the job progress, showing return condition code (COND) of 0000:

In the details, there are:
- Two
SYSOUT results (one for the Extract and one for the SORT). Click these to see the details:
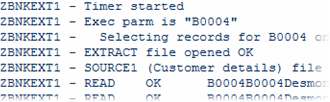
Again, if you cannot see your SYSOUT files, click Printed on the Spool page.
- To return to the previous page, press the backspace key.
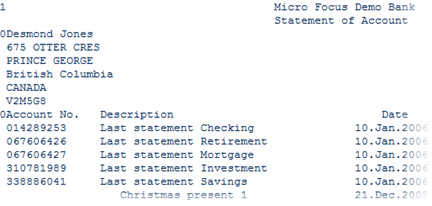
- The
PRINTOUT which is the final printed results created by your job. Click
PRINTOUT to see the results:
- Two
SYSOUT results (one for the Extract and one for the SORT). Click these to see the details:
You can now start to look at how to run the online application.