Deploying the ArcSight Capabilities
After you install the OMT Installer, complete the following steps to configure the cluster and then install the ArcSight capabilities.
- Use your remote desktop to access the jump host.
- Browse to the cluster using your private DNS address at port 3000.
- Log in using admin (user ID) and the password you specified during the OMT installation.
- On the Security Risk & Governance - Container Installer page:
- Select the OMT base product metadata .
- Click Next.

- On the End User License Agreement page:
- Review the End User License Agreement.
- To accept the agreement, select the I agree… check box.
- (Optional) To have information passed to OpenText, select the I authorize... check box.
- Click Next.
For example:
https://installer.private.arcsight.com:3000
The system prompts you to upload the following ArcSight installer metadata.tar file:
arcsight-suite-metadata-<version>.xx.tar

- From the Suite Metadata Upload screen, select the metadata file versions for the release you will be installing. For more information about those files, please refer to the Release Notes for ArcSight Platform 23.3.
- On the Capabilities page:
- Select the checkboxes corresponding to the capabilities you wish to install. For example, to install ArcSight Recon, select the ArcSight Recon check box. The list of capabilities shown depends on products purchased by your organization, but can include Transformation Hub, Fusion, ArcSight Recon, ArcSight Intelligence, and ArcSight ESM Command Center.
- To show additional information associated with the capabilities, click the > (greater than) arrow.
- Click Next.
Other products might require Transformation Hub or other capabilities as prerequisites. You can view any such requirements in the pull-down text associated with the capability. - On the Database page:
- Ensure the PostgreSQL High Availability box is unselected. This database is not used by ArcSight capabilities.
- To continue, click Next.

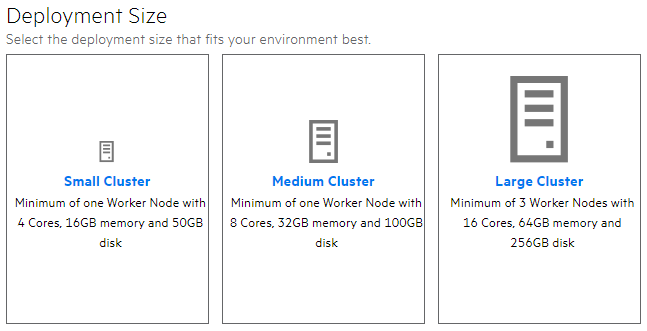
- On the Deployment Size page:
- Based on your planned implementation, select a size for your deployment. (You can configure additional nodes, each running on their own host systems, in subsequent steps.)
- Click Next.

- On the Connection page:
- In External Hostname, the deployment populates an external hostname automatically from the value provided in the
--external-access-hostparameter, specified earlier during the installation of OMT. - Confirm the port is correct.
- To continue, click Next.

- In External Hostname, the deployment populates an external hostname automatically from the value provided in the
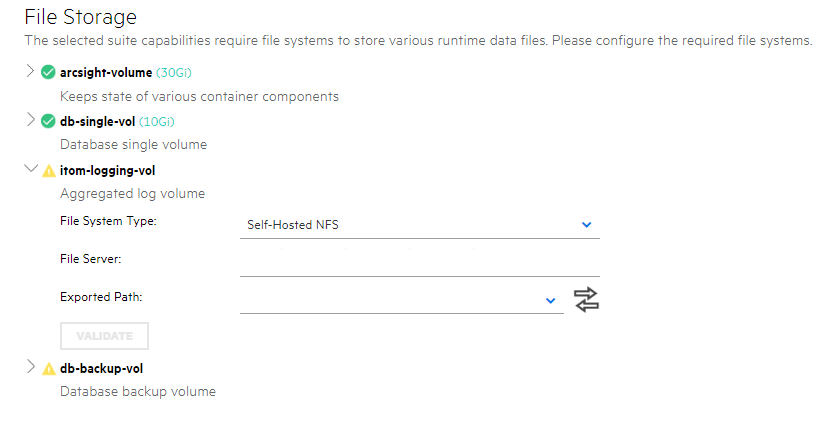
- On the File Storage page, for each NFS volume to configure:
- In the File System Type drop-down, ensure Managed NFS is selected.
- In File Server, specify the IP address or FQDN for the NFS server.
- From the Exported Path drop-down, select the appropriate volume. For example, when using NetApp, specify the path manually instead:
/nfs/arcsight-volume, /nfs/db-backup-vol, /nfs/db-single-vol, /nfs/itom-logging-vol itom-vol. Filling out the volume path forarcsight-volume, and clicking the auto-fill slider (in the upper right corner) will fill out the remaining paths. - Click Next. All volumes must validate successfully to continue with the installation. The following volumes must be available on your NFS server.
- Click Next.
OMT NFS Volume Claim
Your NFS volume
itom-vol<NFS_ROOT_FOLDER>/itom_voldb-single-vol<NFS_ROOT_FOLDER>/db-single-volitom-logging-vol<NFS_ROOT_FOLDER>/itom-logging-volarcsight-volume<NFS_ROOT_FOLDER>/arcsight-volume
After you click Next, the infrastructure implementation is deployed. Please ensure that your infrastructure choices are adequate to your needs. An incorrect or insufficient configuration might require a reinstall of all capabilities.
- On the Confirm dialog, to start deploying the nodes, click Yes.

After all nodes have been configured, and all services have been started on all nodes, the Preparation Complete page displays. You are now ready to configure product-specific installation attributes.

mkdir: cannot create directory 'data/pg-data-backup/log': Permission denied
If this message is found, you will need to manually reassign the NetApp volumes permissions by running these commands:
cd <NFS_ROOT_FOLDER>
chown -R 1999:1999 itom-vol
After the permissions have been reassigned, the itom-pg-backup pod will start running and the suite deployment will finish successfully.