Create the Virtual Private Cloud
Creating the VPC
To create the VPC, in the AWS CLI, run the following command:
# aws ec2 create-vpc \
--cidr-block <CIDR allocated for new VPC> \
| jq -r '.Vpc.VpcId'
The command will return the new VPC's VPC ID. Record the VPC ID and VPC CIDR to the AWS worksheet.
For example below is an input and output:
# aws ec2 create-vpc \
--cidr-block 10.0.0.0/16 \
| jq -r '.Vpc.VpcId'
vpc-0143197ca9bd9c117
To (optionally) verify assigned tags:
Run the command:
# aws ec2 describe-tags \
--filters "Name=resource-id,Values=<VPC ID>"
For example:
# aws ec2 describe-tags \
--filters "Name=resource-id,Values=vpc-0143197ca9bd9c117"
{
			"Tags":[
			{
			"Key":"Name",
			"ResourceId":"vpc-0143197ca9bd9c117",
			"ResourceType":"vpc",
			"Value":"srgdemo-vpc"
			},
			{
			"Key":"kubernetes.io/cluster/srgdemo-cluster",
			"ResourceId":"vpc-0143197ca9bd9c117",
			"ResourceType":"vpc",
			"Value":"shared"
			}
			]
		}
Enabling DNS and Hostname Resolution
DNS support and hostname resolution should be enabled to make IP addresses more easily human-readable.
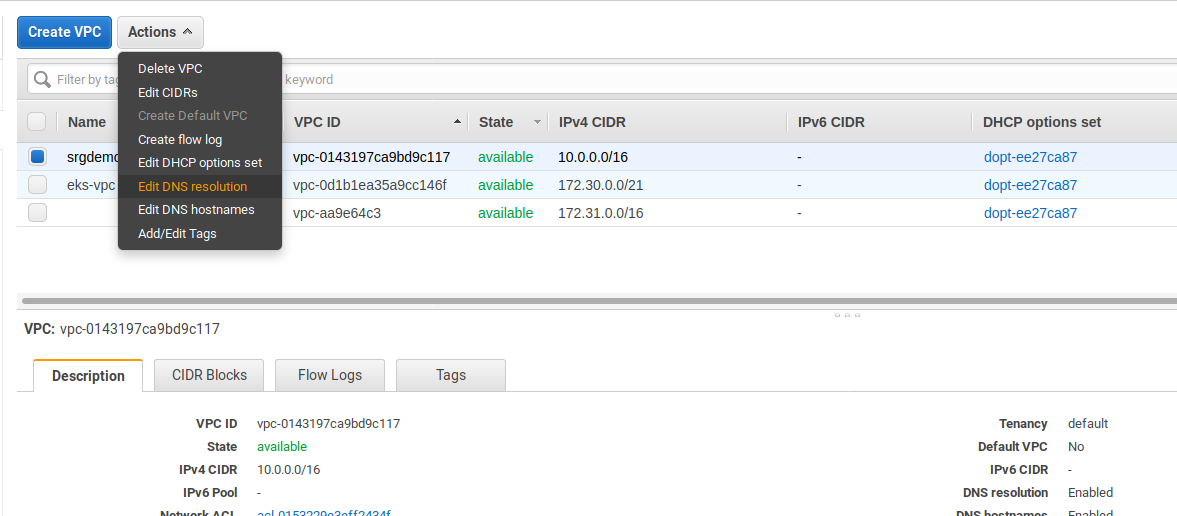
- Using the Find Services search tool, locate and browse to the VPC dashboard.
- On the left navigation panel, under click Your VPCs.
- Select the check box corresponding to your VPC. Then, under , select Edit DNS resolution.
- On the Edit DNS Resolution page, for DNS resolution, select the enable check box.
- Click Save, then click Close.

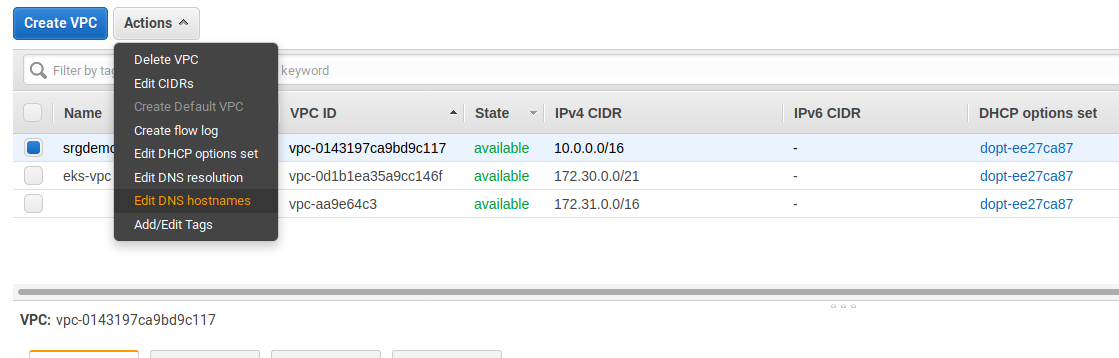
- Using the search tool, locate and browse to the VPC dashboard.
- On the left navigation panel, under , click Your VPCs.
- Select the check box corresponding to your VPC. Then, under , select Edit DNS hostnames.
- On the page, for , select the enable check box.
- Click Save, then click Close.
Execute the following commands in order, using the VPC ID of your created VPC:
# aws ec2 modify-vpc-attribute \
--vpc-id <VPC Id> \
--enable-dns-support

# aws ec2 modify-vpc-attribute\
 --vpc-id <VPC Id> \
--enable-dns-hostnames
These commands have no output.
For example:
# aws ec2 modify-vpc-attribute \
--vpc-id vpc-0143197ca9bd9c117 \
--enable-dns-support
# aws ec2 modify-vpc-attribute \
--vpc-id vpc-0143197ca9bd9c117 \
--enable-dns-hostnames
Next Step: Create the External IP Address