Configuring the Kubernetes Cluster
After you install the CDF Installer, complete the following steps to configure the cluster.
- Use your remote desktop to access the jumphost.
- Browse to the cluster using your private DNS address at port 3000.
- Log in using admin (user ID) and the password you specified during the CDF installation.
- On the page:
- Select the CDF base product metadata .
- To continue, click Next.

- On the page:
- Review the End User License Agreement.
- To accept the agreement, select the I agree… check box.
- (Optional) To have information passed to Micro Focus, select the I authorize... check box.
- To continue, click Next.

- On the page:
- Select the capabilities and products you want to install.
- To show additional information associated with the product, click the > (greater than) arrow.
- To continue, click Next.
For example, to install Transformation Hub as a standalone install, select the Transformation Hub check box.
Other products might require Transformation Hub or other capabilities as prerequisites. Such requirements will be noted in the pull-down text associated with the capability.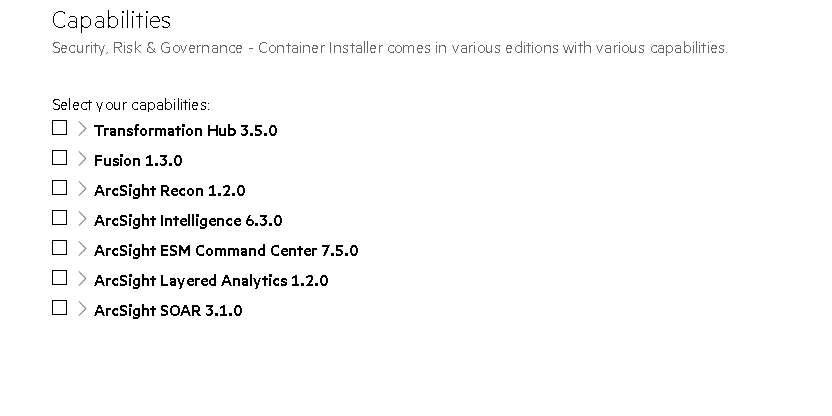
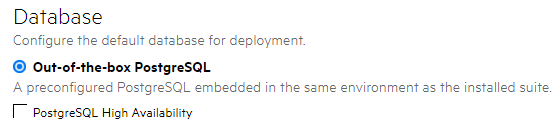
- On the page:
- Ensure the box is clear. This database is not used by capabilities in SODP.
- To continue, click Next.
- On the page:
- Based on your planned implementation, select a size for your deployment.
- To continue, click Next.
Additional nodes, with each running on their own host system, can be configured in subsequent steps.
The installation will not proceed until the minimal hardware requirements for the deployment are met.Size Minimum Worker Nodes Cores Memory Disk Small Cluster 1 Worker Node 4 Cores 16 GB 50 GB Medium Cluster 1 Worker Node 8 Cores 32 GB 100 GB Large Cluster 3 Worker Nodes 16 Cores 65 GB 256 GB 
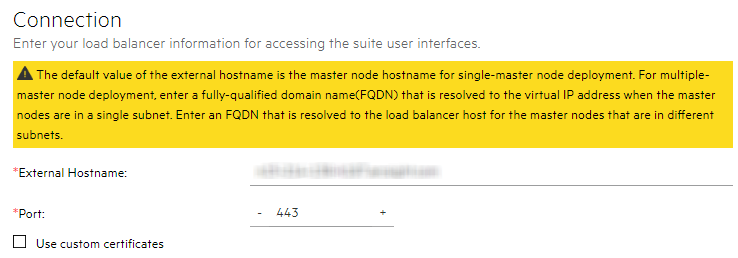
- On the page:
- In the field, the system populates an external hostname automatically from either:
The Virtual IP (VIP) specified earlier during the install of CDF (
--ha-virtual-ip parameter)- The master node hostname if the
--ha-virtual-ipparameter was not specified during CDF installation
- Confirm the port is correct.
- To continue, click Next.
- In the field, the system populates an external hostname automatically from either:
- On the page, for each NFS volume to configure:
- In the drop-down, ensure Self-hosted NFS is selected. Self-hosted NFS refers to the NFS server that you prepared earlier.
- In field, enter the IP address or FQDN for the NFS server.
- In the drop-down, select the appropriate volume. (If using NetApp, enter the path manually instead; for example, /nfs/arcsight-volume, /nfs/db-backup-vol, /nfs/db-single-vol, /nfs/itom-logging-vol itom-vol.)
- Click Validate. All volumes must validate successfully to continue with the installation.
- To continue, click Next.
The following volumes must be available on your NFS server.
CDF NFS Volume Claim
Your NFS volume
itom-vol<NFS_ROOT_FOLDER>/itom_voldb-single-vol<NFS_ROOT_FOLDER>/db-single-voldb-backup-voldb-backup-vol | <NFS_ROOT_FOLDER>/db-backup-volitom-logging-vol<NFS_ROOT_FOLDER>/itom-logging-volarcsight-volume<NFS_ROOT_FOLDER>/arcsight-volume
After you click Next, the infrastructure implementation will be deployed. Please ensure that your infrastructure choices are adequate to your needs. An incorrect or insufficient configuration might require a reinstall of all capabilities.
- On the dialog, to start deploying nodes, click Yes.
- To configure the products and components of the deployment, click Next.
For example:
https://installer.private.arcsight.com:3000
The system prompts you to upload the following ArcSight installer metadata.tar file:
arcsight-installer-metadata-<version>.xx.tar

Once all Nodes have been configured, and all services have been started on all nodes, the page displays.
This message means the installation process is now ready to configure product-specific installation attributes.

mkdir: cannot create directory 'data/pg-data-backup/log': Permission denied
If this message is found, you will need to manually reassign the NetApp volumes permissions by running these commands:
cd <NFS_ROOT_FOLDER>
chown -R 1999:1999 itom-volAfter the permissions have been reassigned, the itom-pg-backup pod will start running and the suite deployment will finish successfully.